Cloudflare Stream is a powerful broadcasting platform that, for many of our customers, just works. B 2026-10-2 16:13:45 Author: blog.cloudflare.com(查看原文) 阅读量:7 收藏
Cloudflare Stream is a powerful broadcasting platform that, for many of our customers, just works. But what if you wanted to render dynamic annotations on a livestream or create an alternate version of a hosted video with burned-in subtitles? You would need to run a custom video pipeline.
Today, we’re releasing a new developer playground, Streamline, that demonstrates how you can build a system to deliver these bespoke video experiences on Cloudflare’s Developer Platform. We’ll walk you through how Streamline leverages Workers, Containers, and several media protocols to modify video — and immediately publish that output as livestream or new hosted video. You’ll also have the opportunity to try it for your projects.
A processing pipeline needs a durable, long-running environment that can run specialized, compiled code with predictable memory and CPU capacity. Video streams can run for minutes or hours, so the media process needs a lifecycle independent of the request that started it. An application should be able to start a pipeline, send its input, inspect it, and stop it without needing to keep a single request open for the entire duration.
Cloudflare provides the primitives we need. Containers are long-lived runtimes suitable for media processing. Durable Objects help with orchestration. Finally, Workers are perfect for control signaling and monitoring.
For Streamline, we built a media engine running in a Container to handle media processing in real-time. The Container is controlled by a Worker exposing control, preview, and testing to an agent or user. Processing will continue even if the Worker disconnects. We've architected Streamline with modular components so that the media engine could be replaced with dedicated encoding products in the future.

Architecture
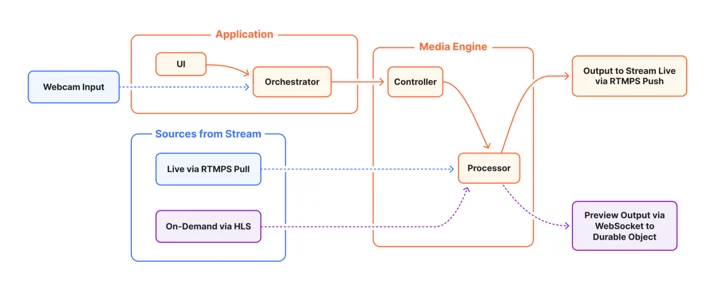
A Streamline deployment consists of two components: the Media Engine, which handles media input/output and processing, and a controlling Application, which creates, configures, observes, and stops media sessions.

Media Engine
The Media Engine has two components:
- Controller. This is a control harness written in Go that implements an HTTP server, receives incoming requests, and translates them into operations that can be executed by the media engine.
- Processor that performs the actual media processing. The current implementation uses FFmpeg, but that is an internal implementation detail rather than part of the user-facing API.
The Media Engine is hosted in a Container, and handles all media input/output as well as processing. It can pull RTMPS playback over the network from one Stream Live input and publish RTMPS output to another Stream Live input. It can pull a Cloudflare Stream HLS manifest and its segments to use hosted videos as input. It can accept video input from a source supplied by the controlling application, for example a webcam. It can publish preview video over an outbound WebSocket to a Durable Object relay. An application that needs preview can connect to that relay through its own WebSocket.
Application
The application is built using Workers, and can be a full-stack browser application, an agent, or an embedded system. It consists of:
- User interface (UI) including client logic, identity and access policy. This post uses a browser application as its concrete example, so it also includes a browser interface.
- Orchestrator coordinates the session, the Container lifecycle, and preview relay. The orchestrator is implemented by a Durable Object.
It is possible to run the system locally during development, in which case the container is just a local Docker instance and the Durable Object is not used: there is a single user, the controlling application does not require authorization for local access, and the video preview can connect directly to a WebSocket on localhost.
When these components are deployed to Cloudflare, an authorized user or agent can visit the Worker to start a new session. This spins up a new Streamline container if needed, manages its lifecycle automatically, exposes an API to perform a number of video manipulation operations, and routes inputs from and outputs back to Cloudflare Stream.
Time for a technical deep dive on how the system works.
Container lifecycle and session management
The controlling Worker application initiates a long-running media processing session. After starting the session, the application can disconnect and reconnect safely, while the Container continues processing until the controlling application stops it. We also include a maximum duration to ensure a session is always eventually closed down and can’t run indefinitely, even without external control. While a media processing session is running, the container instance is unavailable for other applications to use.
A Cloudflare Container will automatically sleep if it has not received any incoming requests since a defined interval. However, in our case, once the pipeline is running, it must continue even if the controlling application disconnects and it receives no requests. We can implement this behavior by overriding the onActivityExpired() callback on the container. If the expiry time has not been reached, then we renew the activity, otherwise we destroy the container.
async onActivityExpired() {
  await this.withControlLock(async () => {
    const session = await this.getRelaySessionLocked()

    if (session?.expiresAt) {
      this.renewActivityTimeout()
      return
    }

    await this.destroy()
  })
}
API
The HTTP server implemented by the Go harness and the Durable Object associated with the Container together define the low-level interface to the system. However, we wanted to provide an abstraction over this, so the system is as agnostic as possible to who or what is controlling the session and any unnecessary details of the backend implementation.
We implement this by exporting two packages from Streamline:
@cloudflare/streamline/clientDefines a high-level, session-based API.@cloudflare/streamline/Exposes the Durable Object base class associated with the container. This routes the API requests, implements the preview relay server described below, and provides hooks for security and access policy.
In a remote deployment, the controlling Worker is expected to import @streamline/cloudflare and define a concrete subclass of the Durable Object exposed by the container that can be used for application-specific logic and storage.
In local mode, where there is no Durable Object, the frontend defines a thin adapter layer that maintains the session-based API, but connects directly to the local Docker instance with no access controls, etc.
The example below shows how the controlling application can use the API to access Streamline, prepare a session, and start a video processing pipeline.
const streamline = createStreamline({ baseUrl: 'https://media.example' })
const session = await streamline.sessions.create()
const result = await session.start(config)

// At this point the pipeline is running, unless failure occurred.
console.log(result)
config is a JSON object that defines the processing pipeline to be executed, described more in subsequent sections.
The table below shows the complete list of all API calls.
Client method | Function |
| Creates a new Streamline instance. |
| Creates a new processing session. |
| Reconnects to an existing session. |
| Starts a new processing pipeline. |
| Sends a chunk of video data in “webcam” mode. |
| Updates the transparent annotation overlay. |
| Receives metrics about the current session. |
| Stops the processing in the current session. |
Defining and running a video processing pipeline
session.start() constructs and runs a processing pipeline. It takes a single argument which is a JSON configuration object defining the processing to be performed:
- Input(s)
- Operations
- Output
The example below starts a pipeline that takes an RTMP (real-time messaging protocol) broadcast as input (for example, a feed of a Stream Live input receiving an inbound livestream), applies an overlay image with transparency, and sends the output to an RTMP destination (for example, to another Stream Live input for recording or broadcast). This allows the Worker application to create a modified version of a livestream in real time.
const session = await streamline.sessions.create()

const result = await session.start({
  input: { type: 'rtmp', profile: 'primary-input' },
  pipeline: [
    {
      op: 'overlay',
      params: { image: '/app/assets/cf-logo.png', position: 'top-right' },
    },
    {
      op: 'encode',
      params: {
        codec: 'h264',
        preset: 'fast',
        bitrate: '1500k',
        resolution: '1280x720',
        fps: 30,
      },
    },
  ],
  output: { mode: 'rtmp', profile: 'primary-output' },
})
Video-on-demand input via HLS
Streamline can also ingest streaming video input via HLS (HTTP live streaming), for example a video hosted on Cloudflare Stream. The example below shows how a Worker application could run a pipeline that ingests a Stream video, reads the embedded closed caption subtitles and renders them as text on the video, and sends the output via RTMP, for example to a Stream Live Input for broadcasting or recording of the modified version.
const streamVideoId = 'your-cloudflare-stream-video-id'
const session = await streamline.sessions.create()

await session.start({
  input: {
    type: 'hls',
    url: `https://videodelivery.net/${streamVideoId}/manifest/video.m3u8`,
  },
  pipeline: [
    { op: 'subtitle', params: { source: 'auto' } },
    {
      op: 'encode',
      params: {
        codec: 'h264',
        preset: 'fast',
        bitrate: '1500k',
        resolution: '1280x720',
        fps: 30,
      },
    },
  ],
  output: { mode: 'rtmp', profile: 'default' },
})
Sending video to Streamline
It’s often useful to be able to quickly preview a processing pipeline by sending video data directly to Streamline, for example from a webcam. An agent or embedded device application may also want to use this capability, for example to send footage from factory cameras for AI analysis, or to combine multiple camera feeds into a composite view.
The example below creates a pipeline that expects input from the Worker application and produces a preview video output available over a WebSocket (we’ll talk more about the WebSocket preview video below). It applies two filters and an “annotation,” which is an overlay specified as a PNG image that can be updated while the processing is running, for example to implement an animated graphic.
const session = await streamline.sessions.create()
const sessionId = session.id
if (!sessionId) throw new Error('Session creation returned no session ID')

const viewer = await openViewer('https://media.example', sessionId)

await session.start({
  input: { type: 'webcam' },
  pipeline: [
    { op: 'filter', params: { preset: 'brightness', amount: 0.1 } },
    { op: 'filter', params: { preset: 'flip' } },
    { op: 'overlay', params: { image: 'annotation', position: 'full' } },
    {
      op: 'encode',
      params: {
        codec: 'h264',
        preset: 'veryfast',
        bitrate: '1500k',
        resolution: '1280x720',
        fps: 30,
        gop: 60,
      },
    },
  ],
  output: { mode: 'websocket', format: 'fmp4' },
})
The code snippet above just starts the pipeline. The controlling Worker is not sending any media to Streamline yet. We’ll discuss the openViewer() function below.
The Worker application sends video data to Streamline using the session.ingest() call. The example below shows how a web browser application might receive chunks from the webcam and forward them to Streamline.
const stream = await navigator.mediaDevices.getUserMedia({ video: true, audio: true })
const recorder = new MediaRecorder(stream, { mimeType: 'video/webm;codecs=vp8,opus' })
let uploadTail = Promise.resolve()

recorder.addEventListener('dataavailable', (event) => {
  if (event.data.size === 0) return
  uploadTail = uploadTail
    .then(() => session.ingest(event.data))
    .catch((error) => reportUploadFailure(error))
})

recorder.start(250)
Animated overlay
The annotation overlay can be updated using the session.annotation() call. The example below shows how the Worker application could snapshot a canvas and send it to Streamline. This could be done on an animation loop, although the update rate may be limited in practice by the size of the PNG overlay images, the available bandwidth, and processing power.
function canvasPng(canvas: HTMLCanvasElement): Promise<Blob> {
  return new Promise((resolve, reject) => {
    canvas.toBlob((blob) => {
      if (blob) resolve(blob)
      else reject(new Error('Canvas could not produce a PNG'))
    }, 'image/png')
  })
}

const png = await canvasPng(overlayCanvas)
await session.annotation(png)
Receiving preview video from Streamline
Streamline can also produce preview video output, by specifying output: { mode: 'websocket' }.
Streamline uses WebSockets for low-latency preview video delivery back to the controlling application: the container publishes fMP4 fragments to the Durable Object, which forwards them to an output relay available over a WebSocket on the URL /relay/view, relative to the application origin. The application must connect a WebSocket to this URL, and will then receive video data pushed to it as it becomes available from Streamline. The code snippet below shows how a web browser application might display the preview video feed.
function openViewer(origin: string, sessionId: string): Promise<WebSocket> {
  const url = new URL('/relay/view', origin)
  url.protocol = url.protocol === 'https:' ? 'wss:' : 'ws:'
  url.searchParams.set('session_id', sessionId)

  return new Promise((resolve, reject) => {
    const socket = new WebSocket(url)
    socket.binaryType = 'arraybuffer'
    socket.addEventListener('open', () => resolve(socket), { once: true })
    socket.addEventListener('error', () => reject(new Error('Preview relay failed')), { once: true })
  })
}

const sessionId = session.id
if (!sessionId) throw new Error('Session creation returned no session ID')

// Connect before session.start(), or the relay rejects the publisher.
const viewer = await openViewer('https://media.example', sessionId)

viewer.addEventListener('message', (event) => {
  if (typeof event.data === 'string') {
    if (event.data === '{"type":"eos"}') mediaSource.endOfStream()
    return
  }
  sourceBuffer.appendBuffer(new Uint8Array(event.data as ArrayBuffer))
})
A production MediaSource player must queue fragments while SourceBuffer.updating is true. In local development, the browser or other controlling application simply opens a WebSocket connection directly on the local container.
Currently supported operations
In the configuration object passed to session.start() in the examples above, pipeline is an array of operations from the set supported by the underlying media engine. The operation order is currently fixed by the engine; the order specified in the array is not significant. The list of currently supported operations and the order in which they are applied is below.
Operation name | Function |
| Applies filtering operations, e.g. blur, saturation. |
| Overlays an image referenced by URL or a binary PNG specified separately in a call to |
| Burns in subtitles. |
| Specifies output encoding parameters. |
Security
This is Cloudflare, so it is important that security is part of the design rather than an addition at the end. We need to ensure that only authorized users can create a new session or take control of an existing one, and that sessions are isolated from each other. We must treat Stream RTMPS input/output keys as secrets that shouldn’t be leaked to the controlling application. We must ensure that resource use is bounded.
The owner deployment is kept private using Workers’ Access integration. The configured owner identity and other allowed users can edit the same shared profiles and start a session while the singleton is idle. The Worker verifies the Access session before accepting control requests and binds the active session to the verified principal. Only one session can run at a time, and a different principal cannot stop or replace the active session.
Stream Live Input keys are stored in Worker secrets or as write-only shared overrides in Durable Object storage. They are never returned by the settings API or placed in browser storage. The controlling application specifies RTMPS input and output by referring to a named profile. The Worker resolves the profile before contacting the container.
The preview video stream has two credentials with separate purposes. A Cloudflare Access service token authenticates the container workload to the publisher endpoint. A random per-session capability authorizes publishing only for the currently active relay. The service token is injected by the container's outbound Worker and never enters container memory. The initial deployment uses a temporary path-specific Access Bypass while the per-session capability remains enforced; after deployment and a successful smoke test, the rollout replaces Bypass with Service Auth.
The owner deployment is intentionally private and singleton-routed. It is not the security model for a public multi-user service.
Playground and open source
We want you to try out Streamline and start building! So together with this post, we are releasing the system as open source and deploying a public playground.
The Streamline container can be run locally or deployed on your account. It exports the Worker API for your control application to use.
There is also an example Worker application with an Astro web frontend that demonstrates Streamline functionality with a few common use cases, including overlays, subtitle decoding, filters and picture-in-picture. There is probe functionality that provides performance metrics and system tracing, and can be useful for debugging the system when developing new features. The example application can be run on a local Astro server, or is set up to be deployed behind Cloudflare Access, so you can control who has access to your Streamline instance.
Both repositories are available as open source on Cloudflare’s GitHub:
- https://github.com/cloudflare/streamline - Media engine, and package exports for applications.
- https://github.com/cloudflare/streamline-demo - Example application Worker, Astro frontend, deployment profiles, and Access tooling.
We have published a public playground deployment of the example application. This is also something a user can deploy if desired. It uses its own Access configuration, one container identity per verified user, one active session per user, global admission control, concurrency, media and session limits, and no ability for one user to replace another user's session.
You can try the public playground at:
Where we go from here
Streamline demonstrates one way to combine existing managed services, like Stream, with lower-level primitives to build highly customizable media pipelines. In this iteration, Streamline uses Container CPU for media processing, which introduces a bottleneck at higher qualities or frame-rates.
Moving forward, we’re excited to see how we and our developer community can extend this architecture to build new support for computer vision pipelines, hardware-accelerated media processing, realtime experiences with next generation protocols like WebRTC and MoQ, and ultimately video encoding and decoding primitives natively in Workers.
Today, we invite you to check out our hosted demo of Streamline to see how powerful these tools can be. From there, check out the codebases we’ve open sourced to see how easy it is to deploy Streamline into your own account and use it to create your own experiences.
如有侵权请联系:admin#unsafe.sh