
好的,我现在需要帮用户总结这篇文章的内容,控制在100字以内,而且不需要用“文章内容总结”这样的开头。首先,我得通读整篇文章,理解它的主要部分。 文章主要讲的是BSA的北向接口功能,包括数据导出和查询。北向接口是BSA与外部系统交互的界面。数据导出方面,BSA通过实例和发送通道将数据传送到外部系统。查询功能则是一个WebService,需要验证令牌并内部转发请求。 接下来是创建北向接口实例的步骤,分为关系型数据库(PostgreSQL)和数据索引(Elasticsearch)两种类型。配置细节包括实例名称、获取方法、执行周期、时间戳字段、过滤规则和数据条目数量等。 还有常见问题解答部分,比如无法拉取数据的原因、时间戳字段的重要性以及过滤规则的设置建议。最后是配置建议,强调合理设置执行周期、时间戳单位和数据条目数量,并进行数据格式化和发送通道配置。 现在我要把这些要点浓缩到100字以内。首先说明北向接口的功能:数据导出和查询。然后提到创建实例的两种类型:PostgreSQL和Elasticsearch。接着简要提到配置细节和常见问题解答及建议。 这样组合起来应该可以控制在100字左右,并且直接描述文章内容。 </think> BSA提供北向接口功能,支持数据导出和查询。用户可通过创建北向接口实例(如PostgreSQL或Elasticsearch)实现数据交互,并配置执行周期、时间戳字段及过滤规则等参数。文章还介绍了常见问题及配置建议,确保高效稳定的数据传输。 2026-4-28 09:3:56 Author: securityboulevard.com(查看原文) 阅读量:22 收藏
In addition to the southbound management feature for log reception, the BSA also provides a northbound interface that enables data export and query functions. So, how can you make proper use of these features? Let’s find out together below!
1. Function Introduction
The northbound interface is the interaction interface between BSA and the northbound system. Through the northbound interface, BSA provides data export and query functions to the northbound system.
Data Export
The BSA actively sends ISOP data to the northbound system via the northbound interface. The northbound interface first executes a northbound interface instance and then transmits the data through a sending channel to the northbound system, thereby enabling data outbound functionality. Specifically, the northbound interface instance is responsible for data retrieval and data formatting.
Query Function
The BSA query function is a web service. When BSA responds to query requests from the northbound system, it first verifies the token to confirm its validity and then forwards the query request internally to the APP.
2. Create a new northbound interface instance
There are two common types of northbound interface instances: relational databases (PostgreSQL) and data indexes (Elasticsearch). The following sections describe the creation steps for each of these two types of instances.
(1) In [Configuration] – [Northbound Interface] – [Data Export] – [Sending channel] In the middle, click [New Channel], enter the new northbound interface Channel Page.

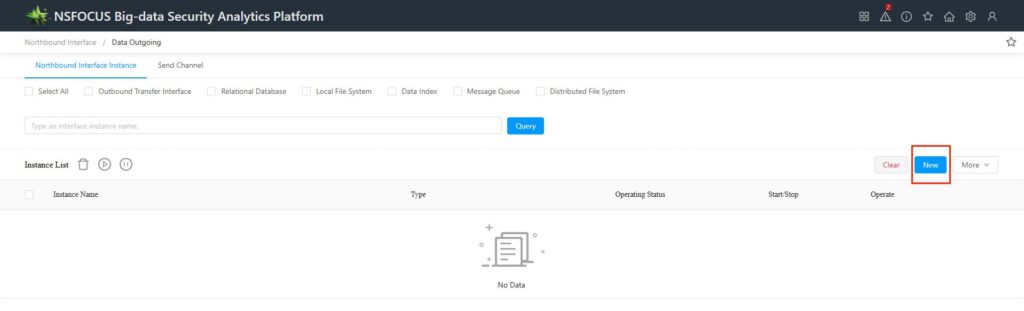
In [Configuration – Northbound Interface – Data Export – Northbound Interface Instance], click [New Instance] to enter the page for creating a new northbound interface instance.
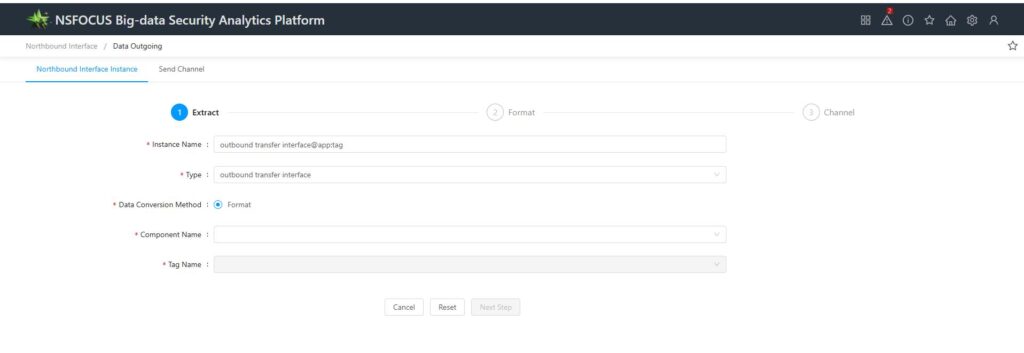
(2) Configuration details:
Configuration differences
Whether you choose a relational database (PostgreSQL) or a data index (Elasticsearch), the key difference lies in the selection of the type field and the subsequent choices made. For a relational database, you need to select the database and the table. It’s important to note that the available databases are those PostgreSQL databases registered during component installation as being permitted to receive data, while the available tables are those registered during APP installation as being permitted to send data. Since the default ISOP installation and deployment does not specifically register databases or tables, this section is typically left empty. When selecting an index, you need to choose the data index to which the data will be sent; the built-in index types provided by BSA include:
- Threat Analysis Event: isoc:internal_isop_event
- Operations and Maintenance Incident: isoc:internal_isop_incident
- Original log: bsa_org
- Normalized Alert Log: bsa_normal
- Traffic log: bsa_traffic
Identical configuration
Apart from the differences in the types mentioned above, all other configurations are identical.
Instance Name: The instance name is a unique identifier for the instance, and no two instances can have the same name. By default, BSA uses the following format for instance names: Instance Type@Database Name:Table Name. If you do not customize the instance name, BSA will automatically generate an instance name according to the default naming format based on the selected instance type, database name, and table name. (When you select the instance type, database name, and table name, BSA will automatically perform validation. If it detects a duplicate instance name, it will display the message: “The instance name already exists!”)
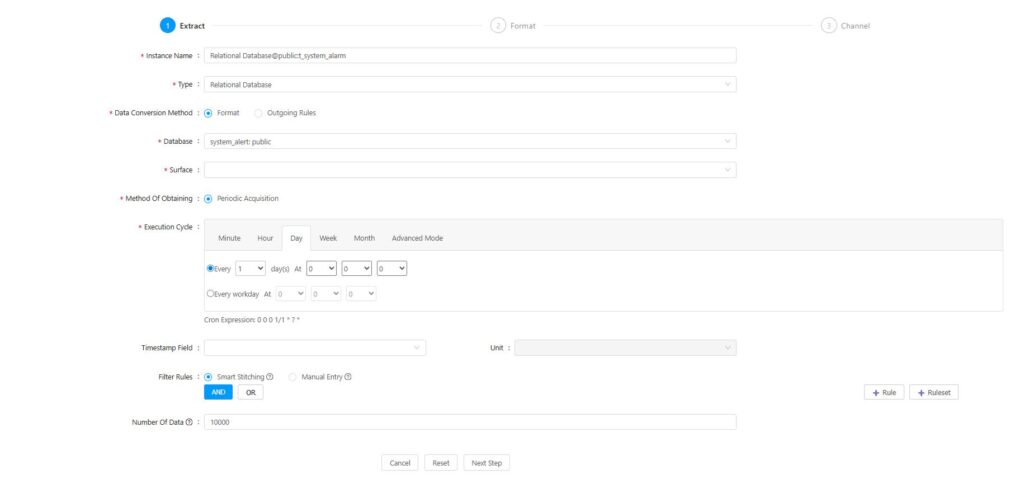
Acquisition method: Both databases and indexes can only be acquired periodically. BSA will regularly send updated data from ES to the northbound system according to the configured cycle. When selecting periodic acquisition, you also need to configure the execution cycle and the number of data records.
Execution cycle: Set the interval by minute, hour, day, week, or month; the system will automatically generate a Cron expression based on your settings. Setting the execution cycle in advanced mode means directly entering a Cron expression.
Timestamp field: Select a timestamp field from the drop-down list; the available options depend on the selected database, table, and index.
Filtering Rules: Setting filtering rules allows you to further filter data that meets specified conditions in the selected database table.
Number of data entries: Data is retrieved periodically, and you need to set an upper limit on the number of data entries to restrict the amount of data pulled. The number of data entries can range from 1 to 100,000, with a default value of 10,000.
3. Frequently Asked Questions
1.Pulling no data
Reason: The pulled index itself contains no data; Or there’s an issue with the configured timestamp field or its unit. Even if all the fields configured as timestamps in the index are in milliseconds, the unit remains consistent.
2.The pulled content isn’t the latest data, or it’s found that the content sent each time is identical.
Reason: Timestamp field not configured.
First, we need to clarify why we’re configuring a timestamp field. The purpose of this field is that, when pulling data, the query range will be limited based on this field—the time of the last pull.-Current time (for the initial pull, it’s the previous period relative to the current time). If no timestamp field is configured, all data will be pulled in full.
3.Try to choose intelligent concatenation for filter rules.
Smart stitching supports four filtering conditions: =, !=, like, and not like. Moreover, more complex filtering conditions can be constructed by adding Rules and RuleSets. Within a RuleSet, the Rules it contains can adopt either AND or OR logical relationships, and between different RuleSets, you can also choose either AND or OR logical relationships.
4.Configuration Recommendations
First, the northbound interface also consumes ES resource performance when fetching index data. Since most of ISOP’s business data is stored in ES, excessively frequent data retrieval could potentially cause issues with ES. Second, because data is being written into the database in real time, the retrieved data reflects the latest updates as well. As a result, there’s a risk that some data might be fetched before it has even been fully written to disk, which would prevent these uncommitted data records from being properly retrieved and transmitted externally. Considering the two points above, we recommend configuring the system in such a way as to avoid frequent data retrieval as much as possible.
1. Try to set the execution cycle as large as possible. We recommend configuring it to pull at least once every 10 minutes; avoid setting it to less than 5 minutes.
2. The timestamp field must be configured correctly; select milliseconds as the unit for the timestamp field.
3. The number of data entries can be set somewhat larger depending on the specific situation each time. (If it’s set too small, and the number pulled in the current batch exceeds the set value, the excess portion won’t be pulled, nor will the next batch be pulled.)
4. Set data formatting
1.Select the fields in the data table that need to be formatted before being sent to the northbound system.
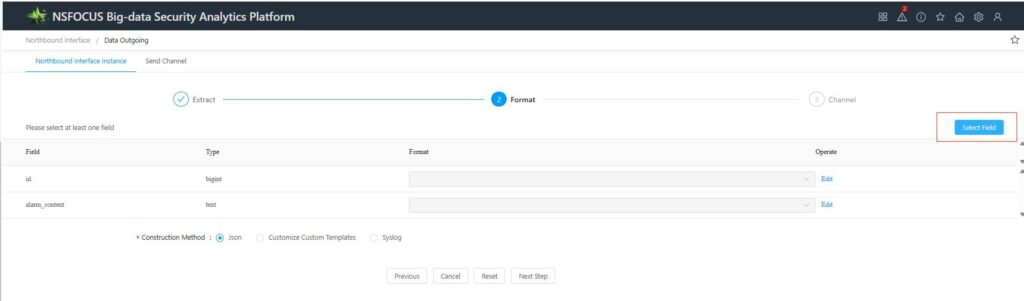
Select one or more fields, click the [OK] button to save the configuration. The selected fields will be displayed in the field list.
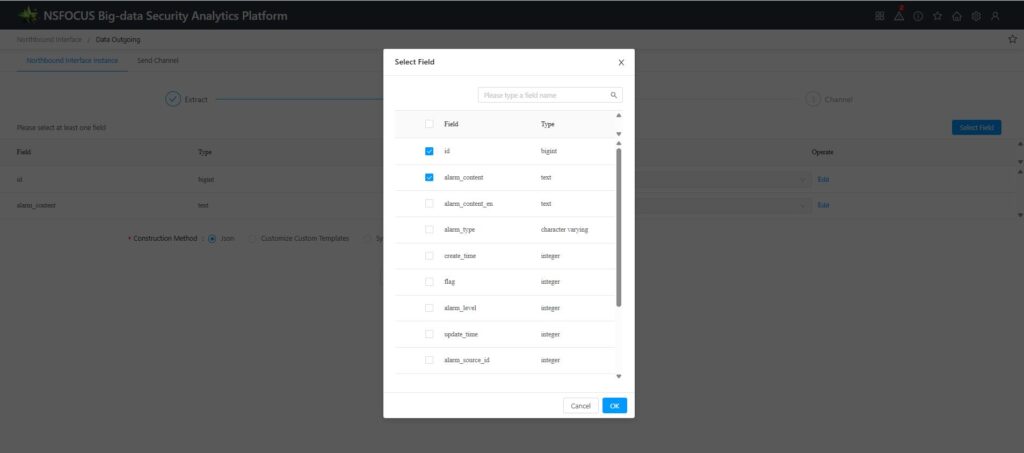
PS: ① If you’re unclear about any of these fields, please contact technical support at 400 for the corresponding field descriptions. ② Try to select only the fields you actually need. Selecting too many fields may result in excessively long individual data records, causing the transmitted packet to exceed the MTU value of certain network devices and compromising the integrity of the received data.
2.Configure the formatting method for the selected field:
① Click the link text “Edit” in the “Actions” column of the field list to enable edit mode in the “Formatting” column.
② Click the “Format” column and select the method for formatting the field:
– base64: formatted using Base64 encoding;
− Mapping: Formatting is performed using a mapping approach. After selecting “mapping,” you need to configure the mapping in JSON format as follows: { “0”: “Failure”, “1”: “Success” }. The original numeric values in the fields will be converted according to the specified settings and sent to the northbound system.
3.Select the construction method: Choose a construction method for the entire data set sent to the selected library table. The available construction methods are: JSON, custom template, and syslog.
– Select JSON: No further configuration is required.
– Select a custom template: You’ll also need to define a formatting string. Follow the on-screen instructions and use the provided examples to configure the settings. Once you’ve completed the setup, click the 【Test】 button to perform an output test; the page will then display the output example.

– Select syslog: Set the values for the syslog fields: FACILITY, SEVERITY, VERSION, APP-NAME, MSGID, and SD-ID. Click the [Test] button to perform an output test; the page will display the output instance.

4.After completing data formatting, click [Next] to proceed to the configuration of the outbound data transmission channel.
5. Configure the sending channel for outbound data.
Select a channel from the drop-down list. For instances of relational database types, you can choose among three types of sending channels: NPAI, UDP, and FTP/SFTP. Each instance can have up to 5 northbound sending channels.

After completing the channel selection, click the [Finish] button to save the instance.
The post BSA Northbound Interface – Introduction of Interface Instance Functions appeared first on NSFOCUS.
*** This is a Security Bloggers Network syndicated blog from NSFOCUS authored by NSFOCUS. Read the original post at: https://nsfocusglobal.com/bsa-northbound-interface-introduction-of-interface-instance-functions/
如有侵权请联系:admin#unsafe.sh