好的,我现在需要帮用户总结这篇文章的内容,控制在100字以内。首先,我得通读整篇文章,理解它的主要目的和步骤。 文章讲的是如何在局域网内访问Ollama服务。默认情况下,Ollama只能在本地主机上运行,所以用户可能想从其他设备访问它。文章详细介绍了三个主要步骤:设置环境变量、配置防火墙和获取IP地址。 接下来,我需要将这些步骤浓缩成一句话。要注意不要使用“文章内容总结”之类的开头,直接描述即可。同时,要确保在100字以内。 可能的结构是:描述设置环境变量的作用,防火墙的配置,以及如何测试连接。最后提到这样做的好处,比如无需额外软件。 现在,把这些元素整合起来,确保语言简洁明了。检查字数是否符合要求,并调整用词使其更流畅。 最终的总结应该涵盖主要步骤和好处,同时保持简洁。 </think> 文章介绍如何通过设置环境变量、配置防火墙和获取IP地址,在局域网内访问Ollama服务,无需额外安装软件或VPN。 2026-2-3 16:40:8 Author: www.blackmoreops.com(查看原文) 阅读量:1 收藏
Running Ollama on your main desktop and wanting to access it from another PC, your NAS, or a mobile device is one of the most practical setups you can do. By default, Ollama only listens on localhost — meaning only the machine it is installed on can talk to it. This guide covers exactly what you need to change so you can access Ollama from another PC on your local network without installing anything extra on the other end.

Illustration of a home network setup where one Windows PC runs Ollama with an RTX GPU, and other devices including a laptop, Unraid server, tablet, and mobile phone connect to it over the local network
Why Access Ollama From Another PC
The idea is straightforward. You have one machine with a decent GPU — your main desktop, for example — and you want to use that GPU’s power from anywhere on your network. This means you can run Ollama on your GPU desktop and access it from a laptop, a NAS like Unraid or Synology, a mobile phone, an iPad, a tablet, or any other device on your LAN. None of those other devices need Ollama installed. They just need a browser or a quick curl command to talk to the API.
This is particularly useful if you are running Open WebUI on Unraid as a front-end, or if you want to keep your heavy AI workloads on one machine while accessing them from wherever you are in the house. If you are already set up with a self-hosted environment, have a look at the top self-hosted Docker apps guide to see what else you can connect to your local Ollama instance. Also if you lock your PC, you can still access Ollama from local network as the service will be running and you can use Open WebUI GUI hosted on a different PC to access it. Pretty good as then it performs better. Just dont use the AI when you’re gaming 😉
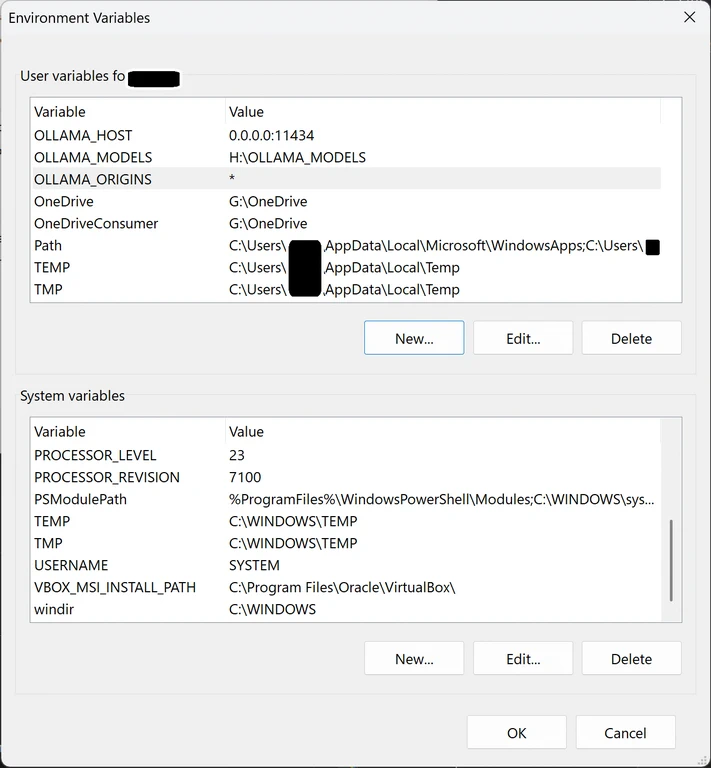
Set the Environment Variables
These two variables are the key. Without them, Ollama stays locked to localhost and nothing else on your network can reach it.
Open sysdm.cpl the same way you did when you install Ollama on a different drive:
- Press
Win + R, typesysdm.cpl, press Enter. - Go to the Advanced tab → Environment Variables.
- Under User variables, add these two:
| Variable name | Variable value |
|---|---|
OLLAMA_HOST | 0.0.0.0:11434 |
OLLAMA_ORIGINS | * |
- Click OK through all dialogs.
- Restart Ollama — right-click the system tray icon and quit, then reopen it.
OLLAMA_HOST set to 0.0.0.0 tells Ollama to listen on all network interfaces instead of just the local machine. OLLAMA_ORIGINS set to * allows requests from any origin, which is needed when other devices or apps on your network send API calls.

Allow Ollama Through Windows Firewall
When Ollama restarts after you set OLLAMA_HOST to 0.0.0.0, Windows 11 will pop up a Windows Defender Firewall prompt asking if you want to allow Ollama to communicate on your network. Click Allow access on private networks. That is all you need for a home LAN.
If the popup did not appear or you accidentally dismissed it, you can manually create the firewall rule. Open PowerShell as Administrator and run:
New-NetFirewallRule -DisplayName "Ollama LAN Access" -Direction Inbound -LocalPort 11434 -Protocol TCP -Action Allow
This opens port 11434 inbound so other devices on your network can reach Ollama. You can verify the rule exists by checking Windows Security → Firewall & network protection → Advanced settings under Inbound Rules.

Find Your Desktop IP Address
You need the IP address of the machine running Ollama to point other devices at it. Open PowerShell or Command Prompt and run:
ipconfig
Look for the IPv4 Address under your active network adapter — it will be something like 192.168.1.x. That is the address every other device on your LAN will use to reach Ollama.
Test the Connection From Another PC
From any other device on your network — a laptop, another desktop, even a phone terminal app — run this:
curl http://192.168.1.x:11434
Replace 192.168.1.x with your actual desktop IP. If Ollama is accessible, you will get back:
Ollama is running
If you get a connection error or timeout, double-check that Ollama is running on your desktop, the environment variables are set correctly, and the firewall rule is in place. You can also test the full API with:
curl http://192.168.1.x:11434/api/tags
This returns a list of all models currently loaded on your Ollama instance, confirming the connection is fully working.
Conclusion
To access Ollama from LAN, you only need three things done on your Windows desktop: set OLLAMA_HOST and OLLAMA_ORIGINS in your environment variables, allow Ollama through the Windows firewall, and grab your desktop IP address. Once that is done, any device on your network can talk to Ollama directly — no VPN, no extra software, no extra installs. The next step from here is connecting a front-end like Open WebUI on your Unraid or NAS to this same Ollama instance.
如有侵权请联系:admin#unsafe.sh