
文章介绍如何利用AWS Elastic Beanstalk服务创建一个C2服务器环境,用于接收和转发恶意流量。通过设置VPC、EC2实例、安全组和部署应用程序代码,实现将外部流量转发到私有VPC中的C2服务器。同时探讨了通过HTTPS访问Elastic Beanstalk应用的可能性及其配置方法。 2025-8-27 06:55:0 Author: thegreycorner.com(查看原文) 阅读量:14 收藏
- Overview
- The C2 server and supporting networking
- Elastic Beanstalk setup
- Accessing the Beanstalk via HTTPS?

Heres the third entry in my series on abusing AWS services to provide C2 high reputation redirectors.
The first part in this series was all the way back in 2023, and in it I discussed abusing the following services to provide a trusted endpoint for C2 communications:
- API Gateway direct proxying,
- Lambda receiving traffic through either Function Urls or the API Gateway,
- Amplify apps and,
- CloudFront distributions.
The second post was last week and covered AWS App Runner.
Check out those posts for more detail.
This time around, after diversions into the worlds of Azure and GCP, I’ve looped back for another look at AWS, to catch any services I missed the first time around.
In this post I will be looking at AWS Elastic Beanstalk, which is a service for easy migration, deployment and scaling of full stack applications on AWS. In this post we will see how it can instead be used to provide a trusted endpoint to receive C2 traffic and forward it to a C2 server running on an EC2 instance in a private VPC. We will do this through describing how you can setup a simple POC environment in your own AWS account.
Want more detail on why this would be useful? See this section in my first blog post on GCP service abuse.
The POC environment we will be looking at will use the following AWS resources:
- A VPC that our C2 instance and Elastic Beanstalk Application will use for internal communications. At minimum this will need one public subnet, that our EC2 instance and Elastic Beanstalk Application will be connected to.
- At least one EC2 instance running a C2 service to receive the traffic.
- A security group associated with the EC2 instance to control access to it.
- A security group for our Elastic Beanstalk environment
- An Elastic Beanstalk Environment to run our app that connects to our VPC
- An Elastic Beanstalk Application running in the Environment that takes incoming traffic and forwards it to the C2 EC2 instance
For the purpose of this post I will discuss parts 1-3 in the section named The C2 Server and supporting networking, and 4-6 in the section named Elastic Beanstalk setup. Given a lot of this is pretty straightforward to deploy I will just provide general clickops creation instructions using the AWS web console.
The C2 service and supporting networking will use a VPC, an EC2 instance attached to that VPC and a security group associated with the EC2 instance to control network access to the instance. The steps in this section are exactly the same as the same section from post 2 in this AWS series, repeated here for ease of use.
VPC
An appropriate VPC can be deployed by visiting the VPC section of the AWS console, hitting the Create VPC button, and using the Wizard to create VPC and more.
In the wizard you can get away with the following minimal settings to create something functional for this POC:
- 1 availability zone
- 1 public subnet
- 0 private subnets
- 0 NAT gateways
- 0 VPC endpoints
This will look something like the following:
After creation, ensure all of the following resources that you create are associated with this new VPC and in the same AWS region.
EC2 and Security group
We can create the EC2 instance and security group in one step. Visit the EC2 section of the console and hit Launch Instance to start the new instance wizard.
The settings below are some simple guidelines and minimums to consider when configuring the instance in the wizard.
Machine image
- AMI: Ubuntu Server 24.04 (HMV), SSD Volume type
- Architecture: 64 bit architecture
Instance type
- Instance type: Minimum of
t2.nanoort3.nano
Key Pair
- Key: Generate a new key or reuse an existing key
Network settings
- Network: Select your new VPC
- Subnet: Select the public subnet in your new VPC
- Auto assign public-ip:
Enable - Security Group: Create a new security group and give it a sensible name and description (you cant change the name later, so pick sensibly!)
- SSH Access: Allow SSH from your IP address in the security group config for direct access, or you can assign an
IAM instance profilein theAdvanced detailssection allowing SSM access if you want to access the instance via SSM intermediated SSH
Configure storage
- Volume type: Choose
30GBof storage and thegp3volume type
Advanced Settings
Go down to the User data - optional and include this script. This will configure the instance as a Sliver C2 server with an Apache forwarder listening on port 80 that receives implant traffic.
Once the instance is up and running and the user data script has completed running, the environment will look something like the following:
We have a C2 server running, but at the moment we have no way to route implant traffic into the environment. This will be setup in the next section.
Create the Elastic Beanstalk security group
We need to create a security group for the Elastic Beanstalk Application we are about to create. This can be done from the AWS console here. Just make sure its created in the VPC we made earlier. We dont need to set any specific rules in the group, we will use it as a source to allow the Elastic Beanstalk Application we create to talk to the EC2 instance we created in the previous section.
Create the Elastic Beanstalk environment
The Elastic Beanstalk environment creation wizard can be started by hitting Create application after visiting the Elastic Beanstalk section of the AWS console. The wizard has six steps, and the below will describe the important values to change for each step. Any option not specifically mentioned can be left at the default values.
Step 1: Configure environment
- Environment tier: Web server environment
- Application information
- Application name: A name for your application - I used
teststalk
- Application name: A name for your application - I used
- Environment information
- Environment name: This is used to set the first component of your apps domain name. I used
teststalk-env - Domain: This is used to set the second component of the apps domain name. You can leave this blank for an autogenerated value (like I did) or pick something that has to be globally unique in AWS for your chosen region.
- Environment name: This is used to set the first component of your apps domain name. I used
- Platform
- Platform: Python
- Platform branch: Latest Python version on 64 bit Amazon Linux
- Platform version: Pick the recommended version
- Application code: Start with the Sample application which we will replace later once the environment is running
- Presets: Any option will work, select based on your performance and cost requirements
Heres a screenshot
Step 2: Configure service access
- Service role: Use the wizard to create a suitable role
- EC2 instance profile: Optional, if you use SSM to access instances make sure you set a profile with SSM permissions here
- EC2 key pair: Optional, but picking the same key used for your C2 EC2 instance is a good choice
Step 3: Set up networking, database, and tags
- Instance settings
- VPC: Pick the VPC you created earlier
- Public IP address: Enable
- Instance subnets: Pick the public subnet in your new VPC
Step 4: Configure instance traffic and scaling
- EC2 security groups: Pick the group your created for Elastic Beanstalk here
Step 5: Configure updates, monitoring, and logging
- Managed platform updates: Disable
- Platform software
- Container options: Proxy server -> Apache
- Environment properties: Set a
DESTINATIONenvironment variable and set the value to the internal IP address of your C2 EC2 instance
Step 6: Review
- Check all the options above have been set correctly and hit
Deploy
Monitor the deployment in the AWS console and once the Health of the deployment in the Elastic Beanstalk Environment overview screen is Green you should be able to get the Domain value for you environment and visit it to ensure you can correctly visit the Sample applications web page (the value is hyperlinked in the console so just clicking will open it in a new tab).
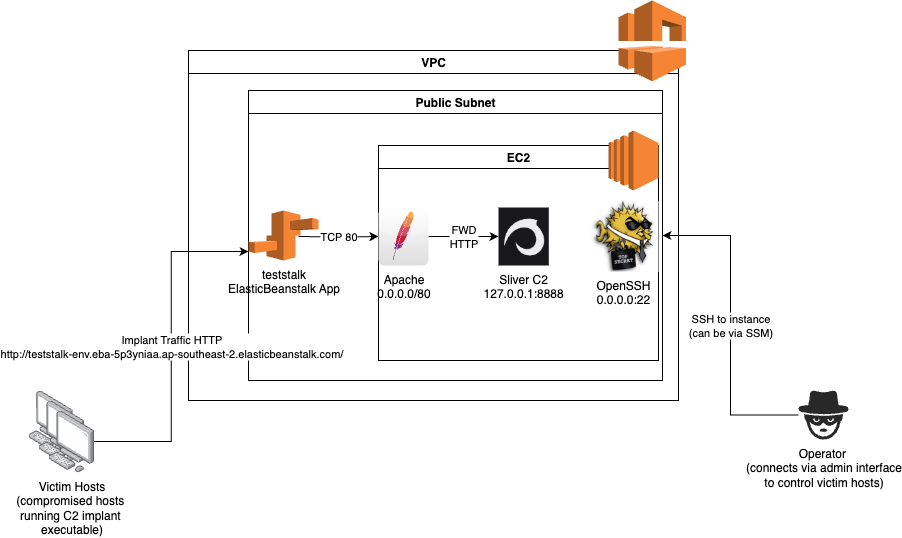
My Domain value was teststalk-env.eba-5p3yniaa.ap-southeast-2.elasticbeanstalk.com.
If you can see the sample app website you can now move ahead to deploying the forwarding web app that will instead route traffic to your C2.
Deploy the application code
The code we will be replacing the sample app with is available here. Clone it locally and create a deployment zip file (/tmp/dep.zip) like so after switching to the source as your present working directory:
zip -r /tmp/dep.zip application.py requirements.txt
Use the Upload and deploy button in the Elastic Beanstalk Environment overview section of the console, and in the following window, upload the zip file you created, and set a new version label for the app.
Once you have hit Deploy and the Running Version section of the Beanstalks Environment page lists your new version, you should be able to access the Apache redirector on your EC2 C2 server by visiting your assigned domain using a http (NOT HTTPS!) request and see a response like the following.
$ curl http://teststalk-env.eba-5p3yniaa.ap-southeast-2.elasticbeanstalk.com/
<html>
</html>
The setup we now have is represented by the following network diagram.
You may have noticed that all instructions of how to access the Elastic Beanstalk app above specifically referenced HTTP and not HTTPS. Unlike some other fronting approaches I have discussed before, Elastic Beanstalk does NOT automatically provide HTTPS accessibility or a trusted certificate for you to use. It is however possible to get a free certificate through LetsEncrypt and use it for your app. This will involve adding some additional files to the deployment zip file you upload. Keep in mind this will get your endpoint some additional attention (and some free security scans!) as your Beanstalk app domain name will appear in the certificate transparency logs.
To enable HTTPS you can follow a process like the one described in this blog post. Just be sure to replace nginx in the examples with apache as we have used in this POC environment.
如有侵权请联系:admin#unsafe.sh