文章介绍了PostgreSQL中的CVE-2024-7348漏洞,该漏洞为竞态条件类型,允许攻击者通过`pg_dump`工具执行任意SQL命令并获取超级用户权限。文章详细描述了漏洞的利用过程、调试环境搭建及修复方法,并强调了升级PostgreSQL版本的重要性以防止系统被攻破。 2025-7-31 19:44:6 Author: www.trustwave.com(查看原文) 阅读量:14 收藏
9 Minute Read
CVE-2024-7348, which was discovered by Noah Misch, is a race condition vulnerability affecting multiple versions of PostgreSQL when using the `pg_dump` utility. An attacker with sufficient privileges can exploit this vulnerability to execute arbitrary SQL commands with the permission of the user, which is typically a superuser, running the dump. The blog post details a vulnerabily in pg_dump regarding how it handles database sequences and functions during database dumps. It exploits a race condition that allows the attackers to replace a database sequence with a view containing a custom function that executes pg_shadow, a command normally executed only by the superuser. We will also discuss later how we mitigate the issue and fix it after a system compromise. The time-of-check Time-of-use (TOCTOU) race condition in `pg_dump` in PostgreSQL allows an object creator to execute arbitrary SQL functions as the user running pg_dump, which is often a superuser. The attack involves replacing another relation type with a view or foreign table. The attack requires waiting for pg_dump to start but winning the race condition is trivial if the attacker retains an open transaction. Versions before PostgreSQL 16.4, 15.8, 14.13, 13.16, and 12.20 are affected. Docker is a powerful tool that simplifies application development and deployment by using isolated environments known as containers. While similar to virtual machines (VMs), Docker differs in that it doesn't require a full operating system for each container; instead, each container operates within its own namespace, isolating processes, so they appear independent of one another. This isolation ensures containers run consistently across different systems while maintaining efficiency. There are several ways to install PostgreSQL in a container: Only one of these options allows us to configure compiler flags and enable debugging symbols. Debugging symbols help us halt a process and investigate it with source code. This allows us to better understand what's happening. This is how we created a Dockerfile: In Figure 1.1, we created a Dockerfile that sets up Ubuntu as the base operating system. This file includes the installation of essential tools such as compilers, editors, and debuggers. Figure 1.2 lists the third-party libraries needed for compiling PostgreSQL in this scenario. In Figure 1.3, we created a folder called `postgres` in the `/tmp` directory and checked out the source code from the GitHub repository. We also cloned a sample data set from morenoh149 for PostgreSQL to simulate a real-world scenario with thousands or even millions of data entries. As we read the configuration and Makefile for PostgreSQL, we found some flags that enabled debug mode, Perl installation, and UUID support for databases for third-party applications. As you can see Figure 1.4, we discovered these flags reviewing the Makefiles: configure –enable-debug –with-perl –with-uuid=ossp`. At this point, PostgreSQL was almost ready! We just needed to run the pre-installation requirements for the database, which includes `initdb` (the location of the data) and `pg_ctl` (the control service). To make it easier to start and stop the PostgreSQL service, we've made two scripts: `start.sh` and `stop.sh`. Figure 1.5 shows what you need to do before installing PostgreSQL to ensure it works. Next, we'll build the image using the Dockerfile. When we run `docker build`, it finds the Dockerfile, which is currently, and hopefully, in the same path as your terminal. Adding `-t` instructs Docker to name the tag of the image. Figure 2.0 shows that the build is successful, and we're ready for the next step in creating Docker containers. Creating containers is easy, but we need to add configurations and options to have an easier way to use them. Plus, when we are using GDB, we need a security option enabled. Figure 2.1 shows the options needed on the container with specific options and configurations. To start PostgreSQL within the Docker container, switch to the `postgres` user and execute `start.sh`. Alternatively, use `stop.sh` to stop the service. First, we will restrict access to a specific user, in our case, `dev_user`. Then, we will escalate our privileges to demonstrate this vulnerability. Figure 3.0 shows the setup of our database. In this example, we have a restricted user account, `dev_user`, which has the following roles: NOSUPERUSER, NOCREATEDB, and NOCREATEROLE. We also configured grants for the role, granting only SELECT, INSERT, DELETE, and UPDATE permissions on the `humanresources` schema. This setup imitates a scenario where only one schema and one account were compromised. Import the previously cloned example from `/tmp/postgres/DBSample/Adventureworks`. There is a `README.md` file that has instructions on how to import the database into our PostgreSQL, and an example on how we will confirm that the data is imported. Before we reproduce the exploit, we need a user with restricted privileges. For this, we just need three roles on PostgreSQL with the following columns set to `false`: `NOSUPERUSER`, `NOCREATEDB`, and `NOCREATEROLE`. In this example, we've used `dev_user` for the restricted privileges. Figure 3.1 illustrates the sample for the user restriction. Upon analysis, there is only one function that uses everything whenever we login or execute commands: `exec_simple_query`. We will use this function as a breakpoint to have a better understanding of what's happening. In Figure 3.2, we set it up as a stopping point where the execution pauses. As we enter, the PostgreSQL services will be interrupted by GDB, pointing out that the current session does not have code for the source file or any function called `exec_simple_query` in the symbol table, and asking if you’ll be looking for this function in the future. We'll pass 'yes' or 'y' in GDB to confirm; it should pause and await the expected event. There are multiple ways to attach the process to GDB. Since we have already started GDB, we're going to use the `attach` command and declare the PID that we want. Looking at the server's PID, any command will do, but in this case, we’ll use a sample `ps` command with the output redirected with `grep` and a word `postgres`. Figure 3.3 illustrates the output; there is only one process that involves `data`, and that's PID 45. Figure 3.4 shows that GDB is attached to process 45 and confirms that the breakpoint from earlier was enabled and has a runtime address. Go to another session with `pg_dump` running and try to dump it. It will suspend, wait for a response from the server, and press 'c' in GDB to continue the dump. This means we've successfully suspended the server, but upon continuing, the breakpoint we set wasn't triggered, and there's information stating Detaching Fork (example in Figure 3.6). This only means that there are multiple forks triggered while doing the process. A fork means there are two threads involving the parent, but since our breakpoint wasn't triggered, we just need the option to switch from parent to child. Stating `follow-fork-mode` with the value `child` in our debugger, we follow the second process and attach it and continue the execution. In Figure 3.7, GDB states that the stop point was triggered with the source code and function name. For this demo, we will use postgres, the default admin account, which is the typical username for exporting data from the database. As we look at the GDB, as soon as the breakpoint triggers (as seen in Figure 3.7), it can be seen that the parameter name query_string on the exec_simple_query has an address and value string on it. In the example, "SELECT pg…" basically pg_dump executes every data on the current database and saves this selected data as a file which will export it eventually. Now, we will use conditional breakpoints with specific values targeting the `sequence_trigger` within the query strings. Figure 4.0 demonstrates a custom breakpoint that triggers only when specific conditions are met. Figure 4.1 shows the breakpoint successfully triggering with the query “SELECT last_value, is_called FROM sequence_trigger”. We will now replace `sequence_trigger` with a table to invoke a custom function upon execution, and we need to ensure that `pg_dump` recognizes the view as a sequence. To allow the table to return the `last_value` of the sequence, we simply need to create another sequence and return its value, which will prevent errors and allow the dump to continue. Figure 4.2 shows the process involves three queries steps. First, we create two sequences and one function. Next, we drop one of the sequences and turn it into a view, applying the function we created earlier to that view. Finally, the last step cleans up the queries we've made. We always trigger the first step waiting for the pg_dump to execute. Once it's executed, we can immediately replace the sequence to view and wait for the pg_dump to trigger the SELECT LAST_VALUE, is_called FROM sequence_trigger. Figure 4.3, Shows the script that we will explain to you line by line. In the first actual line (number 31), there will be initializing Boolean named is_not_executed that will be true at first, stating the pg_dump wasn't executed. This is why in line 43, it received the false value since it started. The next in line is a loop that will execute infinitely until the three steps are successfully completed. In the first condition, if the result is “1” and is_not_executed just to the setup for the database. If the result is “2”, which means that it has the pg_dump currently executed, we can now execute the replace for the view and wait for four seconds to initiate the cleanup and exit. In Figure 4.4, we highlight the vulnerability being exploited: the `pg_shadow` table was accessed despite having a restricted user as utilized in the script. With the MD5 hash of the user exposed, we can now brute force the MD5 using a cracker tool. We simply copied and pasted the hash and saved it to a file, as seen in this example, named `postgresql.hash`. We used a dictionary of 10,000 commonly used passwords saved on [GitHub](https://gist.github[.]com/richardkundl/b68afdcf68240dcff50a). We save this file as `wordlist.txt`, and it will later be used by our cracker. After downloading the necessary file, we needed to edit the `postgresql.hash` file to include information in the format `MD5:<username>`. Then, we used `hashcat` as shown in this example. The command was: `hashcat -m12 postgresql.hash 10-most-common.txt`. As a result, Figure 4.5 demonstrates that the password for the escalated account, 'postgres,' was recovered. 'Postgres' is the default username installed with PostgreSQL. Following this, the account was compromised. We referenced a blog post by Nairuz Abulhul, which details how to access the terminal using the provided SQL. We first used netcat to create a port 80 socket. This allowed us to create a shell table, the output of which is shown in Figure 4.6. We then executed the commands displayed in Figure 4.7, in order, using netcat. The first thing we needed to do was determine if our system was vulnerable to exploit. Therefore, we needed to check two things: the pg_dump version and the server version. For pg_dump, we simply needed to add the –version parameter flag to the command. For the server, we needed to query it using select command. Figure 5.0 shows an example query in the current PostgreSQL version. On a compromised account, it’s crucial to avoid using pg_dump, as it may trigger malicious code in the system. It’s better to upgrade the system first, using the official upgrade tool. Before doing so, however, we needed to download the newer version of PostgreSQL that includes the vulnerability fix. Once the download is complete, we need to determine the paths to the binaries and directories of both version. In Figure 5.1, there is a newest PostgreSQL version 12.20 with the fix vulnerabilty is located pgsql_12_20. Four parameters need to be filled in old-bindir, new-bindir, old-datadir and new-datadir. During this PostgreSQL upgrade, all modules are checked to ensure any third-party components installed in the older version are compatible with the new one. The only downside is that services need to be temporarily turned off, and the duration depends on how long it takes to copy the entire database data. There were two parts that needed to be addressed in this matter: pg_dump and the server side. They added a function called restrict_nonsystem_relation_kind, which can determine if a table has been changed via its OID. This function also shows the error that appears when the vulnerability is patched and corrected, preventing exploitation. This demo shows how a random attack happened on a database, and how a hacker could use their access to take control of the system. Threat actors could get the terminal of the postgres user, which controls the services and configuration of the database. Trustwave’s DBProtect Pro and AppDetectivePro enable security professionals to stay up to date with the latest security threats, and allow them to check if databases are vulnerable. These security solutions don’t just scan PostgreSQL, they also check other databases such as MySQL, MariaDB, MongoDB, Redis, Elasticsearch, and OracleDB. Plus, DBProtect Pro and AppDetectivePro can scan databases’ settings to find and pinpoint any potential problems that could harm them.Vulnerability
Docker Setup
Creation of Dockerfile

Figure 1.1. OS, updates, and program installation required for users
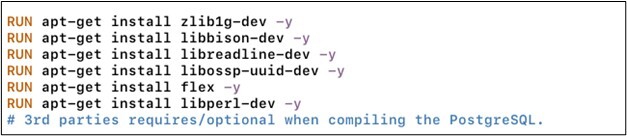
Figure 1.2. Third-party requirements/options when compiling the PostgreSQL
Figure 1.3. Source code check-out.
Figure 1.4. Compiling and installation.
Figure 1.5. Pre-installation phase for the PostgreSQL and its requirements to run.Docker Container Configurations

Figure 2.0. Successful build ‘docker build . -t <docker_image_name>’![]()
Figure 2.1. docker run --name postgres -it --cap-add=SYS_PTRACE --security-opt seccomp=unconfined -d postgres_test
# —name name assignment for the container
# -i interactive
# -t tty
# —cap-add=SYS_PTRACE additional Linux Capabilities PTRACE which is needed for the GDB
# —security-opt
# -d detachEnvironment Setup

Figure 3.0. Setup for the restricted user.
Figure 3.1. Import screenshot for the README.md.
Figure 3.2. We could either spell it out as ‘breakpoint’ or use ‘b’ to halt the process using the function
Figure 3.3. List of processes that use ‘postgres’
Figure 3.4. Attachment of the process with a pid 45 and confirmation that the breakpoint is active![]()
Figure 3.5. Currently halted since we’ve attached the server to GDB.
pg_dump -U postgres -d Adventureworks > trash.dump
# -U username
# -d database name
# > redirecting the output to the trash.dump
Figure 3.6. It was attached to the server but there are several forks during execution.
Figure 3.7. Success using the follow-fork-mode to the child processAttack
![]()
Figure 4.0. Modified breakpoint that only triggers when conditions are meant.![]()
Figure 4.1. Successful trigger exec_simple_query with query with sequence trigger on it.
Figure 4.2. Creation of the query setup.
Figure 4.3. Exploitation script.
Figure 4.4. Result of the vulnerability.
Figure 4.5. Result of the hashcat.![]()
Figure 4.6. Setup for the postgresql.
Figure 4.7. Successful shell.Correction

Figure 5.2. Query for the server version.
Figure 5.1. Successful upgrade for the older to newer PostgreSQL version 12.20.![]()
Figure 5.2. Shows the errors when the database is correct.Conclusion
如有侵权请联系:admin#unsafe.sh