OpenAI Codex 是一个强大的 AI 模型,能够将自然语言指令转化为代码,并支持多种编程语言。它基于 GPT 模型训练而成,可连接 GitHub 仓库执行任务,如编写代码、调试、生成 Pull Request 等。用户可通过简单指令实现复杂功能,并实时审查和管理代码变更。 2025-6-14 20:0:4 Author: hackernoon.com(查看原文) 阅读量:15 收藏
A few weeks ago, OpenAI announced that Codex is available for Plus users, and I didn't miss a chance to try it. And today, I'm excited to share a guide to OpenAI's Codex. As a developer, I've found it to be a powerful and practical tool.
What is OpenAI Codex?
OpenAI Codex is an AI model that turns your plain English instructions into code. It supports dozens of programming languages (including Python, JavaScript, Go, Ruby, and more) and is powerful enough to understand and generate code in those languages.
In essence, if you describe a programming task or ask a question about code, Codex will try to produce a helpful answer in the form of code or an explanation.

It’s built upon the GPT (Generative Pre-trained Transformer) family of models, specifically trained on a massive dataset of publicly available source code from GitHub and natural language text.
However, don’t confuse, Codex is not an extension for your IDE, it’s a cloud-based software engineering agent that can work on multiple tasks in parallel. You connect it to your GitHub repository, give it tasks in plain English, and it goes to work. That simple! :)
It can:
- Read and understand your existing codebase.
- Write new code across multiple files: Not just snippets, but actual features or fixes.
- Run tests (if you guide it or have them set up).
- Debug issues.
- Explain parts of your code.
- Propose and even draft Pull Requests directly to your GitHub repo!
- And more
Getting Started With Codex
Alright, theory is nice, but let’s get practical. To try Codex, you will need at least a Plus subscription for ChatGPT and a GitHub account.
Simply open https://chatgpt.com/codex and log in to your account.
Connecting your GitHub account
The first big step is connecting your GitHub account. Once you click the “Connect to GitHub” button, you’ll be redirected to GitHub to authorize OpenAI.
GitHub will ask you what repositories you want to grant Codex access to. You can choose:
- All repositories: Convenient, but think about security if you have sensitive private repos.
- Only select repositories: This is what I usually do. I pick the specific repo I want Codex to work on.
Once authorized, you’ll be taken back to the Codex interface.

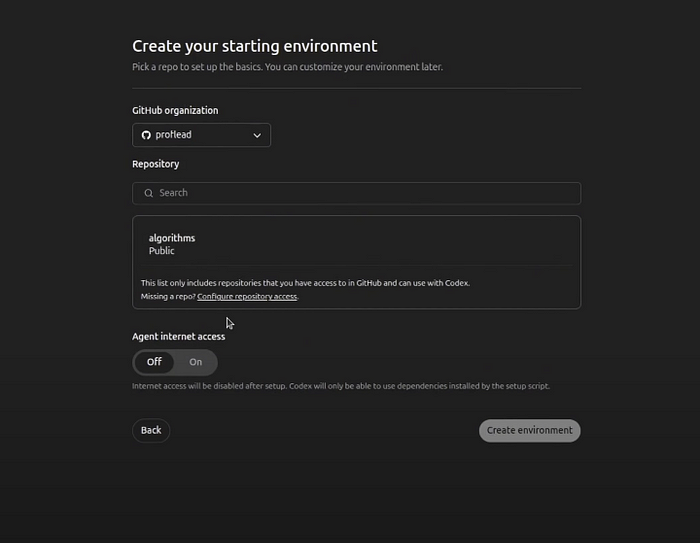
Creating an Environment
Codex works with “environments.” Think of an environment as a dedicated workspace for a specific repository (or a branch within it).
Select your GitHub organization and repository from the dropdowns (these are populated based on the permissions you just gave).
If you want to give Codex access to the internet, you can switch the “Agent internet access” toggle to “On”. It will use it during its setup phase, for example, to download packages. After setup, internet access is usually disabled for the actual coding task for safety.
Then click the “Create environment” button.

Giving Codex Its First Tasks
Once your environment is ready, you’ll see a main screen with an input box labeled “What are we coding next?” This is where the magic happens! You tell Codex what to do in simple English.

Example tasks:
- “Explain the codebase to a newcomer: What is the general structure, what are the important things to know, and what are some pointers for things to learn next?”
- “Find and fix a bug where the jump search algorithm doesn’t handle empty arrays.”
- “Add a web interface for my algorithms repository so I can run the sorting algorithms from a browser.”
- Etc.
To get the best out of Codex, simply follow these simple rules:
- Be Clear and Specific (but not too verbose): “Refactor the userService.js file to use async/await instead of promises for all database calls.”
- Break Down Complex Tasks: If you want it to build a whole new app, that’s probably too much for one prompt. Start with smaller, manageable chunks.
- “Code” and “Ask” Modes: Code: You want Codex to make changes to files. Ask: You want Codex to explain something or answer questions about the codebase without making changes.
Reviewing What Codex Did: The Diff and the PR
You’ll see a list of tasks. Codex will show its progress: “Starting container,” “Downloading repo,” “Reading AGENTS.md” (if you have one — more on that later!), “Exploring files,” “Thinking,” “Running a command,” etc.

Reviewing is super important. Codex is an agent, not a perfect oracle. You must review its work.
Once a task is done, you’ll usually get a notification or see the status update.
Clicking on a completed task often shows you a “diff” — what lines were added (green), what lines were removed (red), just like in a Git diff. This is your first line of defense.

There’s usually a “Logs” tab where you can see the step-by-step actions Codex took, commands it ran, and its thought process. This is invaluable for debugging if something went wrong or understanding why it made certain choices.
Creating a Pull Request
If you’re happy with the changes, there’s often a “Create Pull Request” button right in the Codex interface.

This will create a new branch in your GitHub repo with Codex’s changes and open a PR for you! It even tries to write a decent PR description.
From there, it’s your standard GitHub workflow: review, comment, request changes (you might ask Codex to iterate!), and eventually merge.
For more examples, please watch my video tutorial.
ChatGPT Codex Tutorial
In my video tutorial, I’ll take you through all the steps from start to finish.
Watch on YouTube:
Conclusion
The ability to delegate entire chunks of work to an AI that understands the context of your whole project is incredibly powerful. It won’t replace developers, but it will change how we develop. It can handle a lot of the boilerplate, the initial scaffolding, or even complex refactoring tasks, freeing us up to focus on the harder architectural problems and more creative aspects of software engineering. I’ll continue playing with it and see if it becomes my everyday tool.
Please let me know your experiences if you’ve used it!
Cheers! :)
如有侵权请联系:admin#unsafe.sh