背景
现在很多公司都会面临,内部敏感信息,比如代码,内部系统服务器地址,账号,密码等等泄露到GitHub上的风险,有恶意的也有非恶意的。这个问题有时很难完全规避掉,为了降低可能的恶劣影响,一般都是会内部搭建一个GitHub敏感信息泄露的监控系统。
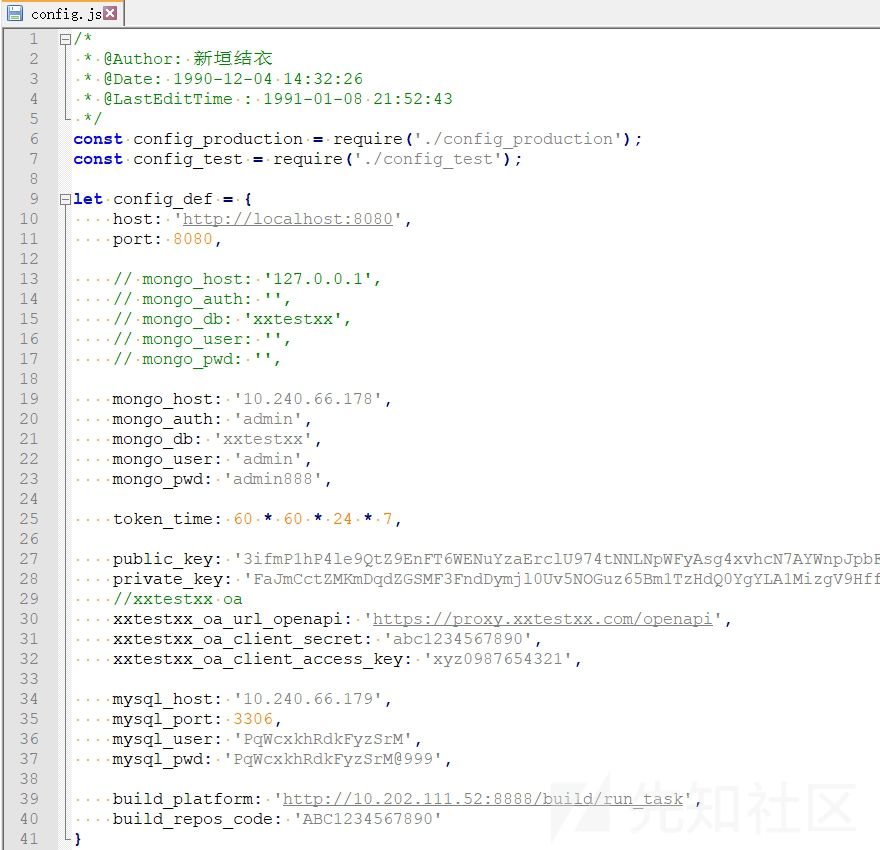
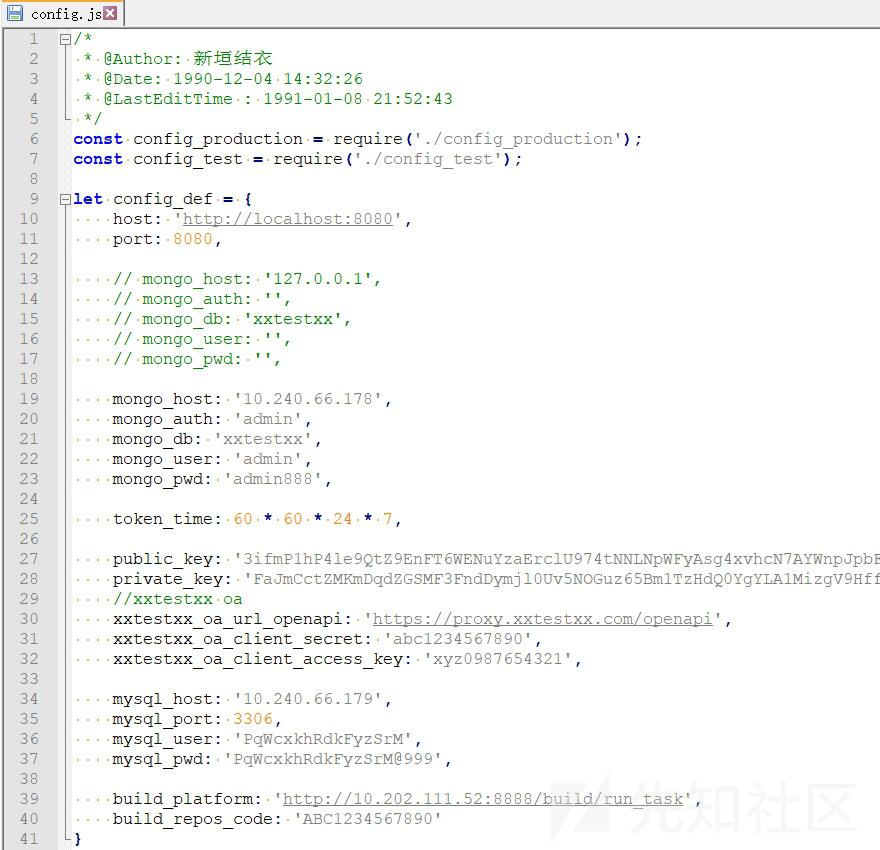
一个典型的泄露敏感信息的配置文件(只是为了说明问题,该文件内容是随机生成的)

在负责这方面工作几个月之后,我遇到了两个问题:
1) 人工指定关键字,必然是不全面的,一般前期是依靠经验来指定,后期根据实际情况慢慢添加。
2) 告警日志数量非常巨大,其中绝大部分是误报,而真正的危险内容就深藏在其中。
人工审核,需要长期耗费大量时间,并且人在长期面对大量误报的情况下,因疲劳产生的思维敏感度下降,可能会漏掉真正的敏感内容,造成漏报。之所以对于敏感信息泄露的审核,一直由人工来进行,我感觉就是因为这个的识别没有一个很有效的模式,很难实现自动化,需要人工去判断。
后来,我在互联网上看到有关机器学习技术的文章,就想尝试用机器学习的方式去解决下工作痛点。
因为在做技术分享的同时,要保证绝对不能够泄露公司的敏感信息,所以下文中涉及到的运行演示,重要敏感信息都进行了脱敏(瞎编。。。)处理。大佬们如果有兴趣,可以使用自己在这方面工作中积累的样本来测试效果。
程序解析
用到的第三方库:hmmlearn, joblib, nltk, numpy, pymongo, scikit-learn, tldextract
实现的功能主要是两个:
1) 找出更多人工没有想到或注意到的敏感关键字。
首先,遍历现有的20个敏感文件样本,读取扩展名,行数,文件大小等信息,作为识别特征。解析文件内容,从中提取出域名和IP地址等主机资产识别信息。对这部分,做判断,如果是主机名,就提取出"domain"和"suffix"部分,如果是IP地址,则计算出相应B段网络。然后将目标文本内容Token化,剥除自定义标点符号和停止词等噪声元素,提取出单词列表。
for filename in os.listdir(POSITIVE_SAMPLE_PATH):
    with open('{}{}{}'.format(POSITIVE_SAMPLE_PATH, '/', filename), 'r', encoding='utf8', errors='ignore') as f:
        sample_str = f.read().lower()

    ext_id = get_filename_ext_id(filename, ext_dict)
    rowsnumber = sample_str.count('\n')
    sample_length = len(sample_str)
    domain_list.append(get_single_sample_domain_list(sample_str, ip_net_list, unfiltered_hostname_list))
    text_list.append(get_single_sample_text_list(sample_str, unfiltered_keyword))

    if rowsnumber > max_rowsnumber:
        max_rowsnumber = rowsnumber
    if min_length == 0:
        min_length = sample_length
    if sample_length > max_length:
        max_length = sample_length
    if sample_length < min_length:
        min_length = sample_length
这部分涉及的几个重要函数实现如下:
# 从样本文件中提取域名和IP列表
def get_single_sample_domain_list(sample_str, ip_net_list, unfiltered_hostname_list):
    unfiltered_single_sample_domain_list = list()
    for hostname in get_affect_assets(sample_str):
        if is_ip(hostname):
            if not is_hit_ip(hostname, ip_net_list):
                ip_net_list.append(ipaddress.ip_network((hostname, 16), strict=False).with_prefixlen)
        else:
            if not is_hit_hostname(hostname, unfiltered_hostname_list):
                unfiltered_hostname_list.append(hostname)

            domain = tldextract.extract(hostname).domain
            unfiltered_single_sample_domain_list.append(domain)

    unfiltered_single_sample_domain_list = nltk.probability.FreqDist(unfiltered_single_sample_domain_list).most_common()

    single_sample_domain_list = list()
    for domain in unfiltered_single_sample_domain_list:
        single_sample_domain_list.append(domain[0])
    return single_sample_domain_list

# 从样本文件中提取单词列表
def get_single_sample_text_list(sample_str, unfiltered_keyword):
    nltk.data.path = ['nltk_data']
    custom_punctuation = get_custom_punctuation()
    english_stopwords = nltk.corpus.stopwords.words('english')

    unfiltered_single_sample_text_list = nltk.tokenize.word_tokenize(sample_str, language='english')
    unfiltered_single_sample_text_list = [word for word in unfiltered_single_sample_text_list if word not in custom_punctuation]
    unfiltered_single_sample_text_list = [word for word in unfiltered_single_sample_text_list if word not in english_stopwords]
    unfiltered_single_sample_text_list = nltk.probability.FreqDist(unfiltered_single_sample_text_list).most_common()

    single_sample_text_list = list()
    for text in unfiltered_single_sample_text_list:
        if len(text[0]) > 2 and len(text[0]) < 9:
            single_sample_text_list.append(text[0])
            if text[0] not in unfiltered_keyword:
                unfiltered_keyword.update({text[0]: text[1]})
            else:
                unfiltered_keyword[text[0]] += text[1]
    return single_sample_text_list

# 获取文件扩展名
def get_filename_ext_id(filename, ext_dict):
    ext_str = os.path.splitext(filename)[1].lower()
    if ext_str not in ext_dict:
        ext_id = max(ext_dict.values(), default=0) + 1
        ext_dict.update({ext_str: ext_id})
    return ext_dict[ext_str]

# 从目标文本中提取IP地址和主机名
def get_affect_assets(sample):
    ip_pattern = '(\d+\.\d+\.\d+\.\d+)'
    domain_pattern = '(?!\-)(?:[a-zA-Z\d\-]{0,62}[a-zA-Z\d]\.){1,126}(?!\d+)[a-zA-Z\d]{1,63}'
    email_pattern = "[\w!#$%&'*+/=?^_`{|}~-]+(?:\.[\w!#$%&'*+/=?^_`{|}~-]+)*@(?:[\w](?:[\w-]*[\w])?\.)+[\w](?:[\w-]*[\w])?"

    affect_assets_dict = {
        'IP': list(set(re.findall(ip_pattern, sample))),
        'DOMAIN': list(set(re.findall(domain_pattern, sample))),
        'EMAIL': list(set(re.findall(email_pattern, sample)))}

    affect_assets = list()
    for assets in affect_assets_dict.keys():
        for asset in affect_assets_dict[assets]:
            if assets == 'IP':
                if not is_ip(asset):
                    continue
            if assets == 'DOMAIN':
                if not is_hostname(asset):
                    continue
            if assets == 'EMAIL':
                hostname = form_email_get_hostname(asset)
                if hostname:
                    asset = hostname
                else:
                    continue
            affect_assets.append(asset.replace("'", '').replace('"', '').replace('`', '').lower())
    return list(set(affect_assets))

# 从邮箱地址中提取域名部分
def form_email_get_hostname(email):
    hostname = tldextract.extract(email.split('@')[-1])
    if hostname.domain and hostname.suffix:
        return '{}.{}'.format(hostname.domain, hostname.suffix)
    else:
        return False

# 判断参数是否是有效的IP地址
def is_ip(ip):
    try:
        ipaddress.ip_address(ip)
    except ValueError as e:
        return False
    else:
        return True

# 判断IP地址是否已存在于配置列表中
def is_hit_ip(ip, ip_net_list):
    if ipaddress.ip_network((ip, 16), strict=False).with_prefixlen in ip_net_list:
        return True
    else:
        return False

# 判断参数是否是有效的主机名
def is_hostname(hostname):
    hostname = tldextract.extract(hostname)
    if hostname.domain and hostname.suffix:
        return True
    else:
        return False

# 判断主机名是否已存在于配置列表中
def is_hit_hostname(hostname, hostname_list):
    if hostname in hostname_list:
        return True
    else:
        return False

# 获取自定义标点符号列表
CUSTOM_PUNCTUATION = ["''", '--', '//', '==', '\\\\', '__', '``', '||', '/*', '*/', '/**', '<!--', '-->']
def get_custom_punctuation():
    custom_punctuation = list(string.punctuation)
    custom_punctuation.extend(CUSTOM_PUNCTUATION)
    return custom_punctuation
对于样本文件的解析,有两种方式,一种如上所示使用正则表达式,另一种是用 https://github.com/skskevin/UrlDetect/blob/master/tool/domainExtract/domainExtract.py 所介绍的"domainExtract.py"
这时,需要把上述"get_affect_assets()"函数的实现改为如下形式:
import domainExtract
def get_affect_assets(sample):
    parser = domainExtract.DomainTokenizer()
    parser.RunParser(sample)

    unfiltered_domains = list(set(parser.urls))

    affect_assets = list()
    for asset in unfiltered_domains:
        if asset.count(':'):
            asset = asset[0:asset.find(':')]
        if asset not in affect_assets:
            affect_assets.append(asset)
    return affect_assets
经测试表明,当样本文件普遍较小的时候,使用"domainExtract.py"效率更高,具体可根据实际情况选择使用哪种解析方法。
接下来,根据域名和单词的IDF值(IDF逆向文件频率是一个词语在文档中普遍重要性的度量),计算出主机名和敏感关键字列表。
idf_max_index = math.log(len(text_list) / 3)

for domain_small_list in domain_list:
    for domain in domain_small_list:
        if domain not in domain_blacklist:
            idf_domain = math.log(len(domain_list) / (get_element_count(domain, domain_list) + 1))
            if idf_max_index > idf_domain:
                filtered_hostname_list = get_filtered_hostname_list(domain, unfiltered_hostname_list)
                for hostname in filtered_hostname_list:
                    if hostname not in hostname_list:
                        hostname_list.append(hostname)

for key, value in unfiltered_keyword.items():
    idf_keyword = math.log(len(text_list) / (get_element_count(key, text_list) + 1))
    if idf_max_index > idf_keyword and idf_keyword > 1 and not key.isdigit():
        keyword_list.append(key)
这部分涉及的几个函数实现如下:
# 获取经过过滤的重点主机名列表
def get_filtered_hostname_list(domain, hostname_list):
    filtered_hostname_list = list()
    for hostname in hostname_list:
        if tldextract.extract(hostname).domain == domain:
            if hostname.count('.') > 1:
                filtered_hostname_list.append(hostname)
    return filtered_hostname_list

# 获取包含关键字或域名的文件数量
def get_element_count(element, element_list):
    count = 0
    for element_small_list in element_list:
        if element in element_small_list:
            count += 1
    return count
将上述计算结果和样本最大、最小字节数及最大行数等保存到JSON配置文件中,供后续使用。
# 获取扩展阈值的实际值
def get_expand_threshold(max_num, min_num):
    expand_threshold = (max_num - min_num) * (80 / 100)
    return int(expand_threshold)

length_expand_threshold = get_expand_threshold(max_length, min_length)
max_length += length_expand_threshold
min_length -= length_expand_threshold
if min_length < 16:
    min_length = 16
max_rowsnumber += get_expand_threshold(max_rowsnumber, 0)

conf_json = dict()
conf_json["hostname_blacklist"] = hostname_blacklist
conf_json["hostname_list"] = hostname_list
conf_json["ip_net_list"] = ip_net_list
conf_json["keyword_list"] = keyword_list
conf_json["ext_dict"] = ext_dict
conf_json["max_length"] = max_length
conf_json["min_length"] = min_length
conf_json["max_score"] = max_score
conf_json["min_score"] = min_score
conf_json["max_rowsnumber"] = max_rowsnumber

with open('config.json', 'w', encoding='utf8') as f:
    json.dump(conf_json, f)
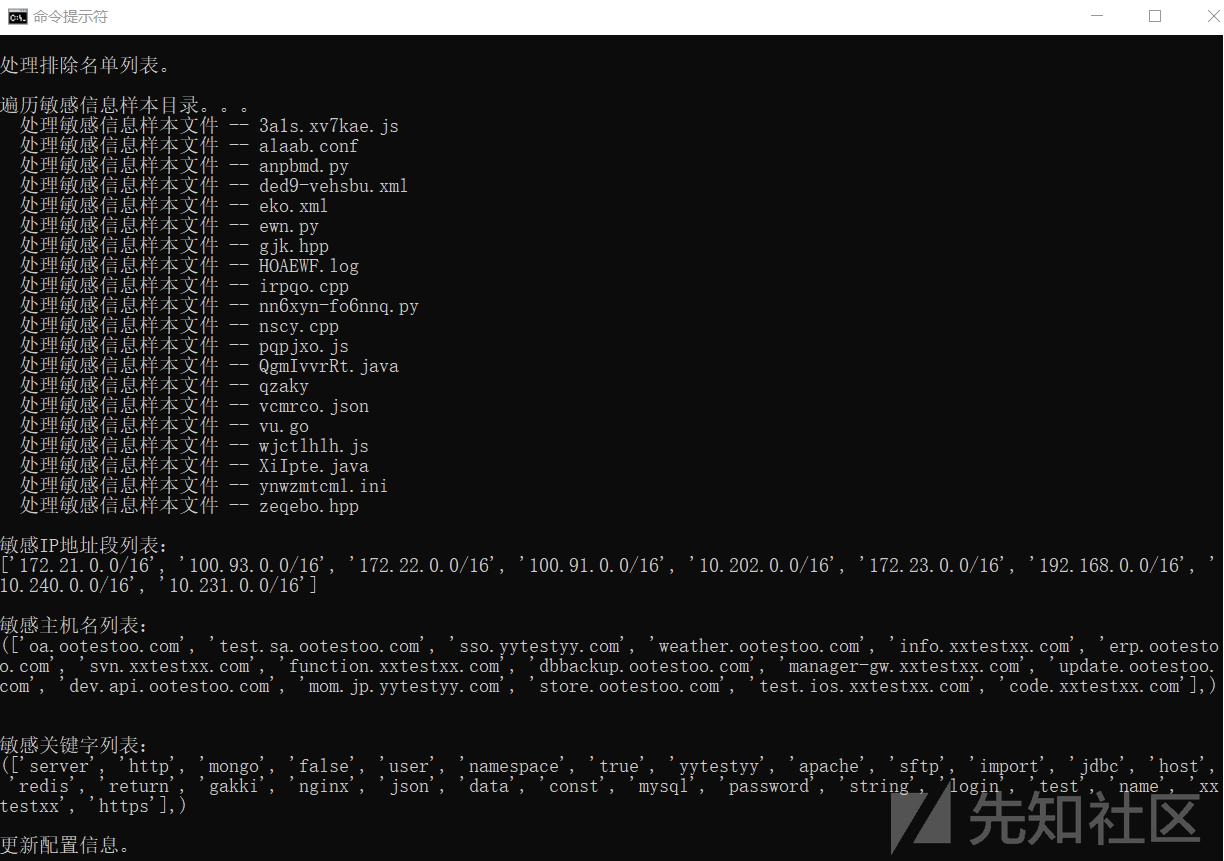
运行效果演示:

2) 识别告警信息,排除误报,找出真正的敏感泄露信息。
首先从JSON配置文件读取配置。也就是通过上一步程序获取的重要信息。然后建立几个后续要用到的临时变量。
with open('config.json', 'r', encoding='utf8') as f:
    conf_dict = json.load(f)
    hostname_blacklist = conf_dict["hostname_blacklist"]
    hostname_list = conf_dict["hostname_list"]
    ip_net_list = conf_dict["ip_net_list"]
    keyword_list = conf_dict["keyword_list"]
    ext_dict = conf_dict["ext_dict"]
    max_length = conf_dict["max_length"]
    min_length = conf_dict["min_length"]
    max_score = conf_dict["max_score"]
    min_score = conf_dict["min_score"]
    max_rowsnumber = conf_dict["max_rowsnumber"]

domain_list = list()
suffix_list = list()
for hostname in hostname_list:
    domain = tldextract.extract(hostname).domain
    if domain not in domain_list:
        domain_list.append(domain)
    suffix = tldextract.extract(hostname).suffix
    if suffix not in suffix_list:
        suffix_list.append(suffix)

SVM_X_POSITIVE = list()
SVM_Y_POSITIVE = list()
HMM_DATA = list()
SVM_X_NEGATIVE = list()
SVM_Y_NEGATIVE = list()
遍历敏感信息样本目录,针对其中的每一个样本文件,收集如上一个脚本中收集的元信息数据,与配置列表进行对比。
将命中主机和IP地主数量,未命中主机数量,命中敏感关键字数量,文件字节数,文本行数和扩展名等统计信息结合在一起,组成矩阵。
再给予一个识别标志数据,表示这个类别是敏感文件类别。
for filename in os.listdir(POSITIVE_SAMPLE_PATH):
    with open('{}{}{}'.format(POSITIVE_SAMPLE_PATH, '/', filename), 'r', encoding='utf8', errors='ignore') as f:
        sample_str = f.read().lower()

    hit_ip_list = list()
    hit_hostname_list = list()
    not_hit_hostname_list = list()
    hit_keyword_dict = dict()
    hit_keyword_count = 0

    ext_id = get_filename_ext_id(filename, ext_dict)
    rowsnumber = sample_str.count('\n')
    sample_length = len(sample_str)

    for hostname in get_affect_assets(sample_str):
        if is_ip(hostname):
            if is_hit_ip(hostname, ip_net_list):
                hit_ip_list.append(hostname)
        else:
            domain = tldextract.extract(hostname).domain
            suffix = tldextract.extract(hostname).suffix

            if domain in domain_list and suffix in suffix_list:
                hit_hostname_list.append(hostname)
            else:
                not_hit_hostname_list.append(hostname)

    for keyword in keyword_list:
        if keyword in sample_str:
            hit_keyword_dict.update({keyword: sample_str.count(keyword)})
            hit_keyword_count += hit_keyword_dict[keyword]

    SVM_X_POSITIVE.append([len(hit_hostname_list), len(hit_ip_list), len(not_hit_hostname_list), hit_keyword_count, sample_length, rowsnumber, ext_id])
    SVM_Y_POSITIVE.append(1)

    HMM_DATA.append(numpy.array([[len(hit_hostname_list)], [len(hit_ip_list)], [len(not_hit_hostname_list)], [hit_keyword_count], [sample_length], [rowsnumber], [ext_id]]))
对于正常信息样本目录,也执行基本相同的操作,然后给予一个相反的识别标志数据,表示这个类别是正常文件类别。
for filename in os.listdir(NEGATIVE_SAMPLE_PATH):
    # 与前一个循环相同的代码。。。
    SVM_X_NEGATIVE.append([len(hit_hostname_list), len(hit_ip_list), len(not_hit_hostname_list), hit_keyword_count, sample_length, rowsnumber, ext_id])
    SVM_Y_NEGATIVE.append(0)
利用上面计算得到的数据,分别建立隐马尔可夫(HMM)模型和支持向量机(SVM)模型,并将它们序列化后保存到本地。
STACKED = numpy.vstack(tuple(HMM_DATA))
model_hmm = hmm.GaussianHMM(n_components=3, covariance_type='full', n_iter=100)
model_hmm.fit(STACKED)

with open('model_hmm.pkl', 'wb') as f:
    joblib.dump(model_hmm, f)

OUT_X = numpy.array(SVM_X_POSITIVE + SVM_X_NEGATIVE)
OUT_Y = numpy.array(SVM_Y_POSITIVE + SVM_Y_NEGATIVE)

(train_x, test_x, train_y, test_y) = sklearn.model_selection.train_test_split(OUT_X, OUT_Y, random_state=1, train_size=0.8)

model_svm = svm.SVC(C=0.5, kernel='linear', gamma=2.5, decision_function_shape='ovr')
model_svm.fit(train_x, train_y.ravel())

with open('model_svm.pkl', 'wb') as f:
    joblib.dump(model_svm, f)
使用隐马尔可夫(HMM)模型对敏感信息样本文件逐个进行评分,然后将阈值保存到JSON配置文件中。
for filename in os.listdir(POSITIVE_SAMPLE_PATH):
    # 与前一个循环相同的代码。。。

    out_ndarray = numpy.array([[len(hit_hostname_list), len(hit_ip_list), len(not_hit_hostname_list), hit_keyword_count, sample_length, rowsnumber, ext_id]]).T
    score = model_hmm.score(out_ndarray)

    if max_score == 0:
        max_score = score
    if score > max_score:
        max_score = score
    if score < min_score:
        min_score = score

score_expand_threshold = get_expand_threshold(max_score, min_score)
max_score += score_expand_threshold
min_score -= score_expand_threshold

conf_json = dict()
conf_json["hostname_blacklist"] = hostname_blacklist
conf_json["hostname_list"] = hostname_list
conf_json["ip_net_list"] = ip_net_list
conf_json["keyword_list"] = keyword_list
conf_json["ext_dict"] = ext_dict
conf_json["max_length"] = max_length
conf_json["min_length"] = min_length
conf_json["max_score"] = int(max_score)
conf_json["min_score"] = int(min_score)
conf_json["max_rowsnumber"] = max_rowsnumber

with open('config.json', 'w', encoding='utf8') as f:
    json.dump(conf_json, f)
运行效果演示:


到这里,就为后续最重要的识别检测工作做好了准备。
程序原本是连接到Hawkeye系统的MongoDB数据库,直接审核在线数据。
出于演示效果和大佬们测试方便的目的,改写了一个以本地目录为数据源的版本,检测逻辑是完全相同的。
稍后我会介绍如何对接Hawkeye系统。
先从配置文件读取配置信息,建立一些临时变量。然后读取并反序列化HMM和SVM机器学习模型。
ALARM_FILE_PATH = 'alarm_file'

with open('config.json', 'r', encoding='utf8') as f:
    conf_dict = json.load(f)
    hostname_blacklist = conf_dict["hostname_blacklist"]
    hostname_list = conf_dict["hostname_list"]
    ip_net_list = conf_dict["ip_net_list"]
    keyword_list = conf_dict["keyword_list"]
    ext_dict = conf_dict["ext_dict"]
    max_length = conf_dict["max_length"]
    min_length = conf_dict["min_length"]
    max_score = conf_dict["max_score"]
    min_score = conf_dict["min_score"]
    max_rowsnumber = conf_dict["max_rowsnumber"]

domain_list = list()
suffix_list = list()
for hostname in hostname_list:
    domain = tldextract.extract(hostname).domain
    if domain not in domain_list:
        domain_list.append(domain)
    suffix = tldextract.extract(hostname).suffix
    if suffix not in suffix_list:
        suffix_list.append(suffix)

with open('model_hmm.pkl', 'rb') as f:
    model_hmm = joblib.load(f)

with open('model_svm.pkl', 'rb') as f:
    model_svm = joblib.load(f)
从数据源处一个接一个的获取待审核告警信息,针对每一个具体的告警文件,首先判断文本行数和字节数是否超出了阈值,接着检查资产信息和敏感关键字的命中情况。
满足条件的话,进入下一步检测,使用HMM模型对目标进行评分,如果评分结果处于敏感文件HMM模型分数阈值范围之内,再使用SVM模型进行二次判断,最终输出一个结果。
print('遍历告警信息目录。。。')
for filename in os.listdir(ALARM_FILE_PATH):
    print('  处理告警信息文件 -- {}'.format(filename))
    with open('{}{}{}'.format(ALARM_FILE_PATH, '/', filename), 'r', encoding='utf8', errors='ignore') as f:
        sample_str = f.read().lower()

    hit_ip_list = list()
    hit_hostname_list = list()
    not_hit_hostname_list = list()
    hit_keyword_dict = dict()
    hit_keyword_count = 0

    ext_id = get_filename_ext_id(filename, ext_dict)
    rowsnumber = sample_str.count('\n')
    sample_length = len(sample_str)

    if rowsnumber > max_rowsnumber:
        print('    行数超出预计范围。')
        continue

    if sample_length > max_length or sample_length < min_length:
        print('    大小超出预计范围。')
        continue

    for hostname in get_affect_assets(sample_str):
        if is_ip(hostname):
            if is_hit_ip(hostname, ip_net_list):
                hit_ip_list.append(hostname)
        else:
            domain = tldextract.extract(hostname).domain
            suffix = tldextract.extract(hostname).suffix

            if domain in domain_list and suffix in suffix_list:
                hit_hostname_list.append(hostname)
            else:
                not_hit_hostname_list.append(hostname)

    for keyword in keyword_list:
        if keyword in sample_str:
            hit_keyword_dict.update({keyword: sample_str.count(keyword)})
            hit_keyword_count += hit_keyword_dict[keyword]

    if (hit_hostname_list or hit_ip_list) and hit_keyword_count > 1:
        out_ndarray = numpy.array([[len(hit_hostname_list), len(hit_ip_list), len(not_hit_hostname_list), hit_keyword_count, sample_length, rowsnumber, ext_id]]).T
        score = model_hmm.score(out_ndarray)

        if not (score > max_score or score < min_score):
            print('    已命中HMM模型范围,继续使用SVM模型进行识别。。。')
            SVM_X = list()
            SVM_X.append([len(hit_hostname_list), len(hit_ip_list), len(not_hit_hostname_list), hit_keyword_count, sample_length, rowsnumber, ext_id])

            if not int(model_svm.predict(SVM_X)):
                print('    确认为正常信息文件。')
            else:
                print('    疑似为敏感信息文件!')
        else:
            print('    未命中HMM模型范围。')
            continue
    else:
        print('    未命中敏感主机地址和关键字。')
        continue
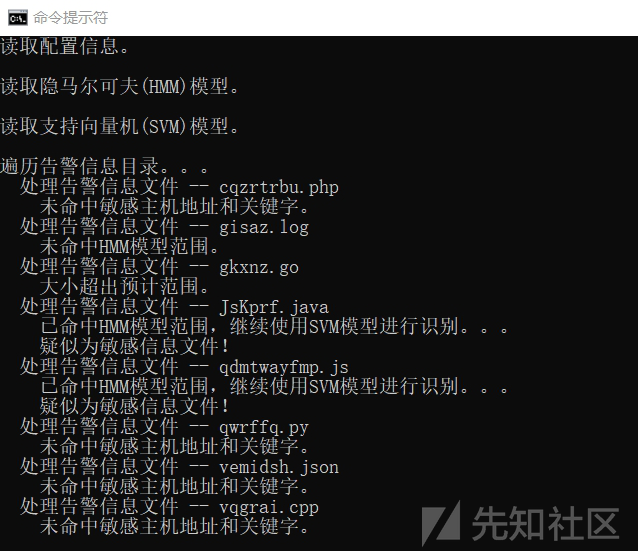
运行效果演示:

关于对接Hawkeye系统:
假设MongoDB数据库连接信息如下:
USERNAME = 'hawkeye'
PASSWORD = 'hawkeye'
HOST = '127.0.0.1'
PORT = 27017
AUTHSOURCE = 'hawkeye'
在Hawkeye系统中,每一条数据记录,体现为"result"集合中的一条"document"数据。
在前端Web管理页面中,显示为待审核的数据,在对应"document"中,其"desc"域是为空,或者说不存在的,在Python里体现为"None"
利用这个属性,将待审核条目中需要用到的数据查询出来进行处理。
client = pymongo.MongoClient('mongodb://{}:{}@{}:{}/?authSource={}'.format(USERNAME, PASSWORD, HOST, PORT, AUTHSOURCE))
collection = client['hawkeye']['result']
cursor = collection.find(filter={'desc': None}, projection=['link', 'code'], no_cursor_timeout=True, batch_size=1)
PS: 这里有一点要注意,因为"no_cursor_timeout"参数置为"True"了,所以在遍历完成后切记应该执行"cursor.close()"显式关闭链接。
这时候,变量"cursor"就成为一个迭代器,从里面获取数据就好了。从"link"域提取文件名,从"code"域提取BASE64编码表示的文件实际内容,解码一下就行。
filename = doc['link']
sample_str = base64.b64decode(doc['code']).decode(encoding='utf-8', errors='ignore').lower()
审核过程的最后,对于一个确认为安全的文件,执行以下操作,将其置为"安全--忽略"状态。
collection.update_one(filter={'_id': doc['_id']}, update={'$set': {'security': 1, 'ignore': 1, 'desc': ''}})
总结
我们用来作为检测依据的各种特征,都来源于对安全和非安全样本的学习,通过对样本集的各种特征的收集和计算,得出阈值,再做适当扩展。也就是说,只有处在阈值范围内的文件,程序才能够进行有效识别,超出了认知盲区的部分,是不能随便给出结论的。
结合数据源特性,程序形成的效果就是,将确定一定不是敏感信息的告警置为安全忽略状态。其他的则留在待审标记下,由人工来做判断。
想象一下,当人工在审核告警信息的时候,思维模式大概分为两个部分:
一部分是,一眼看上去就知道一定是误报的告警,果断忽略掉。另一部分是,有的告警文件,内容上比较难以辨别,需要仔细检查一小会儿才能确定。
程序的运行其实也是相同的过程,机器学习可以在极短的时间内将绝大部分一眼看上去就是误报的告警排除掉,剩下就是那些占比极小的,需要仔细检查一会儿才能确定的文件,将它们留在原地,由人工来进行判断,实现在节省巨量不必要的时间投入的同时,准确识别出那些可能会带来巨大损失的信息泄露隐患。
我们的样本文件集,数量越多,质量越好,产出的机器学习模型也就越高效和精准。就好像人读书越多越聪明一样。
在前期,当我们的样本集具备基本的可用性的时候,实际上就已经能够很好的运行了,随着工作的进行,收集到的样本会越来越多,对机器学习模型的训练也就越来越容易。
结束
因为我自身的工作主要是渗透测试方面。程序开发经验和对机器学习算法的理解都十分匮乏,所以历时很久,参考了网上各路大神的资料之后,反复测试迭代,才搞到现在这个效果,能够很好的解决自身的这个工作需求。
但程序本身还存在很多不足,后面打算再做优化,尝试添加其他的算法和思路,以期打磨的更加完善。
如有侵权请联系:admin#unsafe.sh