Preface
Back in 2016, I was a passionate mechanical engineering student. Though I never graduated and eventually pivoted into AppSec, my love for engineering never faded. Fast forward to 2023, I bought a 3D printer – playing around with mechanics again. Naturally, I began merging this hobby with my security background, leading me to seek out vulnerabilities in 3D printing software.
During one of our in-company white hat hacking activities, I took the opportunity to examine several 3D printing open source products. One of them was UltiMaker Cura, a popular slicer that according to UltiMaker’s website is trusted by millions (more on slicers soon). After scanning Cura with Checkmarx SAST, I uncovered a potential lead for code injection vulnerability, now tracked as CVE-2024-8374.
In this blog post, we’ll examine the vulnerable flow and exploitation of CVE-2024-8374. We’ll also share insights into the impact of such vulnerabilities on the open source 3D printing community. Finally, we’ll highlight key takeaways from UltiMaker’s excellent response.

Introduction
Slicers
First things first, what exactly is a slicer?
Simply put, a slicer is a program that is responsible for transforming a 3D model into a set of instructions (i.e. a gcode file) that the 3D printer can follow to physically print the model.
Slicing is a vital part of the 3D printing process, and it cannot be skipped. As the name suggests, the slicer divides the 3D model into layers and provides a set of instructions for each one, such as temperature, speed, and more. The printer then processes these instructions, layer by layer, when printing.
A typical flow of printing a 3D model is:
- Obtaining a model (e.g., download from a public model database or design it yourself)
- Slicing the model (e.g., with UltiMaker Cura)
- Hit PRINT
- Enjoy the 3D print
3D Models Formats
Before diving into Cura’s source code, we need to take a step back and first discuss the file formats used in 3D printing. There are different 3D models formats, each with different properties and purposes.
The most popular format for 3D printing is called STL. Another popular format is the 3MF that is essentially a ZIP archive with the `.3mf`extension holding the model data in XML along with a collection of metadata files.
The popularity of 3MF is rapidly growing because it adds capabilities that the well-known STL format doesn’t provide, such as color printing. It’s also gained popularity because it is backed by industry leaders including Autodesk and Dassault Systèmes. All of these make it one of the most widely used formats for 3D printing.
Most importantly, it serves as our payload entry point.
The Vulnerability
Our journey to Cura’s source code starts in the `_read` method of the `3MFReader.py` plugin, which is responsible for loading 3MF models into Cura before slicing.
Let’s start by examining this method (the important lines are highlighted in yellow):

- The function accepts a `file_name` parameter, which is the path to the 3MF model we want to slice (line of code).
- The 3MF model is then parsed by a ZIP reader (as mentioned earlier, a 3MF file is a ZIP archive) (line of code).
- The file `3dmodel.model` is read from the archive. This file contains the actual model data in the XML format. Note that Cura stores this information in a variable called `scene_3mf` (line of code).
- Transforming each node from our 3MF file into an UltiMaker format. Note that the `node` is passed in the first parameter of `_convertSavitarNodeToUMNode` (line of code).
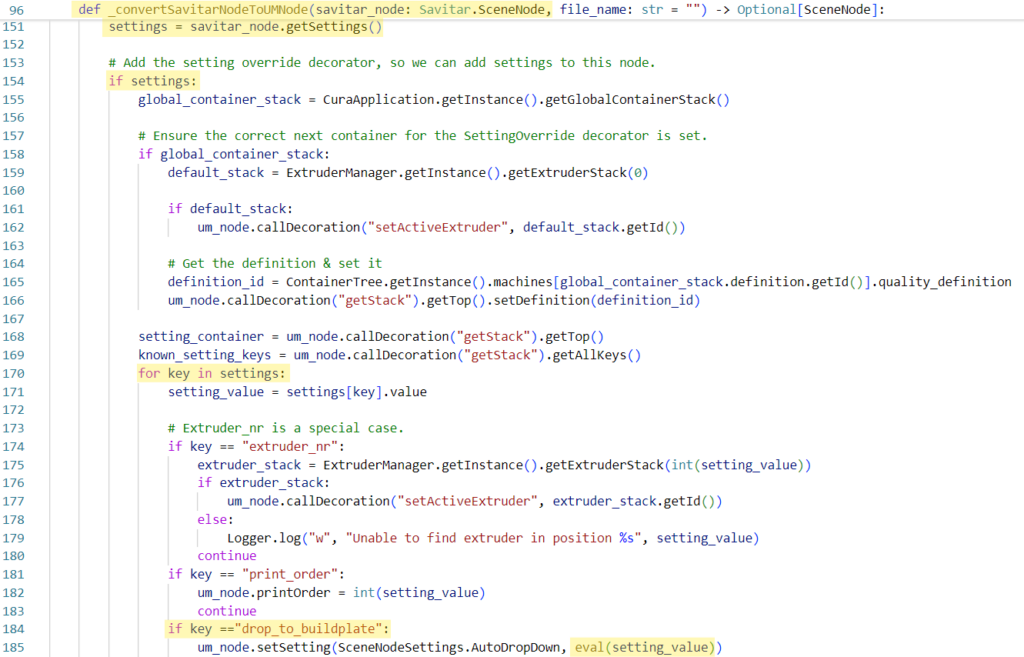
Examining the flow further, we can move forward to `_convertSavitarNodeToUMNode`. This function is quite long, and most of it is not relevant to us, so we’ll only focus on the specific lines which our input flows to:

The `node` variable passed by the `_read` function is now called `savitar_node` inside the function `_convertSavitarNodeToUMNode` (line of code)
- Settings are extracted from the `savitar_node` (line of code)
- If `settings` is defined, Cura tries to add them (line of code)
- While iterating each setting, Cura may find that the `drop_to_buildplate` is defined (line of code)
- Once that happens, the value of this setting will end up in a call to `eval` which results in code execution (line of code).
Exploitation
By now it seems that we have a weakness because we didn’t see any kind of sanitization in the execution flow.
To exploit it, we need to verify that we can control the `drop_to_buildplate` property and, if so, to understand the valid XML structure in which we can place the payload.
Searching for known information about the 3MF format didn’t reveal much about the `drop_to_buildplate` property. However, it looked like this is a feature that is specific to Cura and not used by other slicers, which makes finding this setting in publicly available models quite challenging. Guessing the correct XML format also doesn’t seem to be the best approach in this case. Another alternative is to dive deeper into the source code to learn the appropriate format for setting Cura configurations. But fortunately, I found an easier way:
Since we know that this property is unique to Cura, we may be able to use it to create a valid XML model that contains the `drop_to_buildplate` property for the payload.
Let’s try that by downloading any 3MF model from a public model database. Note that we don’t care about anything else but the format (.3mf) of the file. For example, in the image below you can see that the specific model that I downloaded was created by OnShape (line #9), which is a 3D design software, but soon this metadata will be overridden.

Now, let’s load this 3MF file into Cura and export it back to a 3MF format. The metadata will be converted to the format used by Cura.
Extracting `3dmodel.model` from the 3MF archive we have just exported confirms our success, revealing a valid 3MF model with Cura’s metadata, including the `drop_to_buildplate` property (line #6):

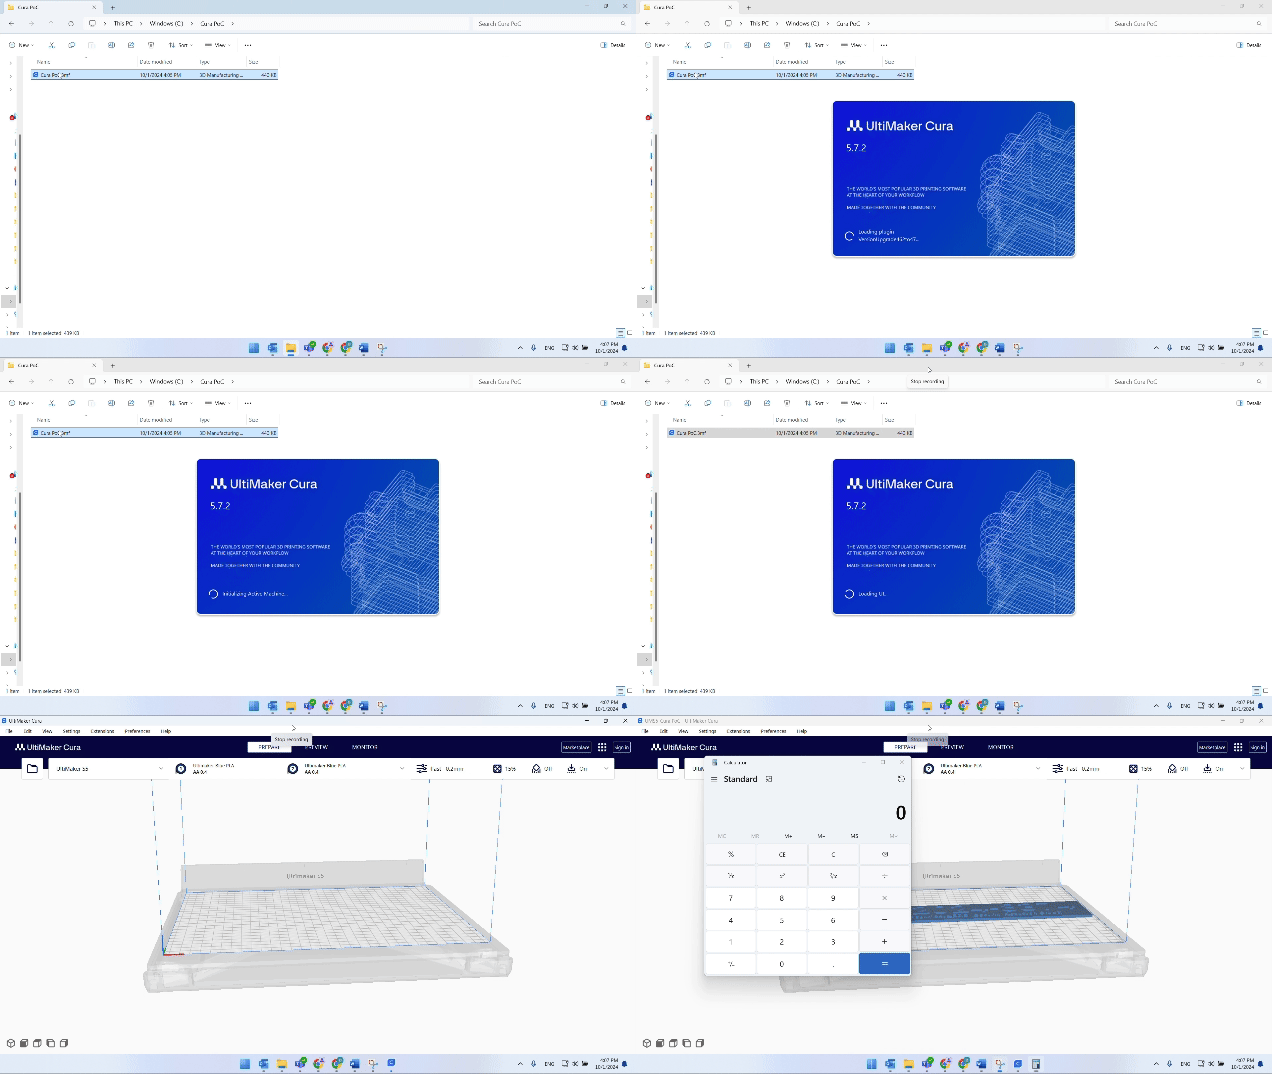
Let’s replace the value of `drop_to_buildplate` with Python code that spawns a calculator:

The only thing left to do now is to open our crafted model with Cura-

Let’s highlight a few things about the exploitation:
- The code is executed with the default Cura configuration.
- The code runs immediately, even before the model is loaded. There’s no need to slice or perform any action in Cura.
- The model remains completely valid after tampering, making it appear legitimate from the user’s perspective.
- The only way to identify this model as malicious is by examining the XML data.
This allows a malicious actor to easily download, modify, and redistribute popular models for exploitation.
But that’s not all – yet.
A Note About Supply Chain Attacks
We know already that this vulnerability is quite simple to exploit. Additionally, beyond model databases like Printables and Thingiverse, which are popular among makers and hobbyists, there are also open source repositories for engineering-focused projects, often used by sensitive sectors such as national security contractors, healthcare engineers, and others. The engineers use basic models in several ways, such as building blocks for their own designs or testing purposes. The open source nature of the 3D printing industry makes such vulnerabilities a potential target for supply chain attacks.
The Fix
The fix is straightforward: the maintainers removed the unnecessary eval call and replaced it with strict Boolean parsing, as shown here:
Another thing to note is that UltiMaker didn’t reveal any information about the vulnerability in their commit’s comment:

This is important because malicious actors frequently scan GitHub for vulnerabilities that were fixed but not yet released.
UltiMaker’s Response
UltiMaker responded and acted quickly, implementing a fix within less than 24 hours. The fix was released in the next beta release `5.8.0-beta.1` on 16 Jul. UltiMkaer’s security team was very responsive and gave all the required information for a smooth disclosure process.
All in all, working with UltiMaker to address this issue was a great experience, and they’ve certainly earned Checkmarx’s Seal of Approval.

References
Timeline
- 15 June 2024 – Initial contact made with the UltiMaker’s Security team via [email protected], providing a comprehensive report on the vulnerability.
- 16 June 2024 – UltiMaker responded, confirming the vulnerability. A fix was subsequently implemented and committed on the same day.
- 16 July 2024 – Version 5.8.0-beta.1, containing the fix, was released.
- 1 August 2024 – Stable version 5.8.0, containing the fix, was released.
- 3 September 2024 – CVE number assigned.
