前言
为了让博客新发布的文章能自动推送到telegram的博客交流群,所以写了这个机器人代码,实现了单个或多个群组同时推送文章。只有你网站支持RSS就可以用。不多说,直接上教程。
第一步(安装mw面板)
因为这个代码是基于MW面板【tgbot 0.1】插件写的,所以这个面板安装为必须步骤。具体安装步骤看以下文章
Linux主机开源面板:mdserver-web,完全免费,界面仿宝塔面板
mdserver-web:支持Centos、Debian、Ubuntu等系统至于为什么推荐这个面板呢?因为是完全开源的,再者就是宝塔(后门塔)的各种上传用户隐私事件宝塔上传用户隐私数据新闻二MW面板的环境组件全都是从官方直连下载安装的,emmm,解释一下是什么官方,比如你安装PHP那么就是从P...
第二步(安装依赖)
运行以下代码安装机器人所需依赖
pip install feedparser && pip install schedule
如果安装出现报错不能正常进行安装,运行以下命令进行安装(装了面板,先跑这个命令)
cd /www/server/mdserver-web && source bin/a* && pip install feedparser && pip install schedule
第三步(安装配置tgbot 0.1插件)
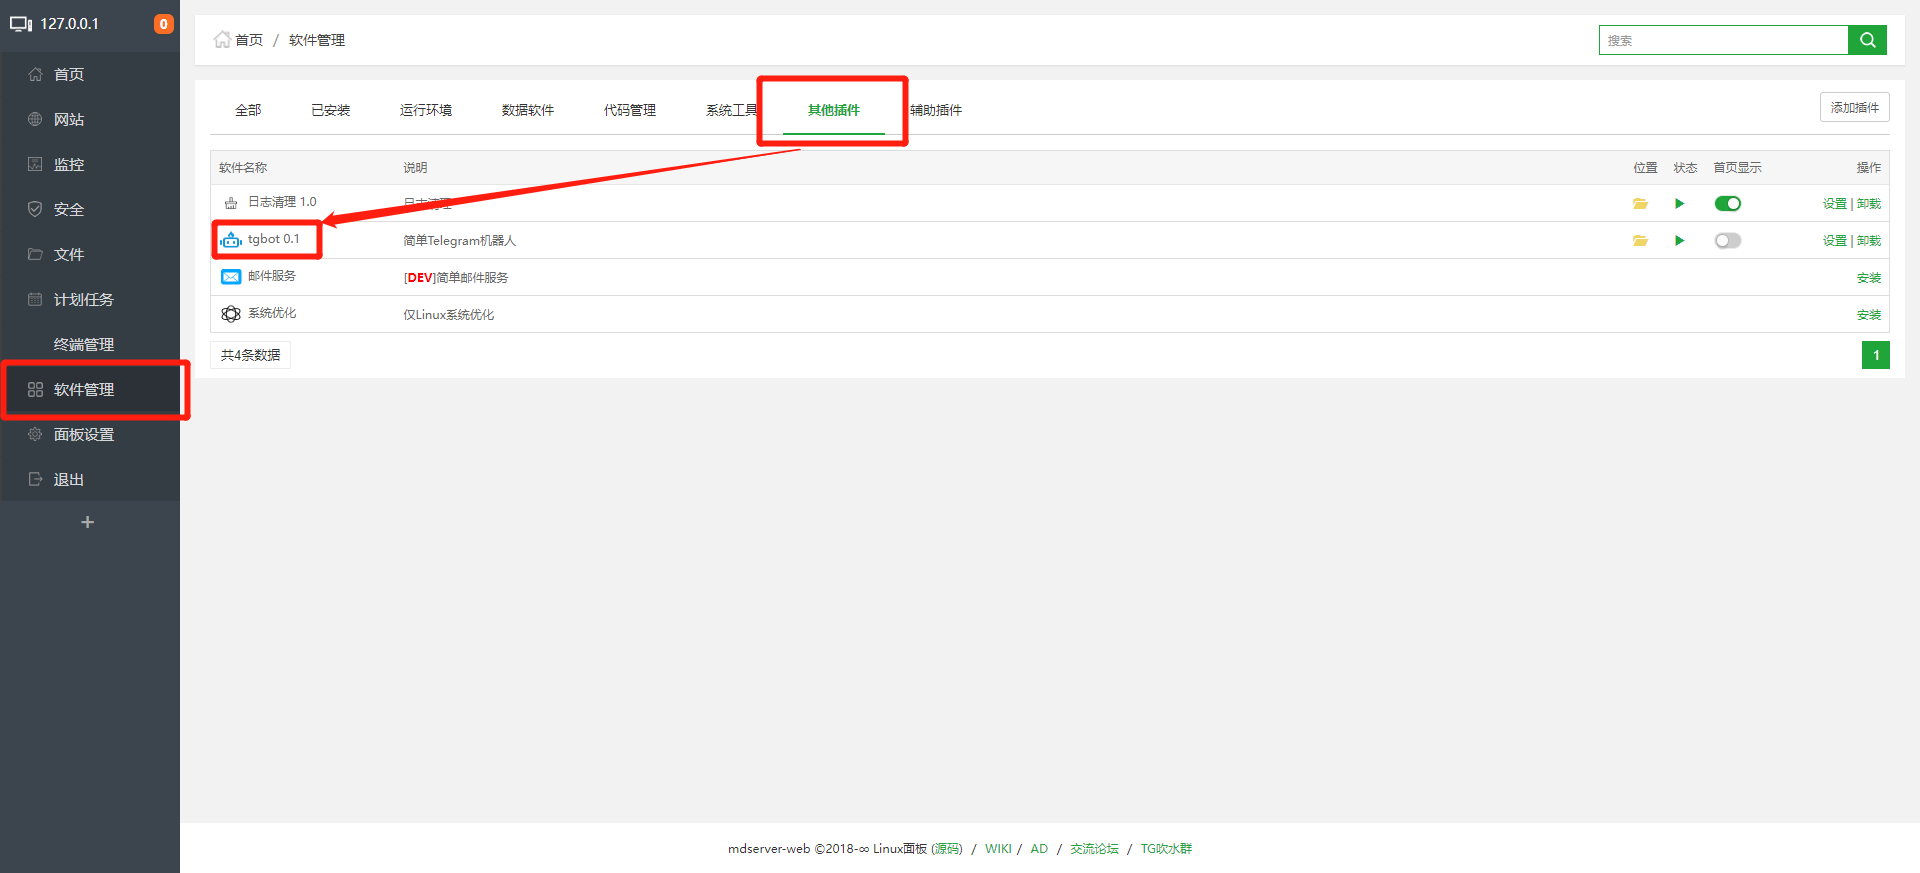
- 如图所示,在面板找到【软件管理】-【其他插件】位置安装插件进行操作。
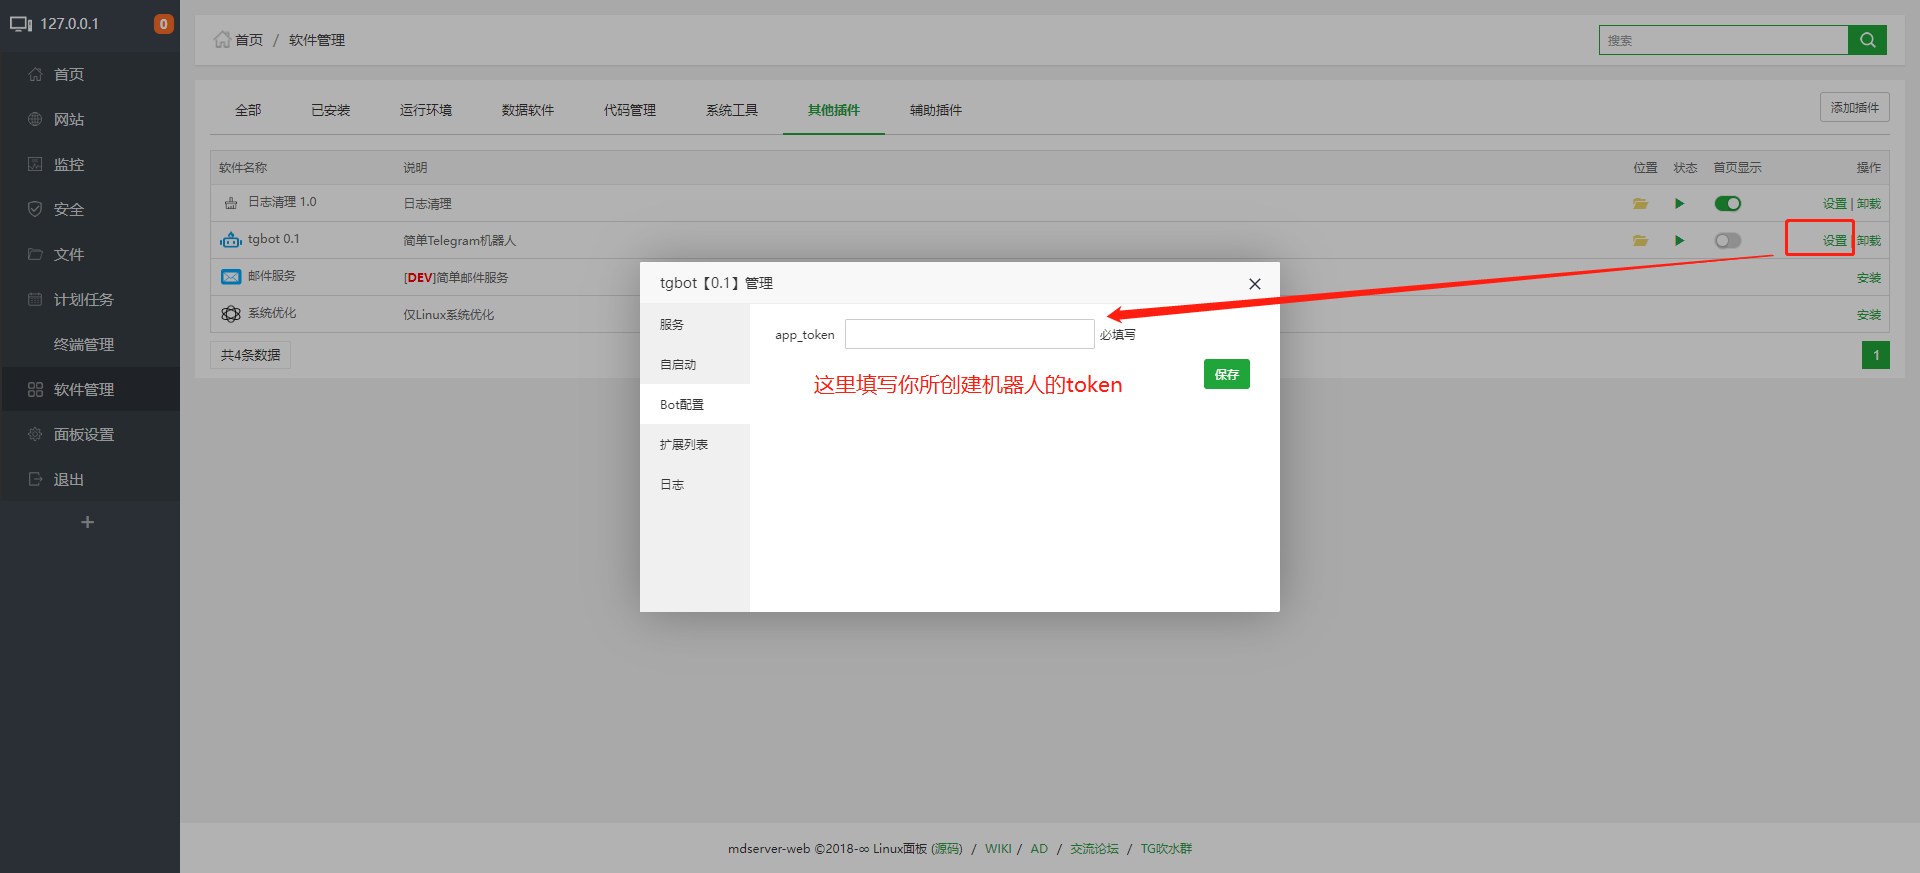
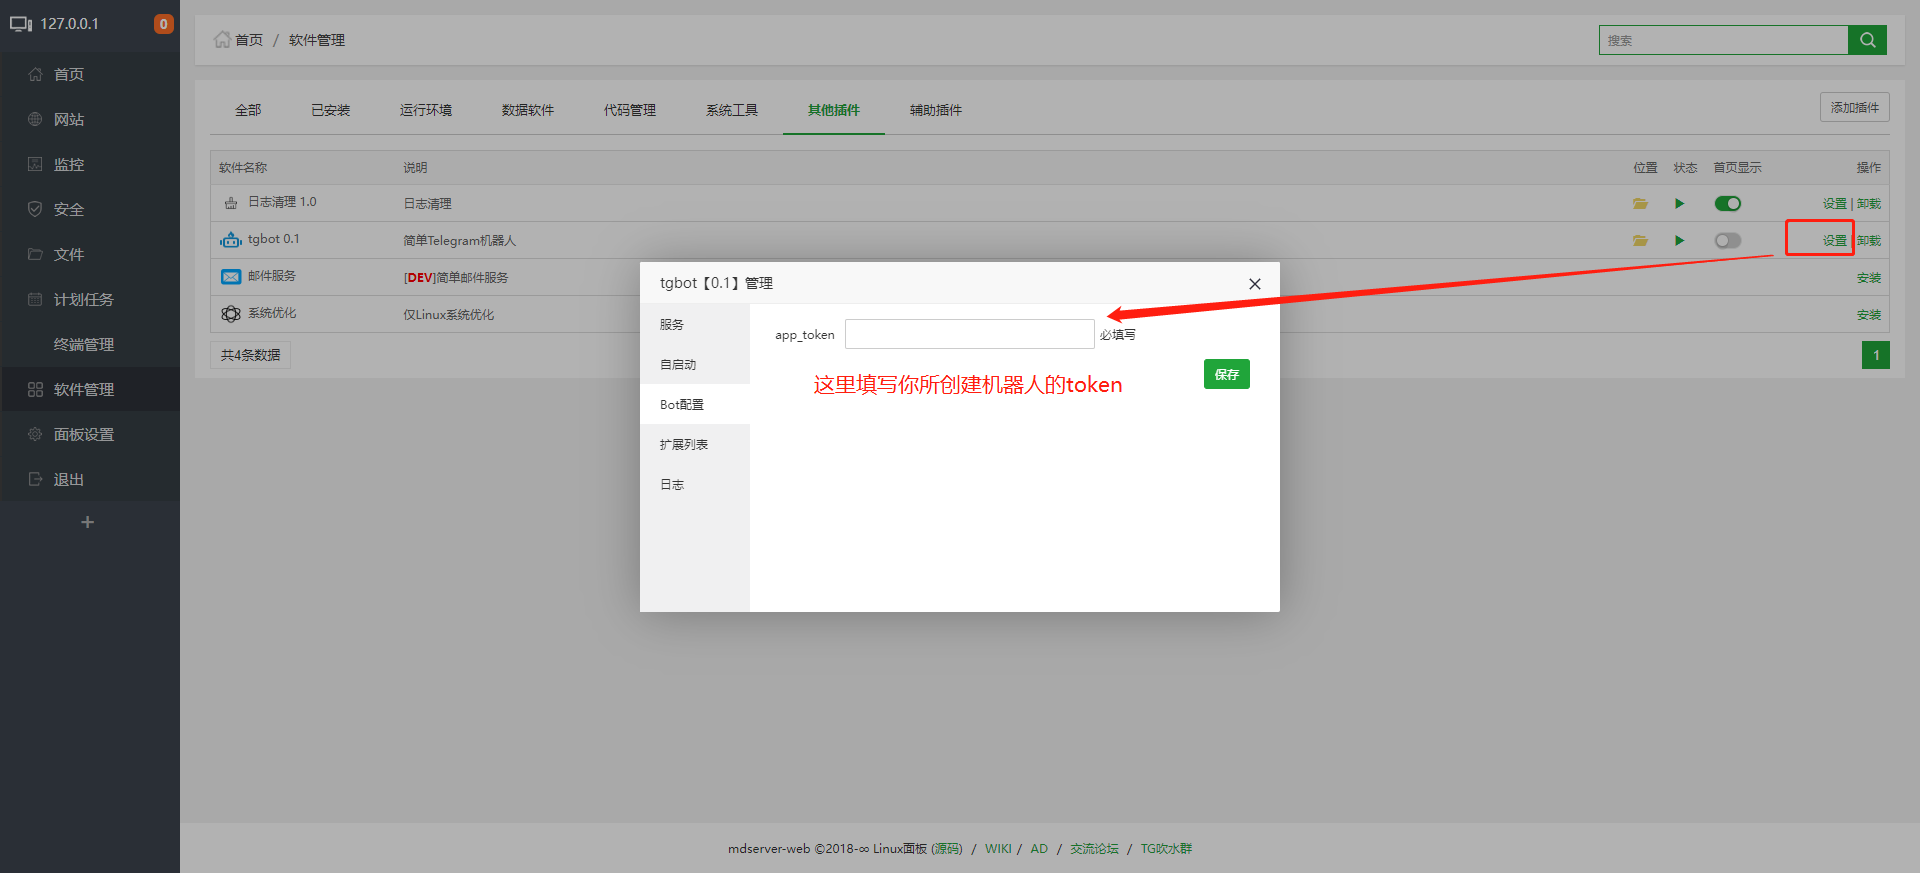
- B.安装完毕插件后打开插件的设置,在【bot配置】的【app_token】处填写你创建的机器人的token然后保存;创建机器人和获取token都在telegram的@BotFather里进行的。
在插件设置的前面有个【文件夹】的图标,点击图标进入插件的安装目录,进入【extend】文件夹,新建【push_blog_new.py】文件,将以下代码粘贴到新建的文件里并保存。
实时版本
import sys
import io
import os
import time
import re
import json
import base64
import threading
import feedparser

sys.path.append(os.getcwd() + "/class/core")
import mw

import telebot
from telebot import types
from telebot.util import quick_markup

sent_posts_file = 'sent_timestamp.json'
push_lock = threading.Lock()

def get_latest_blog_post():
    rss_url = 'https://www.google.com/rss/' # 把网址替换为你网站的RSS地址
    feed = feedparser.parse(rss_url)

    latest_post = {
        'title': feed.entries[0].title,
        'link': feed.entries[0].link,
        'timestamp': time.mktime(feed.entries[0].published_parsed)
    }

    return latest_post

def load_last_sent_timestamp():
    if os.path.exists(sent_posts_file):
        with open(sent_posts_file, 'r') as f:
            timestamp = json.load(f)
            return float(timestamp)
    else:
        return None

def save_last_sent_timestamp(timestamp):
    with open(sent_posts_file, 'w') as f:
        json.dump(float(timestamp), f)

def send_blog_post_to_group(bot, chat_ids):
    with push_lock:
        last_sent_timestamp = load_last_sent_timestamp()
        latest_post = get_latest_blog_post()
        if last_sent_timestamp is None or float(last_sent_timestamp) < latest_post['timestamp']:
            message_text = f"{latest_post['title']}:\n{latest_post['link']}"
            for chat_id in chat_ids:
                bot.send_message(chat_id, message_text)
            save_last_sent_timestamp(latest_post['timestamp'])

def schedule_blog_post_check(bot, chat_ids):
    threading.Timer(600, schedule_blog_post_check, args=(bot, chat_ids)).start()
    send_blog_post_to_group(bot, chat_ids)

def run(bot_instance):
    chat_ids = [-1001578009023]   # 这里填写你的群ID,根据需要添加更多群组的ID,格式为-1001578009023, -1001578009024, -1001578009025
    schedule_blog_post_check(bot_instance, chat_ids)
定时版本
import sys
import io
import os
import time
import re
import json
import base64
import feedparser
import schedule

sys.path.append(os.getcwd() + "/class/core")
import mw

import telebot
from telebot import types
from telebot.util import quick_markup

sent_posts_file = 'sent_timestamp.json'

def get_latest_blog_post():
    rss_url = 'https://www.google.com/rss/'  # 把网址替换为你网站的RSS地址
    feed = feedparser.parse(rss_url)

    latest_post = {
        'title': feed.entries[0].title,
        'link': feed.entries[0].link,
        'timestamp': time.mktime(feed.entries[0].published_parsed)
    }

    return latest_post

def load_last_sent_timestamp():
    if os.path.exists(sent_posts_file):
        with open(sent_posts_file, 'r') as f:
            timestamp = json.load(f)
            return float(timestamp)
    else:
        return None

def save_last_sent_timestamp(timestamp):
    with open(sent_posts_file, 'w') as f:
        json.dump(float(timestamp), f)

def send_blog_post_to_group(bot, chat_ids):
    last_sent_timestamp = load_last_sent_timestamp()
    latest_post = get_latest_blog_post()
    if last_sent_timestamp is None or float(last_sent_timestamp) < latest_post['timestamp']:
        message_text = f"{latest_post['title']}:\n{latest_post['link']}"
        for chat_id in chat_ids:
            bot.send_message(chat_id, message_text)
        save_last_sent_timestamp(latest_post['timestamp'])

def run_schedule(bot, chat_ids):
    while True:
        schedule.run_pending()
        time.sleep(1)

def schedule_blog_post_check(bot, chat_ids):
    schedule.every(5).minutes.do(send_blog_post_to_group, bot, chat_ids) # schedule.every(5)将5改为10就是10分钟检测一次是否有最新文章。

def run(bot_instance):
    chat_ids = [-1001578009023]  # 这里填写你的群ID,根据需要添加更多群组的ID,格式为-1001578009023, -1001578009024, -1001578009025
    schedule_blog_post_check(bot_instance, chat_ids)
    run_schedule(bot_instance, chat_ids)
第四步(启动机器人扩展)
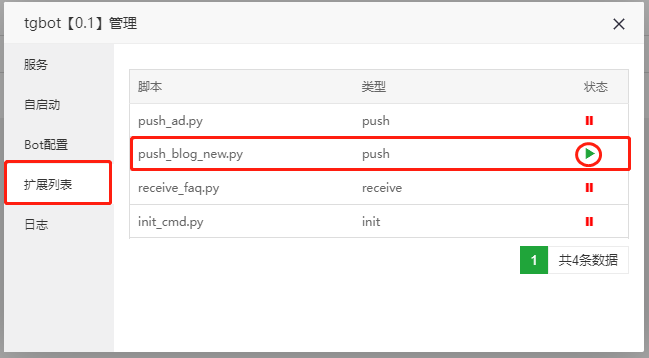
在【软件管理】-【已安装】找到插件,点击【设置】后找到【扩展列表】,可以看见有【push_blog_new.py】的扩展,点击后面的运行按钮,机器人即可推送博客文章了(前提是机器人已经在相关的群里)。
相关:https://www.notetoday.net/note/538.html
文章来源: https://blog.upx8.com/3277
如有侵权请联系:admin#unsafe.sh
如有侵权请联系:admin#unsafe.sh

