Gareth Heyes |13 March 2023 at 15 2023-3-13 23:0:0 Author: portswigger.net(查看原文) 阅读量:61 收藏
Gareth Heyes | 13 March 2023 at 15:00 UTC

We recently published some research on server-side prototype pollution where we went into detail on techniques for detecting this vulnerability black-box. To make your life easier, we've integrated these techniques into an automated, open source tool called Server-Side Prototype Pollution Scanner. In this post, we'll walk you through how to use this tool to exploit the Web Security Academy lab privilege escalation via server-side prototype pollution.
Installation
To install the Server-Side Prototype Pollution Scanner:
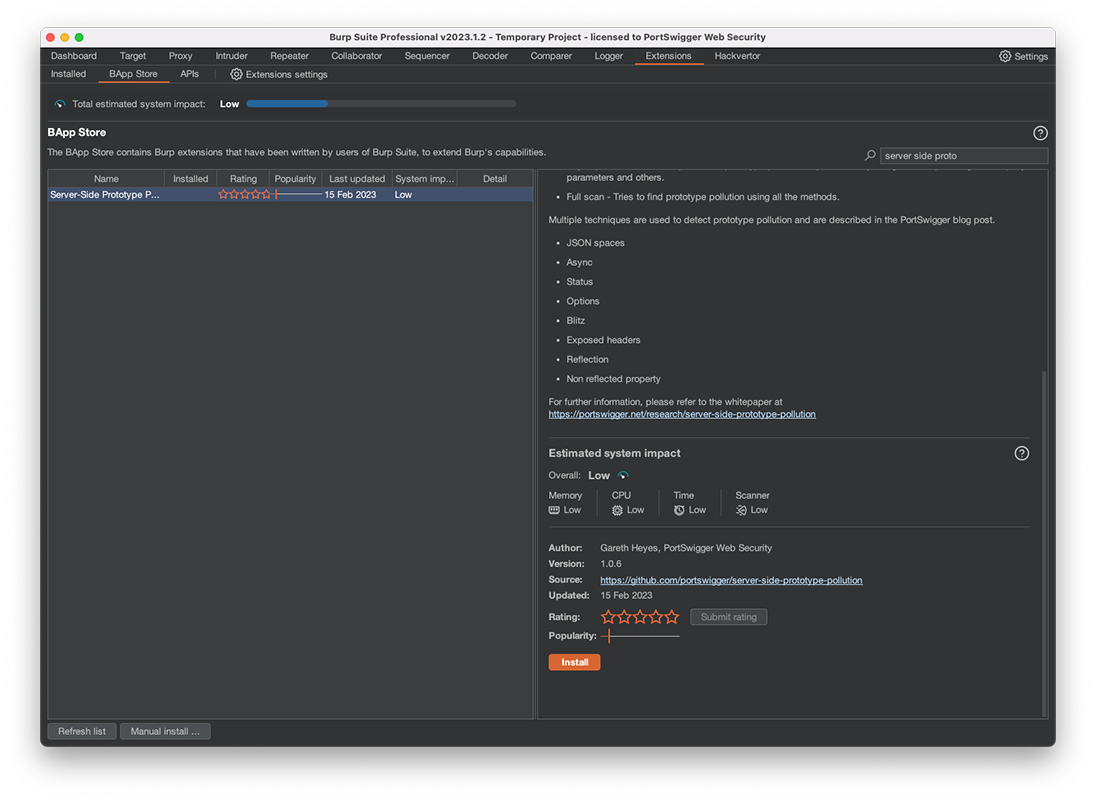
1. In Burp, go to the Extensions > BApp Store tab.
2. From the list of extensions, select Server-Side Prototype Pollution Scanner.
3. Click Install.
The Server-Side Prototype Pollution Scanner now appears on the Extensions > Installed tab, where you can enable and disable it as needed.

Using the Server-Side Prototype Pollution Scanner
Now that we've got the BApp installed we need something to test it on. Let's walk through the process using one of the deliberately vulnerable labs from the Web Security Academy.
To follow this tutorial, you need to create a free account on portswigger.net.
Launch the lab
1. In Burp, go to the Proxy > Intercept tab.
2. Click Open browser to launch Burp's built-in browser.
3. In Burp's browser, go to the following URL:
https://portswigger.net/web-security/prototype-pollution/server-side/lab-privilege-escalation-via-server-side-prototype-pollution
4. Click Access the lab, then log in if prompted. After a short pause, the deliberately vulnerable online store opens.
Map the target
1. In Burp, go to the Target > Site map tab.
2. From the list of hosts, right-click on the top-level entry for the lab and select Add to scope.
3. In the browser, go back to the lab and click My account.
4. When prompted, log in using the following credentials:
Username: wiener
Password: peter
5. Manually explore the lab. In particular, investigate the function for changing your delivery address. This accumulates a log of HTTP interactions in Burp, which we'll later use to scan for prototype pollution.
Scan for server-side prototype pollution
1. In Burp, go to the Proxy > HTTP history tab.
2. Above the list of HTTP interactions, click the Filter: bar to open the filter settings.
3. In the filter settings, select Show only in-scope items then click Apply.
4. Select all of the items in the proxy history. Due to the filter we applied, this should only contain HTTP interactions with the lab. This is important to ensure that we don't accidentally scan any unrelated sites that are out of scope.
5. Right-click on the selected interactions and select Extensions > Server-Side Prototype Pollution Scanner > Server-Side Prototype Pollution > Body scan.

6. When prompted, click OK to accept the default settings. The scan begins probing for prototype pollution using any request that contains a JSON body.
Check the results
The results of the scan are reported in different locations depending on whether you're using Burp Suite Professional or Burp Suite Community Edition. The following steps assume you're using Burp Suite Professional.
1. On the Dashboard tab, go to the Issue Activity tab.
2. Notice that this contains three new issues related to server-side prototype pollution.
3. Select the issue Server-side prototype pollution via JSON spacing.
4. Observe that the issue provides several requests and responses as evidence:
- The first request is the unmodified base request where the vulnerability was found.
- In the second request, notice that the scanner attempted to pollute the
json spacesproperty. When successful, this technique increases the spacing in the JSON in any subsequent responses, which provides a visual indication of the prototype pollution. This is a strong indication that a vulnerability is present. - The third request removes the spacing. If you look at the response and switch to the Raw view, notice that the JSON does not contain additional spacing.
- The fourth request is the same as the base request and shows there is no spacing and is used to confirm the
json spacesproperty has been neutralized.
Exploiting prototype pollution
So you've found prototype pollution on the change address endpoint, but now you need to exploit it!
1. Go back to the Server-side prototype pollution via JSON spacing issue and select the first request.
2. Right-click on the request and select Send to Repeater.
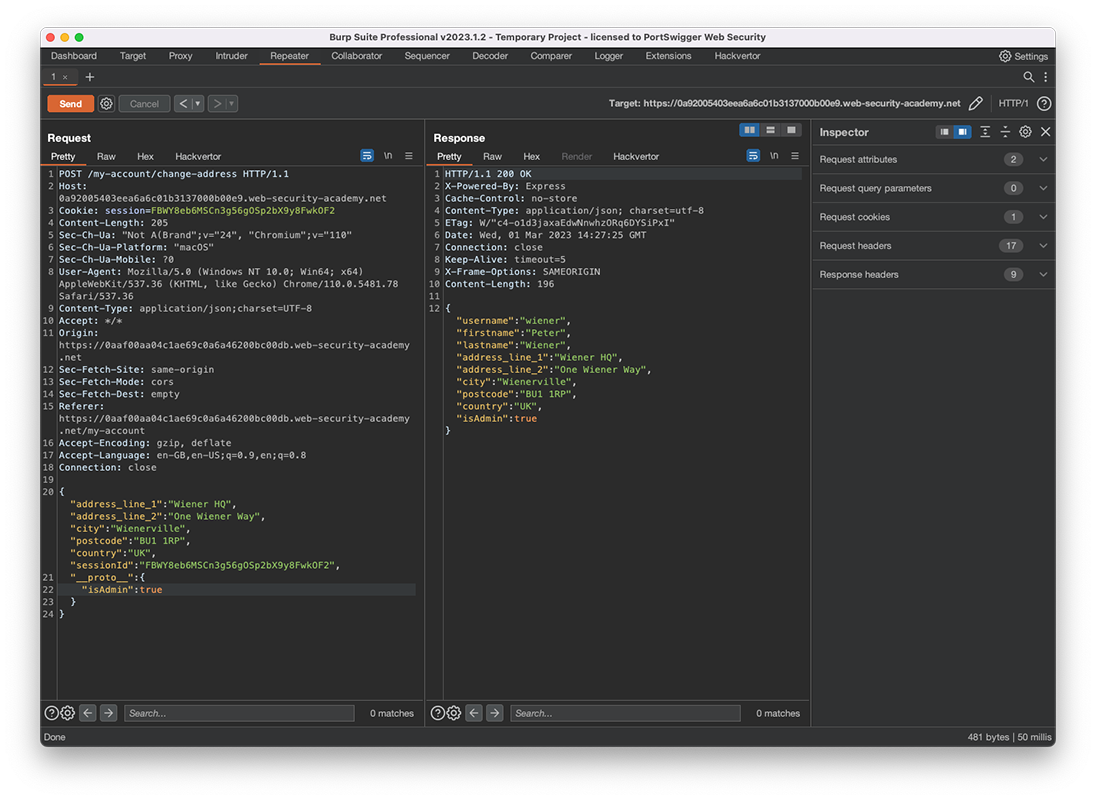
3. Send the request and observer that the response contains an isAdmin property, which is currentlyfalse. I wonder what would happen if we polluted this property?
4. In the request body, add the following property to the JSON:
"__proto__":{
   "isAdmin": true
}

1. Send the request again. This time, observe that the isAdmin property in the response is now true. This suggests that you've successfully polluted your user object via its prototype.
2. Back in the browser, navigate to the homepage. Notice that this now contains an option for accessing an admin panel.
3. Visit the admin panel and delete the user carlos. You've now successfully exploited server-side prototype pollution for privilege escalation and solved the lab.
Summary
We've shown you how to use the new server-side prototype pollution BApp to find vulnerabilities and exploit them. You should now have an understanding of how the scanner identifies prototype pollution, and you should be able to apply this knowledge to find vulnerabilities in other applications. For further reading on how the scanner works you can read our research post.
If you're ready to try out the scanner on different targets we have more labs & learning materials available on our Web Security Academy in the server-side prototype pollution section.

如有侵权请联系:admin#unsafe.sh