What is PI-Defender ?
PI-Defender is a kernel security driver used to block past, current and future process injection techniques on Windows operating system:
- Process Hollowing
- Process Doppelgänging
- Process Herpaderping
- Process Ghosting
- Process Overwritting
- Dll Injection
Demonstration
Process Ghosting PoC from Hasherezade.
demonstation_pi-defender.mp4
How does it works ?
Whenever a binary wants to interact with the memory of a Windows Object, it has to specify rights according to what it wants to achieve.
Then, the system returns a handle associated to this object with the granted rights.
Since all process injection techniques need to write in the memory of a remote process, they need a handle with specific rights (PROCESS_VM_WRITE and PROCESS_VM_OPERATION).
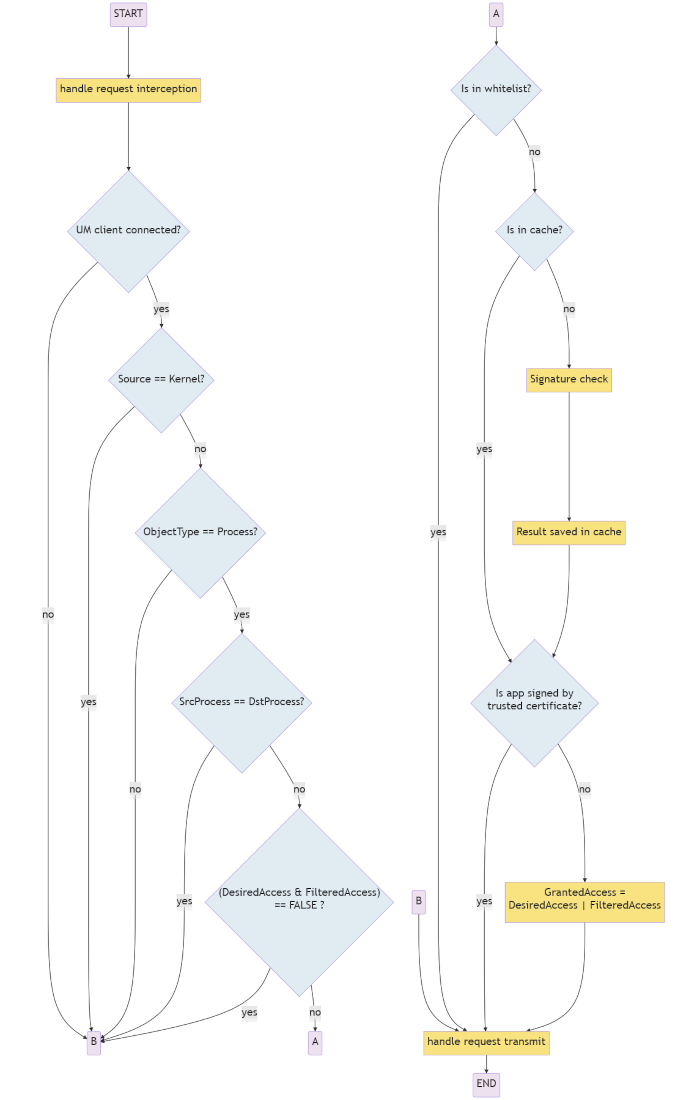
The technique used by PI-Defender is simply to remove forbidden access rights on handles associated with remote processes.
Driver Kernel
Handle Rights
| Requested | Granted |
|---|---|
| DELETE | |
| READ_CONTROL | |
| WRITE_DAC | |
| WRITE_OWNER | |
| SYNCHRONIZE | |
| PROCESS_TERMINATE | |
| PROCESS_CREATE_THREAD | |
| PROCESS_SET_SESSIONID | |
| PROCESS_VM_OPERATION | |
| PROCESS_VM_READ | |
| PROCESS_VM_WRITE | |
| PROCESS_DUP_HANDLE | |
| PROCESS_CREATE_PROCESS | |
| PROCESS_SET_QUOTA | |
| PROCESS_SET_INFORMATION | |
| PROCESS_QUERY_INFORMATION | |
| PROCESS_SUSPEND_RESUME | |
| PROCESS_QUERY_LIMITED_INFORMATION | |
| PROCESS_SET_LIMITED_INFORMATION |
For detailled information about Process Security and Access Rights, please visit https://docs.microsoft.com/en-us/windows/win32/procthread/process-security-and-access-rights.
Configuration
Whitelist
You can whitelist an entire folder or a simple executable if you don't want the driver to filter these files.
Modify the registry key HKLM\SYSTEM\CurrentControlSet\Services\PI-Defender\Parameters\Whitelist, then add folders and applications.
Cache
The cache holds by default 100 hashes corresponding to the last 100 applications that were analyzed.
It allows the driver to cache recurrent files and save computing time.
Modify the registry key HKLM\SYSTEM\CurrentControlSet\Services\PI-Defender\Parameters\CacheSize to increase or decrease the number of hashes hold by the cache.
Communication Port
The communication port is used by the driver and the user-mode service to communicate through a specified channel.
By default, the communication port is labelled \PIDefenderPort.
Modify the registry key HKLM\SYSTEM\CurrentControlSet\Services\PI-Defender\Parameters\CommunicationPort to modify the communication port.
Number of clients
By default, the number of clients is set to 1.
Modify the registry key HKLM\SYSTEM\CurrentControlSet\Services\PI-Defender\Parameters\MaxClients to increase this number.
Service User-Mode
Verify Signature
There are two kinds of signature in Windows:
- Embedded signature.
- Catalog signature.
Both are checked in PI-Defender in order to trust an application.
Configuration
Listener Thread
The listener thread purpose is to wait for data send by the driver. Once a data is received it create a work pool and send the data to the worker thread.
Modify the registry key HKLM\SYSTEM\CurrentControlSet\Services\PI-Defender_UM\Parameters\ListenerThreads to increase this number.
Workers Threads
Workers threads have multiple goals:
- Verify the signature of an executable.
- Send the response back to the driver.
- Push a new message in queue for the listener.
Modify the registry key HKLM\SYSTEM\CurrentControlSet\Services\PI-Defender_UM\Parameters\MaxWorkerThreads \ MinWorkerThreads to increase/decrease the number of workers threads.
Getting Started
These instructions will get you a copy of the project up and running on your local machine.
Tested on
- Windows 10 21H2 19044.1415
- Microsoft Visual Studio version 2019.
- Windows Driver Kit (WDK) 10.0.19041.685.
- Windows Software Development Kit (SDK) 10.0.19041.685.
Building
- Clone the project.
git clone https://github.com/PI-Defender/pi-defender.git
- Load PI-Defender.sln with Visual Studio.
- Make sure the configuration manager is set to x64 (Release).
- Build the solution (Crtl + Maj + B).
Installing
-
The driver uses test signing, so before using it Windows should be set to install and run test signed drivers. Enable test signed drivers can be done with the following steps:
- Reset this PC (search bar)
- Troubleshoot
- Advanced Options
- Startup repair
- Select the number 7 to disable the driver signature enforcement.
Windows will restart for changes to take effect.
-
Install the driver with the user-mode service.
PI-Defender_UM.exe install
To ensure a smooth installation, PI-Defender_UM.exe, PI-Defender.sys and PI-Defender_MsgFile.dll must be in the same folder before running the previous command. If everything went well, you should have a success message.
Usage
$ PI-Defender_UM.exe [install,start,query,stop,delete]

Protect your system from process injection.

Actions:
	install		Install the service User-Mode and the Driver kernel.
	start		Start the service User-Mode and the driver kernel.
	query		Query informations about the service and the driver.
	stop		Stop the service user-mode and the driver.
	delete		Delete the service user-mode and the driver.
Documentation
The offline documentation is available in the Doc/ directory.
The online documentation is available in the main website.
Maintainers / Authors
- Nicolas JALLET (@Nikj-Fr)
- Bérenger BRAULT (@CapitaineHadd0ck)
Credits
- Naval Group
- Baptiste David
Licence
This project is under LGPLv3 License.

