文章介绍如何使用Jamf Pro的Blueprints功能分发Apple beta测试令牌,使设备无需用户登录即可加入beta计划。通过创建Blueprint并配置软件更新设置组件,管理员可以管理beta程序 enrollment,并验证配置是否正确。 2026-1-7 16:3:31 Author: derflounder.wordpress.com(查看原文) 阅读量:16 收藏
As discussed in a previous post, Apple provides tokens which allow devices to be enrolled in Apple’s beta programs without the need for the user to sign in with an Apple Account on the device.
You can use Blueprints in Jamf Pro to distribute these tokens, using the Software Update Settings component in Blueprints. Let’s see how this works using the following software update configuration as an example:
- Macs are enrolled in the macOS Tahoe beta program.
- Macs cannot opt out of participating in the macOS Tahoe beta program.
For more details, please see below the jump.
Pre-requisites:
As of Jamf Pro 11.23.1, there is not a Blueprints template available for creating blueprints which manage software updates so the blueprint will need to be configured manually. To do this, use the following procedure:
1. Log into Jamf Pro.
2. Select Blueprints
3. Click the Create blueprint button.

4. You should see an unconfigured Blueprint. Click where it says Untitled blueprint and provide a name.

For this example, I’m using Apple Beta Tokens.

5. Scroll down in the list on the left-hand side of the browser window to locate the Software Update Settings component.

6. Click on the Software Update Settings component and drag the Software Update Settings component to the Declaration group section.

7. Once added to the Declaration group section, click anywhere on the Software Update Settings component to open it for editing.
8. At this point, you will see all available Software Update settings which are available for all Apple platforms. To apply the desired beta program settings, select the following option:
Beta Updates
Click the associated Configure button.
In the Program enrollment section, select the following:
- Check the checkbox for Program enrollment
- Select the Always option
Once the Always option is selected, two additional options should appear:
- Require program
- Offer programs
Select the Require program option.
Once the Require program option has been selected, a new set of entry blanks should appear:
- Apple Business Manager or Apple School Manager beta enrollment token
- Description
For the Apple Business Manager or Apple School Manager beta enrollment token entry, enter the token for the macOS Tahoe beta program.
For the Description entry, enter whatever you want in plain text. For this example, I’m entering the following text:
macOS Tahoe beta program
Once all choices have been made and verified, click the Update button.

9. Once all the settings choices have been made and verified, click the Save button.

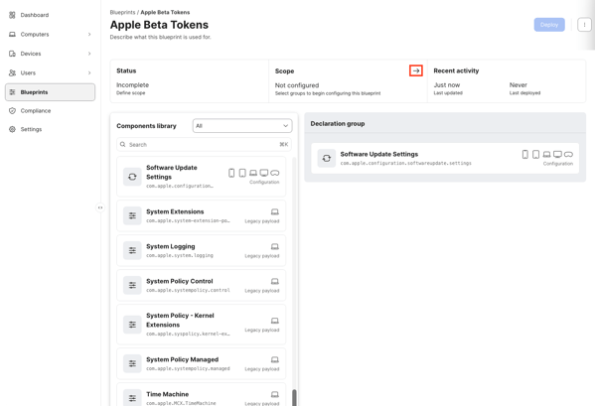
10. At this point, you should have a blueprint which has all settings configured but where no target scope has been set. To scope this blueprint, go to the Scope section and click the arrow button.

For this example, I’m selecting a static group named Beta Software Deployment Group. Once the desired smart and/or static groups have been set and verified for the scope, click the Save button.

11. Once everything has been configured, click the Deploy button to deploy the changes to the Macs you want to manage.

12. Once deployed, the Blueprints screen in Jamf Pro should show the newly-created Apple Beta Tokens Blueprint as being deployed.

You can also check on the managed device’s end by opening System Settings: General: Device Management, locating the MDM enrollment profile in the list of profiles and double-clicking on it. When you scroll to the bottom of the enrollment profile’s window, you should see a Device Declarations section.
If you’re deploying a software update settings configuration via Blueprints, you should see a Software Update Settings listing for Software Update in the Device Declarations section.

If you click on the Software Update Settings listing, it should report the following for the beta program settings:
- Beta program enrollment: AlwaysOn
- Require Specific Beta Program: macOS Tahoe beta program

You can also see the details of what’s configured in System Settings: General: Software Update. In this case, it’s showing the latest macOS Tahoe beta version available for installation.

You can also click on the ( i ) button next to the Beta Updates section and see the settings which have been applied, as well as a notification that the settings are managed.

如有侵权请联系:admin#unsafe.sh