Tim@PortalLab实验室介绍APISIX 是动态、实时、高性能的 API 网关。它提供丰富的流量管理功能,比如负载均衡、动态上游、金丝雀发布、熔断、认证、可观测性等。既可以使用 APISIX 2023-6-9 09:2:19 Author: 星阑实验室(查看原文) 阅读量:21 收藏
介绍
APISIX 是动态、实时、高性能的 API 网关。它提供丰富的流量管理功能,比如负载均衡、动态上游、金丝雀发布、熔断、认证、可观测性等。既可以使用 APISIX API 网关处理传统的南北向流量,也可以使用它处理服务间的东西向流量。同时,它也可被用作 Kubernetes Ingress 控制器。
APISIX Ingress 控制器提供 Helm 安装方式,但是使用原生 YAML 安装,更加有助于理解其原理。
在本教程中,我们将使用原生 YAML 在 Kubernetes 中安装 APISIX 和 APISIX Ingress 控制器。
先决条件
如果没有 Kubernetes 集群使用,建议使用 kind 创建本地 Kubernetes 集群。
kubectl create ns apisix在本教程中,我们的所有操作都将在命名空间 apisix 中执行。
ETCD 安装
在这里,我们将在 Kubernetes 集群内部部署不带认证的单节点 ETCD 集群。
在本例中,我们假设你拥有存储部署器。如果你正在使用 Kind,那么将自动创建本地路径部署器。如果没有存储部署器或不想使用持久化存储卷,那么可以使用 emptyDir 作为存储卷。
# etcd-headless.yamlapiVersion: v1kind: Servicemetadata:name: etcd-headlessnamespace: apisixlabels:app.kubernetes.io/name: etcdannotations:service.alpha.kubernetes.io/tolerate-unready-endpoints: "true"spec:type: ClusterIPclusterIP: Noneports:- name: "client"port: 2379targetPort: client- name: "peer"port: 2380targetPort: peerselector:app.kubernetes.io/name: etcd---# etcd.yamlapiVersion: apps/v1kind: StatefulSetmetadata:name: etcdnamespace: apisixlabels:app.kubernetes.io/name: etcdspec:selector:matchLabels:app.kubernetes.io/name: etcdserviceName: etcd-headlesspodManagementPolicy: Parallelreplicas: 1updateStrategy:type: RollingUpdatetemplate:metadata:labels:app.kubernetes.io/name: etcdspec:securityContext:fsGroup: 1001runAsUser: 1001containers:- name: etcdimage: docker.io/bitnami/etcd:3.4.14-debian-10-r0imagePullPolicy: "IfNotPresent"# command:# - /scripts/setup.shenv:- name: BITNAMI_DEBUGvalue: "false"- name: MY_POD_IPvalueFrom:fieldRef:fieldPath: status.podIP- name: MY_POD_NAMEvalueFrom:fieldRef:fieldPath: metadata.name- name: ETCDCTL_APIvalue: "3"- name: ETCD_NAMEvalue: "$(MY_POD_NAME)"- name: ETCD_DATA_DIRvalue: /etcd/data- name: ETCD_ADVERTISE_CLIENT_URLSvalue: "http://$(MY_POD_NAME).etcd-headless.apisix.svc.cluster.local:2379"- name: ETCD_LISTEN_CLIENT_URLSvalue: "http://0.0.0.0:2379"- name: ETCD_INITIAL_ADVERTISE_PEER_URLSvalue: "http://$(MY_POD_NAME).etcd-headless.apisix.svc.cluster.local:2380"- name: ETCD_LISTEN_PEER_URLSvalue: "http://0.0.0.0:2380"- name: ALLOW_NONE_AUTHENTICATIONvalue: "yes"ports:- name: clientcontainerPort: 2379- name: peercontainerPort: 2380volumeMounts:- name: datamountPath: /etcd# If you don't have a storage provisioner or don't want to use persistence volume, you could use an `emptyDir` as follow.# volumes:# - name: data# emptyDir: {}volumeClaimTemplates:- metadata:name: dataspec:accessModes:- "ReadWriteOnce"resources:requests:storage: "8Gi"
将这两个 YAML 文件应用到 Kubernetes,等待几秒,ETCD 安装就成功了。我们可以运行健康检查,进行确认:
$ kubectl -n apisix exec -it etcd-0 -- etcdctl endpoint health127.0.0.1:2379 is healthy: successfully committed proposal: took = 1.80916ms
请注意该 ETCD 安装非常简单,缺乏许多必要的生产特性,仅用于学习场景。如果想部署生产级 ETCD,请参阅 bitnami/etcd。
APISIX 安装
为我们的 APISIX 创建配置文件。我们将部署 2.5 版本的 APISIX。
注意 APISIX Ingress 控制器需要与 APISIX 管理 API 进行通信,因此为进行测试,我们将 apisix.allow_admin 设置为 0.0.0.0/0。
apiVersion: v1kind: ConfigMapmetadata:name: apisix-confnamespace: apisixdata:config.yaml: |-apisix:node_listen: 9080 # APISIX listening portenable_heartbeat: trueenable_admin: trueenable_admin_cors: trueenable_debug: falseenable_dev_mode: false # Sets nginx worker_processes to 1 if set to trueenable_reuseport: true # Enable nginx SO_REUSEPORT switch if set to true.enable_ipv6: trueconfig_center: etcd # etcd: use etcd to store the config valueallow_admin: # http://nginx.org/en/docs/http/ngx_http_access_module.html#allow- 0.0.0.0/0port_admin: 9180# Default token when use API to call for Admin API.# *NOTE*: Highly recommended to modify this value to protect APISIX's Admin API.# Disabling this configuration item means that the Admin API does not# require any authentication.admin_key:# admin: can everything for configuration data- name: "admin"key: edd1c9f034335f136f87ad84b625c8f1role: admin# viewer: only can view configuration data- name: "viewer"key: 4054f7cf07e344346cd3f287985e76a2role: viewer# dns_resolver:# - 127.0.0.1dns_resolver_valid: 30resolver_timeout: 5nginx_config: # config for render the template to generate nginx.conferror_log: "/dev/stderr"error_log_level: "warn" # warn,errorworker_rlimit_nofile: 20480 # the number of files a worker process can open, should be larger than worker_connectionsevent:worker_connections: 10620http:access_log: "/dev/stdout"keepalive_timeout: 60s # timeout during which a keep-alive client connection will stay open on the server side.client_header_timeout: 60s # timeout for reading client request header, then 408 (Request Time-out) error is returned to the clientclient_body_timeout: 60s # timeout for reading client request body, then 408 (Request Time-out) error is returned to the clientsend_timeout: 10s # timeout for transmitting a response to the client.then the connection is closedunderscores_in_headers: "on" # default enables the use of underscores in client request header fieldsreal_ip_header: "X-Real-IP" # http://nginx.org/en/docs/http/ngx_http_realip_module.html#real_ip_headerreal_ip_from: # http://nginx.org/en/docs/http/ngx_http_realip_module.html#set_real_ip_from- 127.0.0.1- 'unix:'etcd:host:- "http://etcd-headless.apisix.svc.cluster.local:2379"prefix: "/apisix" # apisix configurations prefixtimeout: 30 # secondsplugins: # plugin list- api-breaker- authz-keycloak- basic-auth- batch-requests- consumer-restriction- cors- echo- fault-injection- grpc-transcode- hmac-auth- http-logger- ip-restriction- jwt-auth- kafka-logger- key-auth- limit-conn- limit-count- limit-req- node-status- openid-connect- prometheus- proxy-cache- proxy-mirror- proxy-rewrite- redirect- referer-restriction- request-id- request-validation- response-rewrite- serverless-post-function- serverless-pre-function- sls-logger- syslog- tcp-logger- udp-logger- uri-blocker- wolf-rbac- zipkin- traffic-splitstream_plugins:- mqtt-proxy
请确保 etcd.host 与我们最初创建的无头服务匹配。在我们的例子中,它是 http://etcd-headless.apisix.svc.cluster.local:2379。
在该配置中,我们在 apisix.admin_key 部分的下方定义具有 admin 名称的访问密钥。该密钥是我们的 API 密钥,以后将用于控制 APISIX。该密钥是 APISIX 的默认密钥,在生产环境中,应该修改它。
将其保存为 config.yaml,然后运行 kubectl -n apisix create -f config.yaml,创建 ConfigMap。稍后,我们将该 ConfigMap 挂载到 APISIX Deployment 中。
apiVersion: apps/v1kind: Deploymentmetadata:name: apisixnamespace: apisixlabels:app.kubernetes.io/name: apisixspec:replicas: 1selector:matchLabels:app.kubernetes.io/name: apisixtemplate:metadata:labels:app.kubernetes.io/name: apisixspec:containers:- name: apisiximage: "apache/apisix:2.5-alpine"imagePullPolicy: IfNotPresentports:- name: httpcontainerPort: 9080protocol: TCP- name: tlscontainerPort: 9443protocol: TCP- name: admincontainerPort: 9180protocol: TCPreadinessProbe:failureThreshold: 6initialDelaySeconds: 10periodSeconds: 10successThreshold: 1tcpSocket:port: 9080timeoutSeconds: 1lifecycle:preStop:exec:command:- /bin/sh- -c- "sleep 30"volumeMounts:- mountPath: /usr/local/apisix/conf/config.yamlname: apisix-configsubPath: config.yamlresources: {}volumes:- configMap:name: apisix-confname: apisix-config
现在,应该可以使用 APISIX 了。使用 kubectl get pods -n apisix -l app.kubernetes.io/name=apisix -o name 来列举 APISIX Pod 名称。这里我们假设 Pod 名称是 apisix-7644966c4d-cl4k6。
我们检查一下:
kubectl -n apisix exec -it apisix-7644966c4d-cl4k6 -- curl http://127.0.0.1:9080如果你正在使用 Linux 或 macOS,那么在 Bash 中运行下面的命令:
kubectl -n apisix exec -it $(kubectl get pods -n apisix -l app.kubernetes.io/name=apisix -o name) -- curl http://127.0.0.1:9080如果 APISIX 正常工作,那么它应该输出:{"error_msg":"404 Route Not Found"}。因为我们尚未定义任何路由。
HTTPBIN 服务
在配置 APISIX 前,我们需要创建一个测试服务。在这里,我们使用 kennethreitz/httpbin。我们将该 httpbin 服务放在 demo 命名空间中。
kubectl create ns demokubectl label namespace demo apisix.ingress=watching # 给 demo 命名空间添加 apisix.ingress 标签kubectl -n demo run httpbin --image-pull-policy=IfNotPresent --image kennethreitz/httpbin --port 80kubectl -n demo expose pod httpbin --port 80
在 httpbin 服务启动后,我们应该可以在 APISIX Pod 中通过服务访问它。
kubectl -n apisix exec -it $(kubectl get pods -n apisix -l app.kubernetes.io/name=apisix -o name) -- curl http://httpbin.demo/get该命令输出请求的查询参数,比如:
{"args": {},"headers": {"Accept": "*/*","Host": "httpbin.demo","User-Agent": "curl/7.67.0"},"origin": "172.17.0.1","url": "http://httpbin.demo/get"}
定义路由
现在,我们可以定义通过 APISIX 代理 HTTPBIN 服务流量的路由。
假设我们想路由 URI 拥有 /httpbin 前缀,并且请求包含 Host: httpbin.org 头的所有流量。
请注意管理端口是 9180。
kubectl -n apisix exec -it $(kubectl get pods -n apisix -l app.kubernetes.io/name=apisix -o name) -- curl "http://127.0.0.1:9180/apisix/admin/routes/1" -H "X-API-KEY: edd1c9f034335f136f87ad84b625c8f1" -X PUT -d '{"uri": "/*","host": "httpbin.org","upstream": {"type": "roundrobin","nodes": {"httpbin.demo:80": 1}}}'
输出如下所示:
{"action":"set","node":{"key":"\/apisix\/routes\/1","value":{"status":1,"create_time":1621408897,"upstream":{"pass_host":"pass","type":"roundrobin","hash_on":"vars","nodes":{"httpbin.demo:80":1},"scheme":"http"},"update_time":1621408897,"priority":0,"host":"httpbin.org","id":"1","uri":"\/*"}}}我们可以通过 GET /apisix/admin/routes 检查路由规则:kubectl -n apisix exec -it $(kubectl get pods -n apisix -l app.kubernetes.io/name=apisix -o name) -- curl "http://127.0.0.1:9180/apisix/admin/routes/1" -H "X-API-KEY: edd1c9f034335f136f87ad84b625c8f1"输出如下所示:
{"action":"get","node":{"key":"\/apisix\/routes\/1","value":{"upstream":{"pass_host":"pass","type":"roundrobin","scheme":"http","hash_on":"vars","nodes":{"httpbin.demo:80":1}},"id":"1","create_time":1621408897,"update_time":1621408897,"host":"httpbin.org","priority":0,"status":1,"uri":"\/*"}},"count":"1"}现在,我们测试路由规则:
kubectl -n apisix exec -it $(kubectl get pods -n apisix -l app.kubernetes.io/name=apisix -o name) -- curl "http://127.0.0.1:9080/get" -H 'Host: httpbin.org'输出如下所示:
{"args": {},"headers": {"Accept": "*/*","Host": "httpbin.org","User-Agent": "curl/7.67.0","X-Forwarded-Host": "httpbin.org"},"origin": "127.0.0.1","url": "http://httpbin.org/get"}
安装 APISIX Ingress 控制器
APISIX Ingress 控制器可以帮助你通过使用 Kubernetes 资源的方式,声明式地管理配置。这里我们将安装 1.6.0 版本。
当前,APISIX Ingress 控制器同时支持官方的 Ingress 资源和 APISIX 的自定义资源定义,包括 ApisixRoute 和 ApisixUpstream。
在安装 APISIX Ingress 控制器前,我们需要创建服务账号和相应的集群角色,以确保 APISIX Ingress 控制器有足够的权限访问所需的资源。
下面是来自 apisix-helm-chart 的示例配置:
apiVersion: v1kind: ServiceAccountmetadata:name: apisix-ingress-controllernamespace: apisix---apiVersion: rbac.authorization.k8s.io/v1kind: ClusterRolemetadata:name: apisix-clusterrolenamespace: apisixrules:- apiGroups:- ""resources:- configmaps- endpoints- persistentvolumeclaims- pods- replicationcontrollers- replicationcontrollers/scale- serviceaccounts- services- secretsverbs:- get- list- watch- apiGroups:- ""resources:- bindings- events- limitranges- namespaces/status- pods/log- pods/status- replicationcontrollers/status- resourcequotas- resourcequotas/statusverbs:- get- list- watch- apiGroups:- ""resources:- namespacesverbs:- get- list- watch- apiGroups:- appsresources:- controllerrevisions- daemonsets- deployments- deployments/scale- replicasets- replicasets/scale- statefulsets- statefulsets/scaleverbs:- get- list- watch- apiGroups:- autoscalingresources:- horizontalpodautoscalersverbs:- get- list- watch- apiGroups:- batchresources:- cronjobs- jobsverbs:- get- list- watch- apiGroups:- extensionsresources:- daemonsets- deployments- deployments/scale- ingresses- networkpolicies- replicasets- replicasets/scale- replicationcontrollers/scaleverbs:- get- list- watch- apiGroups:- policyresources:- poddisruptionbudgetsverbs:- get- list- watch- apiGroups:- networking.k8s.ioresources:- ingresses- networkpoliciesverbs:- get- list- watch- apiGroups:- metrics.k8s.ioresources:- podsverbs:- get- list- watch- apiGroups:- apisix.apache.orgresources:- apisixroutes- apisixroutes/status- apisixupstreams- apisixupstreams/status- apisixtlses- apisixtlses/status- apisixclusterconfigs- apisixclusterconfigs/status- apisixconsumers- apisixconsumers/status- apisixpluginconfigsverbs:- get- list- watch- apiGroups:- coordination.k8s.ioresources:- leasesverbs:- '*'---apiVersion: rbac.authorization.k8s.io/v1kind: ClusterRoleBindingmetadata:name: apisix-clusterrolebindingnamespace: apisixroleRef:apiGroup: rbac.authorization.k8s.iokind: ClusterRolename: apisix-clusterrolesubjects:- kind: ServiceAccountname: apisix-ingress-controllernamespace: apisix
然后,我们需要创建 ApisixRoute CRD:
git clone https://github.com/apache/apisix-ingress-controller.git --depth 1cd apisix-ingress-controller/kubectl apply -k samples/deploy/crd
请参阅 samples 获取细节。
为使 Ingress 控制器与 APISIX 一起正常工作,我们需要创建一个配置文件,其中包含 APISIX 管理 API URL 和 API 密钥,如下所示:
apiVersion: v1data:config.yaml: |# log optionslog_level: "debug"log_output: "stderr"http_listen: ":8080"enable_profiling: truekubernetes:kubeconfig: ""resync_interval: "30s"namespace_selector:- "apisix.ingress=watching"ingress_class: "apisix"ingress_version: "networking/v1"apisix_route_version: "apisix.apache.org/v2"apisix:default_cluster_base_url: "http://apisix-admin.apisix:9180/apisix/admin"default_cluster_admin_key: "edd1c9f034335f136f87ad84b625c8f1"kind: ConfigMapmetadata:name: apisix-configmapnamespace: apisixlabels:app.kubernetes.io/name: ingress-controller
如果想学习所有配置项,查看 conf/config-default.yaml 获取细节。
因为 Ingress 控制器需要访问 APISIX 管理 API,所以我们需要为 APISIX 创建一个服务。
apiVersion: v1kind: Servicemetadata:name: apisix-adminnamespace: apisixlabels:app.kubernetes.io/name: apisixspec:type: ClusterIPports:- name: apisix-adminport: 9180targetPort: 9180protocol: TCPselector:app.kubernetes.io/name: apisix
因为当前 APISIX Ingress 控制器不 100% 兼容 APISIX,所以我们需要删除之前创建的路由,以防某些数据结构不匹配。
kubectl -n apisix exec -it $(kubectl get pods -n apisix -l app.kubernetes.io/name=apisix -o name) -- curl "http://127.0.0.1:9180/apisix/admin/routes/1" -X DELETE -H "X-API-KEY: edd1c9f034335f136f87ad84b625c8f1"完成这些配置后,我们现在部署 Ingress 控制器。
apiVersion: apps/v1kind: Deploymentmetadata:name: apisix-ingress-controllernamespace: apisixlabels:app.kubernetes.io/name: ingress-controllerspec:replicas: 1selector:matchLabels:app.kubernetes.io/name: ingress-controllertemplate:metadata:labels:app.kubernetes.io/name: ingress-controllerspec:serviceAccountName: apisix-ingress-controllervolumes:- name: configurationconfigMap:name: apisix-configmapitems:- key: config.yamlpath: config.yamlinitContainers:- name: wait-apisix-adminimage: busybox:1.28command: ['sh', '-c', "until nc -z apisix-admin.apisix.svc.cluster.local 9180 ; do echo waiting for apisix-admin; sleep 2; done;"]containers:- name: ingress-controllercommand:- /ingress-apisix/apisix-ingress-controller- ingress- --config-path- /ingress-apisix/conf/config.yamlimage: "apache/apisix-ingress-controller:1.6.0"imagePullPolicy: IfNotPresentports:- name: httpcontainerPort: 8080protocol: TCPlivenessProbe:httpGet:path: /healthzport: 8080readinessProbe:httpGet:path: /healthzport: 8080resources:{}volumeMounts:- mountPath: /ingress-apisix/confname: configuration
在该 Deployment 中,我们将上面创建的 ConfigMap 挂载为配置文件,并且告诉 Kubernetes 使用服务账号 apisix-ingress-controller。
在 Ingress 控制器的状态转换为 Running 后,我们创建 APISIXRoute 资源,观察它的行为。
下面是 APISIXRoute 示例:
apiVersion: apisix.apache.org/v2kind: ApisixRoutemetadata:name: httpserver-routenamespace: demospec:http:- name: httpbinmatch:hosts:- local.httpbin.orgpaths:- /*backends:- serviceName: httpbinservicePort: 80
注意 apiVersion 字段应该匹配上面的 ConfigMap。serviceName 应该匹配暴露的服务名称,这里是 httpbin。
在创建它前,我们确认带头 Host: local.http.demo 的请求返回 404:
kubectl -n apisix exec -it $(kubectl get pods -n apisix -l app.kubernetes.io/name=apisix -o name) -- curl "http://127.0.0.1:9080/get" -H 'Host: local.httpbin.org'将返回:
{"error_msg":"404 Route Not Found"}在与目标服务相同的命名空间中应用 APISIXRoute,本例是 demo。在应用它后,我们检查它是否生效:
kubectl -n apisix exec -it $(kubectl get pods -n apisix -l app.kubernetes.io/name=apisix -o name) -- curl "http://127.0.0.1:9080/get" -H "Host: local.httpbin.org"应该返回:
{"args": {},"headers": {"Accept": "*/*","Host": "local.httpbin.org","User-Agent": "curl/7.67.0","X-Forwarded-Host": "local.httpbin.org"},"origin": "127.0.0.1","url": "http://local2.httpbin.org/get"}
这就是所有!享受你的 APISIX 和 APISIX Ingress 控制器之旅。
Ingress 控制器
用于 Kubernetes 的 Apache APISIX Ingress 控制器。
模块
Ingress-types
定义 Apache APISIX 所需的 CRD(CustomResourceDefinition)
当前支持 ApisixRoute/ApisixUpstream,以及其它服务和路由级插件
可打包为独立的二进制文件,与 Ingress 定义保持同步
CRD 设计
Types
定义接口对象,以匹配 Apache APISIX 中的概念,比如路由、服务、上游和插件
可打包为独立的二进制文件,需要匹配兼容的 Apache APISIX 版本
向该模块添加新类型,以支持新特性
Seven
包含主应用程序逻辑
基于 Apisix-types 对象,将 Kubernetes 集群状态同步到 Apache APISIX
Ingress-controller
Ingress 控制器的驱动进程;监听 Kubernetes API Server
在将控制移交给上面的模块 Seven 前,匹配并将 Apisix-ingress-types 转换为 Apisix-types
CRD 设计
当前 apisix-ingress-controller CRD 包括 6 部分:ApisixRoute/ApisixUpstream/ApisixConsumer/ApisixTls/ApisixClusterConfig/ApisixPluginConfig。其设计遵循如下思想。
网关最重要的部分是路由部分,它用于定义网关流量的分发规则
为便于理解和配置,ApisixRoute 的设计结构与 Kubernetes Ingress 基本相似
在注解的设计中,以 Kubernetes Ingress 的结构为参考,但内部实现基于 Apache APISIX 的插件
在最简单的情况下,只需定义 ApisixRoute,Ingress 控制器将自动添加 ApisixUpstream
ApisixUpstream 可以定义 Apache APISIX 上游上的一些细节,比如负载均衡/健康检查等
监视 CRD
apisix-ingress-controller 负责与 Kubernetes API Server 进行交互,申请可访问资源权限(RBAC),监视变更,在 Ingress 控制器中实现对象转换,比较变更,然后同步到 Apache APISIX。
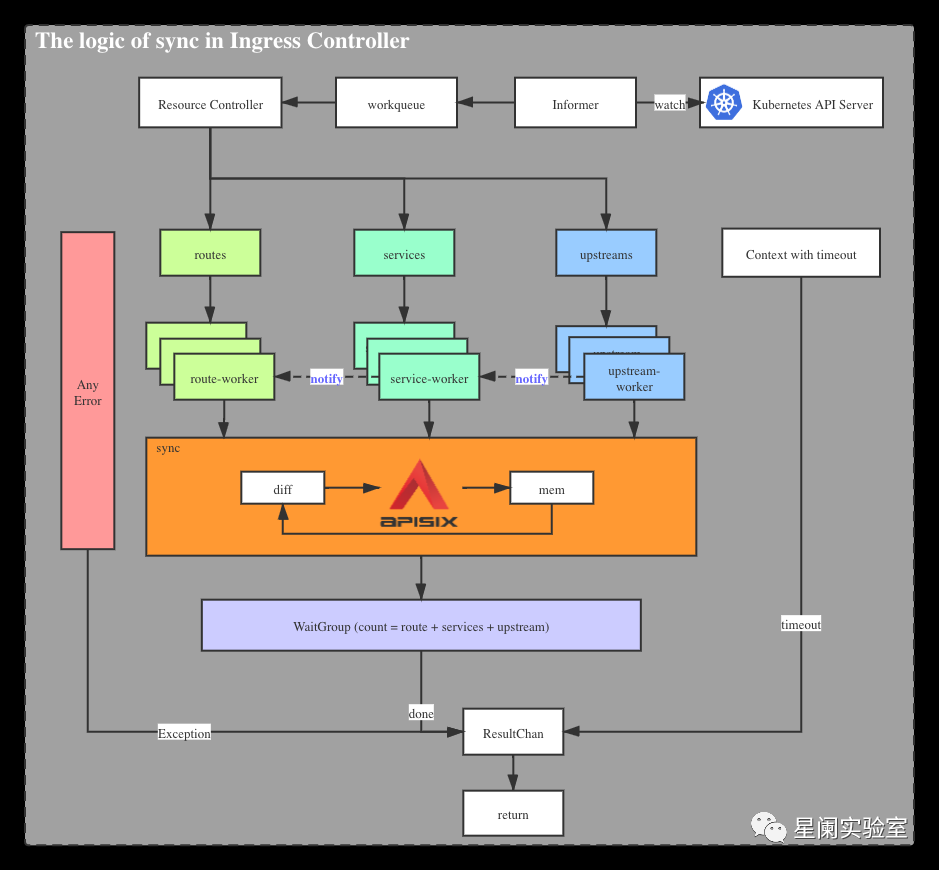
时序图
下面是介绍 ApisixRoute 和其它 CRD 在同步过程中的主要逻辑的流程图。
转换结构
apisix-ingress-controller 为 CRD 提供外部配置方法。它针对的是日常运维等操作人员,他们经常需要批量地处理大量路由,希望在同一配置文件中处理所有相关服务,同时具有方便易懂的管理能力。而 Apache APISIX 从网关的角度进行设计,所有路由相互独立。这导致两者在数据结构上有明显的差异。一个侧重于批量定义,而另一个是离散实现。
考虑到不同人群的使用习惯,CRD 的数据结构借鉴 Kubernetes Ingress 的数据结构,在形态上基本相同。
简单的对比如下,它们有不同的定义:
他们是多对多的关系。因此,apisix-ingress-controller 必须对 CRD 执行一些转换,以适配不同网关。
级联更新
目前,我们定义多个 CRD,这些 CRD 负责它们各自的字段定义。ApisixRoute/ ApisixUpstream 对应 Apache APISIX 中的 route/ service/upstream 等对象。由于 APISIX 对象之间的强绑定关系,在批量修改和删除 CRD 等数据结构时,必须考虑对象之间的级联影响。
因此,在 apisix-ingress-controller 中,通过 channel 实现广播通知机制,即任何对象的定义必须被通知给与其相关的其它对象,并且触发相应的行为。
差分规则
seven 模块在内部保存内存数据结构,目前它与 Apache APISIX 资源对象非常相似。当 Kubernetes 资源对象发生新变更时,seven 将比较内存对象,然后根据比较结果,进行增量更新。
当前的比较规则基于 route / service / upstream 资源对象的分组,分别进行比较,发现差异后,进行相应的广播通知。
服务发现
apisix-ingress-controller 根据 ApisixUpstream 资源对象中定义的 namespace、name、port,将处于 running 状态的 endpoints 节点信息注册到 Apache APISIX Upstream 中的节点。并且根据 Kubernetes,实时同步 Endpoint 状态。
基于服务发现,Apache APISIX Ingress 可以直接访问后端 Pod 节点。绕过 Kubernetes 服务,可实现定制化的负载均衡策略。
注解实现
与 Kubernetes Nginx Ingress 的实现不同,apisix-ingress-controller 基于 Apache APISIX 的插件机制实现注解。
比如,通过 ApisixRoute 资源对象中的 k8s.apisix.apache.org/whitelist-source-range 注解配置黑/白名单设置。
apiVersion: apisix.apache.org/v2kind: ApisixRoutemetadata:annotations:k8s.apisix.apache.org/whitelist-source-range: 1.2.3.4,2.2.0.0/16name: httpserver-routespec:...
这里的黑/白名单由 ip-restriction 插件实现。
未来将有更多注释实现,以方便定义一些常见配置,比如 CORS。
如果你有注解需求,欢迎到 issue 讨论,我们讨论如何进行实现。
参考文档
https://apisix.apache.org/zh/docs/ingress-controller/tutorials/the-hard-way/
https://apisix.apache.org/zh/docs/ingress-controller/design/
关于Portal Lab
星阑科技 Portal Lab 致力于前沿安全技术研究及能力工具化。主要研究方向为API 安全、应用安全、攻防对抗等领域。实验室成员研究成果曾发表于BlackHat、HITB、BlueHat、KCon、XCon等国内外知名安全会议,并多次发布开源安全工具。未来,Portal Lab将继续以开放创新的态度积极投入各类安全技术研究,持续为安全社区及企业级客户提供高质量技术输出。
如有侵权请联系:admin#unsafe.sh